Dreamy Room Level 225 Walkthrough
Welcome to the walkthrough for Dreamy Room Level 225! This guide will help you navigate through the steps to create a whimsical and charming space by arranging items in their appropriate locations.
Step-by-Step Guide
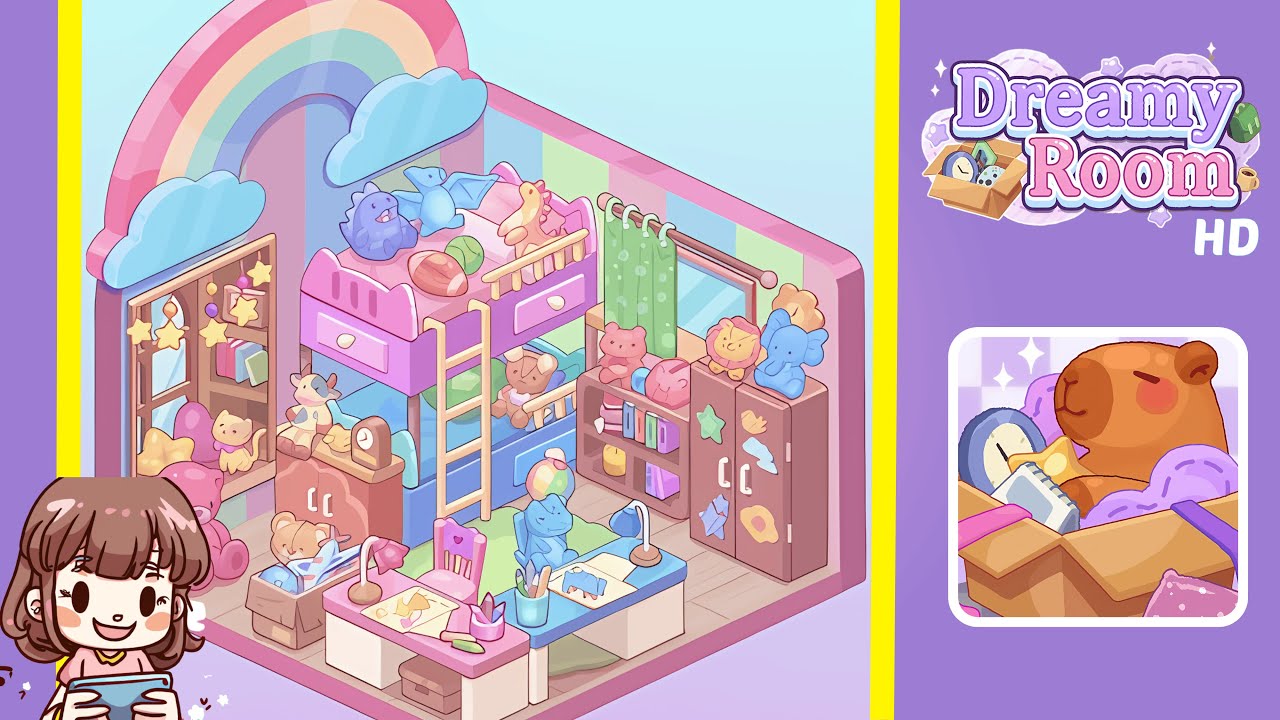
- Place the rainbow arch and clouds on the left wall. Position the rainbow arch against the left interior wall, ensuring alignment with the floor. Enhance with cloud cushions on each end for a seamless backdrop.
- Hang the star mobile above the window. Center the star mobile over the left window, adjusting strings so stars hover six inches below the curtain rod.
- Install the green polka-dot curtains on the window. Secure the curtain rod and hang green polka-dot curtains, ensuring they graze the floor and tie back to allow light in.
- Position the pink and blue bunk bed. Slide the bunk bed into the center of the back wall, aligning with the rainbow arch corner and ensuring the bed trim is flush against the stripes.
- Make the top bunk bedding. Dress the top bunk with a pastel pink mattress cover, lavender and pink pillows, and a light pink blanket.
- Arrange the top bunk plush toys and items. Position dinosaur plush toys and fruit cushions on the top bunk, creating a balanced vignette.
- Attach the ladder to the bunk bed. Secure the yellow ladder to the bunk bed's side rail, ensuring stability without wobbling.
- Make the bottom bunk bedding. Lay a soft green blanket and place a teddy bear at the head, ensuring neatness and alignment with the top bunk.
- Place plush toys and ball under the bottom bunk. Add a blue dinosaur plush and beach ball under the bed, ensuring clearance for the ladder.
- Place the large pink teddy bear on the floor. Position the oversized teddy bear near the left wall by the window, adjusting its posture and scarf to complement the room's palette.
- Place the storage box with airplane toy. Slide a storage box with a toy plane and teddy cub next to the teddy bear, aligning with the floor seams.
- Assemble the pink desk. Snap the pink desk together and position it against the front wall, allowing movement behind chairs.
- Decorate the pink desk with lamp and art supplies. Add a pink desk lamp, open sketchpad, crayons, markers, and a pencil holder to the desk.
- Place the pink heart chair at the desk. Position the chair with a heart cutout at the desk, aligning just beneath the tabletop overhang.
- Assemble the blue desk. Align and secure the blue desk's components, positioning it parallel to the pink desk for symmetry.
- Decorate the blue desk with lamp and drawing materials. Add a blue lamp, dinosaur sketchbook, colored pencils, and a dinosaur plush to the desk.
- Place the blue dinosaur chair at the desk. Position the chair with the dinosaur cutout at the desk, ensuring proper alignment and legroom.
- Position the wardrobe on the right wall. Slide the wardrobe into place, aligning with the floor and ensuring doors can open fully.
- Decorate the wardrobe with stickers and top plushes. Adorn with vinyl stickers and place plush animals on top for a decorative touch.
- Add the bookshelves and fill with books and small decor. Position bookshelves, fill with books, a piggy bank, a bear figurine, and a pink pig plush.
Notes & Precautions
- Refer to in-game guidelines to avoid misplacing essential anchor points.
- Align the game cursor carefully when handling delicate objects to prevent rotation.
- Reposition furniture if you encounter clipping issues with the ladder or bunk bed.
- Avoid overlapping wardrobe and bookshelf pieces to prevent visual glitches.
- Ensure proper furniture alignment for a cohesive aesthetic.
Tips & Tricks
- Enable grid snapping for precise object placement.
- Rotate items in increments of 5 degrees for ideal angles.
- Duplicate and mirror decorative elements for quick symmetrical layouts.
- Save your progress frequently to avoid data loss.
- Position smaller accessories first, then add larger furniture to fill gaps.
- Experiment with background color toggles to understand lighting effects.