Dreamy Room Level 212 Walkthrough & Guide
Welcome to the walkthrough for Dreamy Room Level 212. This guide provides detailed instructions to complete each step with precision, ensuring your room is beautifully decorated and perfectly aligned.
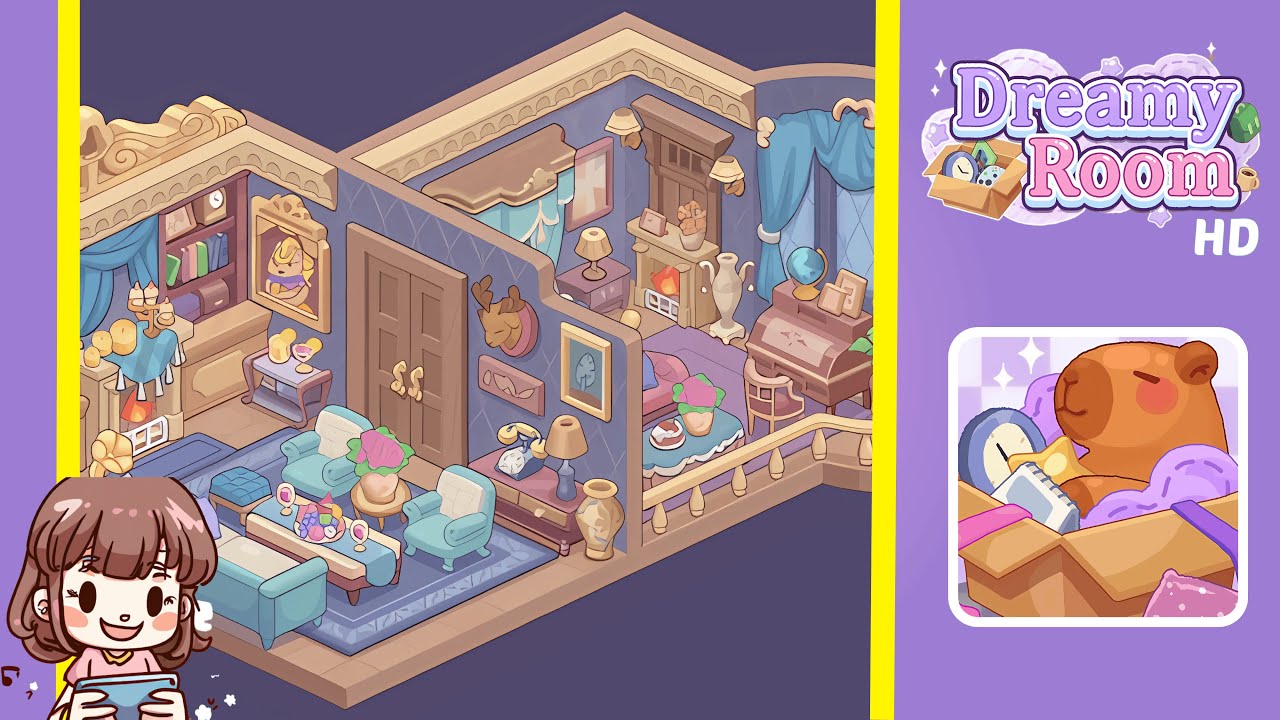
Step-by-Step Guide
- Place the ornate golden cornice and carved pediment. Begin by selecting the ornate golden cornice from your décor palette. Align each segment carefully with the peach-toned border and rotate until it clicks perfectly into place without shifting the wallpaper pattern.
- Lay down the rug, sofa, coffee table, and chairs. Center the large blue patterned rug on the left wing of the floor, ensuring it sits flush against the bottom left wall. Place the three-seat teal sofa on the rug’s front edge, and position a pair of teal armchairs to either side of where the coffee table will be placed. Finish by adding the long wooden coffee table at the rug's midpoint.
- Add living-room accessories: pouf, gramophone, candles, and tabletop treats. Place the teal tufted pouf between the sofa and left armchair, followed by the side table with a vintage gold gramophone inside the left alcove. Drape the blue mantle cloth over the fireplace shelf and arrange the brass candelabra and pillar candles atop it. Finally, add a fruit bowl and two wine glasses to the coffee table.
- Furnish the left wall: bookshelf, portrait, bench, and console. Position the built-in bookshelf right of the fireplace alcove. Hang the ornate gold frame portrait to the right, ensuring it's centered vertically and place the wooden bench below it. Next, align the console table with a pitcher and dessert glass to the right of the bench.
- Style the partition wall and hallway table. Hang the deer head trophy slightly left of the center partition, with a carved wooden plaque beneath it. Mount the framed leaf sketch to the right, leaving a gap. Place the console table flush against the partition's base and organize the rotary phone and ceramic table lamp on top, with a tall patterned vase on the floor.
- Complete the master bedroom decor. Install the blue canopy frame above the bed area and hang teal curtains over the window. Position the roll-top desk on the right side with a globe and framed photos on top. Beside the desk, stand a tall white urn and place the yellow-stone fireplace mantel on the rear wall next to the door. Finish the scene with a purple nightstand and a scalloped-edge round table with cake and blooms at the bed's foot.
Notes & Precautions
- Alignment is everything: Any misplacement can disrupt sightlines, especially the cornice and rug.
- Wall-mount spacing: Use snap guides for equal distances when hanging items.
- Inventory limits: Avoid dragging items before ensuring enough room in the toolbox.
- Symmetry vs. asymmetry: Determine which elements need symmetry and which allow offsets.
Tips & Tricks
- Use the rotate-lock feature to prevent accidental rotation of tall items.
- Work from back to front; complete wall units first, then move to rugs and sofas.
- Zoom in for precision when aligning décor pieces for the best overhead view.