Dreamy Room Level 220 Walkthrough
Welcome to the Dreamy Room Level 220 walkthrough. This guide will assist you in perfectly arranging every element to convert a static room into a lively, interactive scene.
Step-by-Step Guide
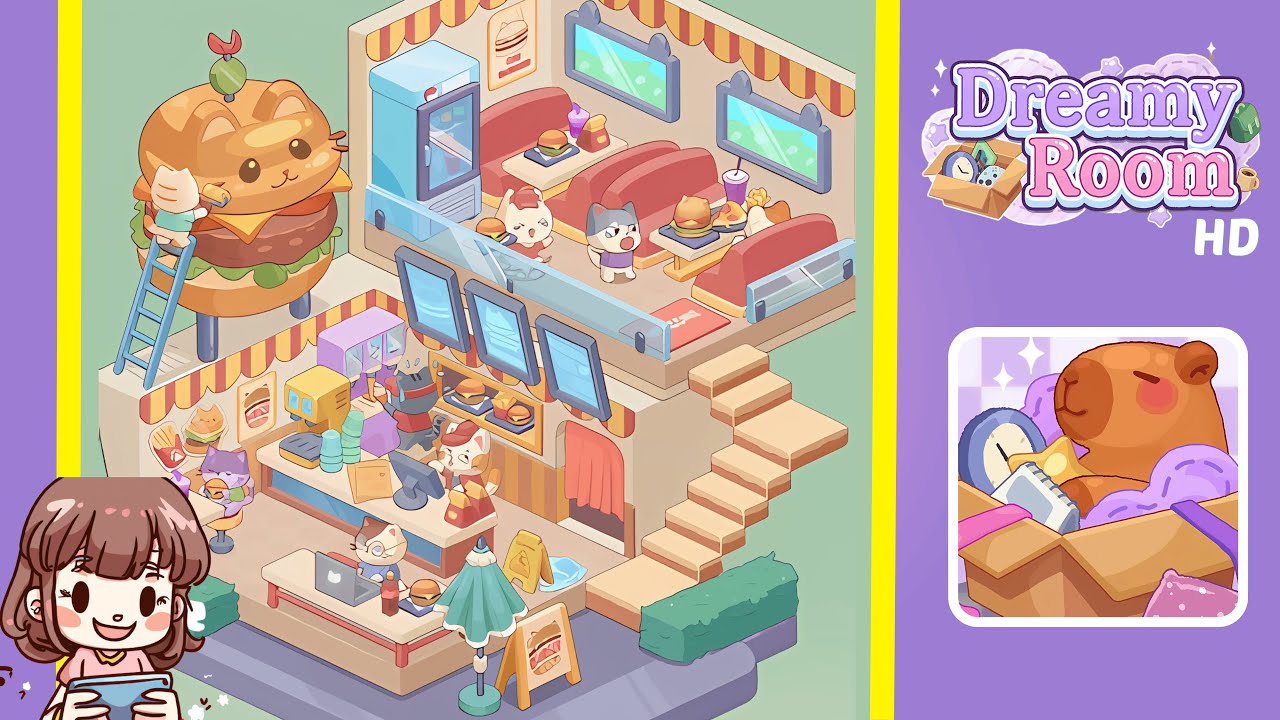
- Place the Giant Cat Burger Statue on the Exterior Platform. Select it from the outdoor décor menu and align it with the front edge of the purple foundation platform. Ensure it is centered horizontally and slightly back from the walls.
- Place the Ladder against the Left Side of the Giant Cat Burger Statue. Position the light blue Ladder at a slight angle of approximately 60 degrees, with its base touching the purple foundation.
- Position the Painter Cat at Mid-Rung on the Ladder. Align the Painter Cat’s feet with the second rung of the Ladder, ensuring the roller brush touches the statue’s bun surface.
- Attach the Red and Yellow Striped Awning Under the Upper Ceiling Edge. Drag the scalloped awning piece to fit below the ceiling plane, ensuring perfect alignment.
- Install the Three Cat-Head Windows on the Right Wall. Place a cat-head silhouette window on the right wall, use the duplicate function to add two more, and space them evenly.
- Place the Blue Vending Fridge on the Left Side of the Upper Floor. Position the fridge beneath the awning’s overhang, ensuring proper alignment.
- Arrange the Red Booths and Their Tables in the Right-Side Upper Floor. Place the booths and tables evenly beneath the windows for a balanced café layout.
- Mount the Menu Boards and Install the Drink Station at the Counter Wall. Align the digital Menu Boards evenly and position the Drink Station directly beneath them.
- Set Up the Service Counter, POS Terminal, and Staff in the Lower Floor. Place the Counter Unit and POS Terminal for a complete service area setup.
- Populate the Ground Floor with Additional Tables, Hedges, and Entryway Details. Add dining tables, detailed props, and organize the environment to finalize the scene.
Notes & Precautions
- Verify alignment using the grid overlay to prevent misplacement of objects.
- Be careful with angled items; even minor rotation can cause issues.
- Watch for overlapping collision boxes to maintain visual coherence.
- Align characters properly to prevent animation issues.
- Ensure precise vertical alignment of objects like the Blue Vending Fridge.
- Frequently save progress as the game doesn’t autosave during editing.
- Toggle the alignment grid if you encounter snapping issues.
- Monitor in-game memory usage to prevent slow performance.
Tips & Tricks
- Begin with large anchor pieces to set scale and orientation.
- Use copy-and-paste for multiple identical items to save time.
- View from an isometric angle to better align angled objects.
- Hold the shift key to fine-tune positions beyond grid snapping.
- Utilize the developer grid overlay for precise adjustments.
- Memorize item coordinates for consistency in placement.
- Use the undo button to correct misplaced objects immediately.