Dreamy Room Level 217 Walkthrough
Welcome to the Dreamy Room Level 217 Walkthrough. This guide will provide detailed steps to transform your blank central grass platform into a beautifully decorated masterpiece.
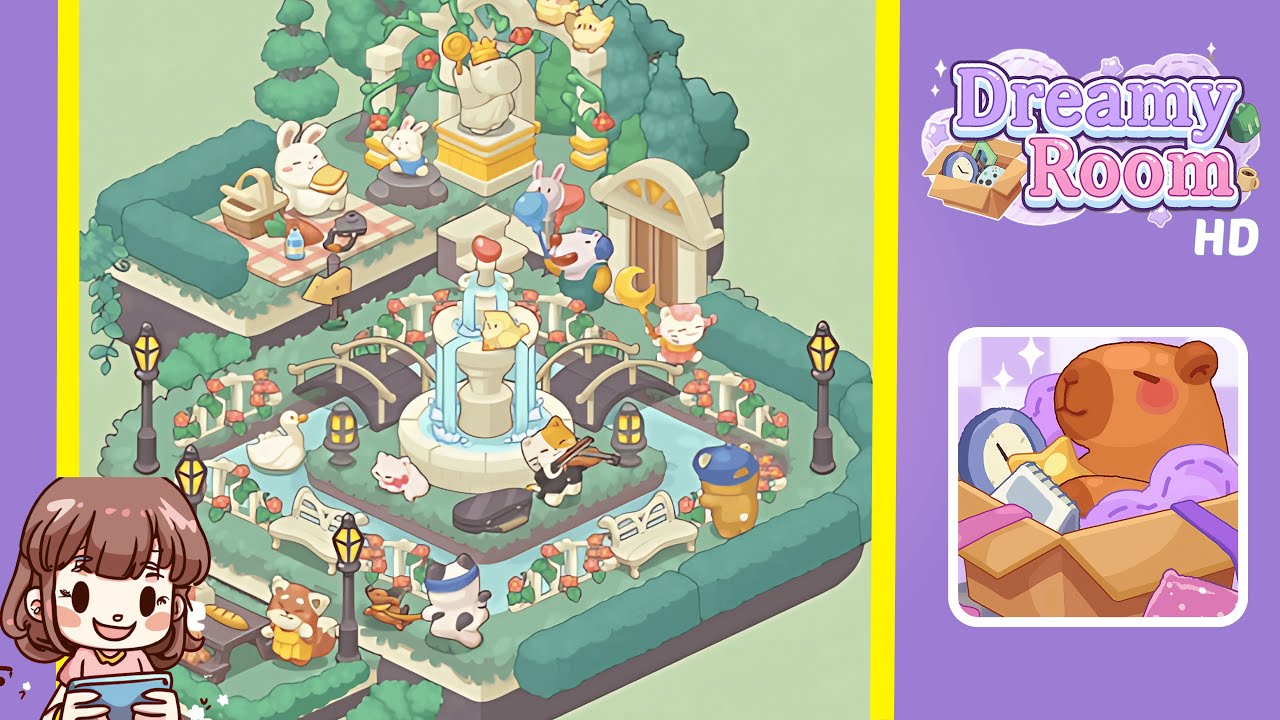
Step-by-Step Guide
- Outline the main platform with decorative fences, bridges, lanterns, and lampposts. Use ornate white fence pieces, wooden garden bridges, golden lantern posts, and black-and-gold lampposts to frame the area beautifully.
- Place the central fountain precisely in the water moat, ensuring the water cascades align with the platform’s drawn streams for a perfect centerpiece.
- Organize the surrounding green space by adding benches and the rocking horse toddler figurine to make the environment lively and balanced.
- Add life to the scene with a white goose and a pink bunny near the fountain, carefully aligning them with the fence and moat.
- Enhance the ambiance by placing the cat musician with its violin, creating a captivating music feature on the platform.
- Create a quaint picnic scene on the upper-left platform with a picnic blanket, basket, food items, and bunnies, ensuring everything is neatly aligned with the hedges.
- Guide visitors with a wooden signpost near the picnic area, positioned to point directly at the picnic setup.
- Design a regal garden centerpiece on the top-center platform using a stone arch, vines, a snail statue, and yellow chicks, ensuring all elements align perfectly.
- Bring the upper-right region to life with a doorway, balloon vendor, pink cat, and blue bear, each perfectly positioned to add character to the scene.
- Set up a cozy nook on the bottom-left mini platform with a picnic table, bread, teddy bear toy, brown bunny, and red panda, all aligned against the platform edge.
- Fill any remaining border gaps with decorative vines and shrubs, adjusting placements to ensure a lush and seamless garden experience.
Notes & Precautions
- Grid Alignment Matters: Ensure all objects snap to the grid to avoid misalignment.
- Overlap Warnings: Be mindful of potential overlaps with hedges, especially for larger objects.
- Rotations: Some items have a single correct orientation. Rotate until you hear the alignment click.
- Undo Function: Use the undo button if a piece doesn't snap correctly; retrial often solves the issue.
- No Time Pressure: The level is untimed, so take breaks if needed.
- Visual Cues: Pay attention to subtle visual hints for object placement.
Tips & Tricks
- Snap Guides: Enable “snap preview” in settings for ghost outlines before placement.
- Layer Order: Use the layer cycle feature to navigate hidden items in crowded areas.
- Group Placement: Utilize multi-select for similar items, ensuring alignment afterward.
- Zoom & Pan: For precise placements, zoom in on smaller details.
- Save Presets: Record tricky rotation angles for future use.
- Color Contrast: Adjust brightness to better see placement guides against different backgrounds.
- Community Layouts: Check forums for user-shared positions and layout tips.