Dreamy Room Level 223 Walkthrough & Guide
Welcome to the detailed walkthrough for Dreamy Room Level 223. This guide will help you master all placements in the level, ensuring your treehouse looks perfect with all elements aligned correctly.
Step-by-Step Guide
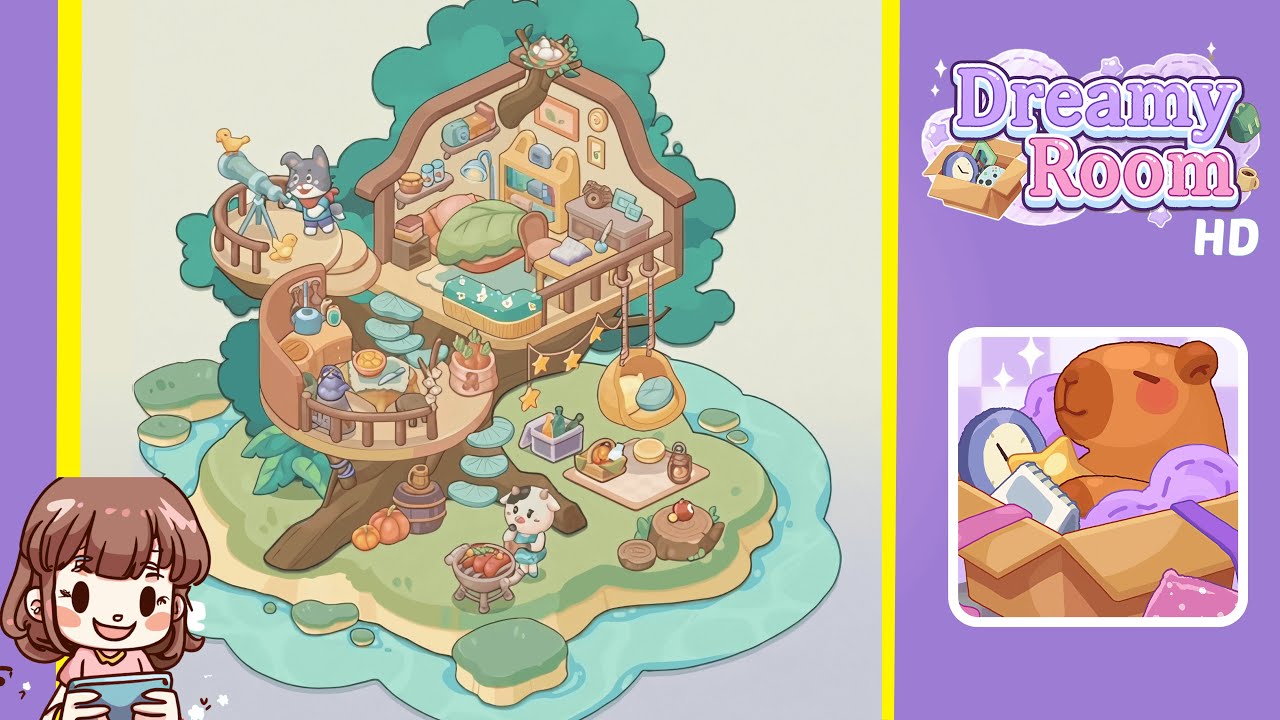
- Place the mossy island base at the center of the water border. Click and drag the sandy-green island piece to align it perfectly with the water’s scalloped edge, triggering a satisfying chime.
- Install the giant tree trunk with the lily pad staircase on the island. Align the trunk’s bottom curves with the green top layer of the island. Attach the lily pad steps spiraling around the trunk for a seamless look.
- Build the lower-level balcony kitchen area on the left side of the trunk. Position the curved wooden balcony with railing mid-trunk, ensuring it sits flush against the tree bark.
- Add cooking accessories: place the stove against the balcony railing, the blue kettle atop the burner, the fruit bowl filled with oranges, and hang the garlic bundle on the railing spindles.
- Construct the upper-level bedroom treehouse on the right side of the trunk. Drag the larger rectangular balcony with an arch to its correct height and align with the bark curve.
- Decorate the bedroom: set the bed under the arch, place the blanket and pillow, position the bookshelf, desk, and lamp, and hang wall frames.
- Add outdoor leisure features: place the telescope on the left balcony railing, position the dog character, place the chicks, and attach the bird's nest to a branch.
- Hang the star string lights and wicker swing chair on the right balcony, aligning the ropes and lights for a whimsical effect.
- Lay out the picnic blanket area with a basket, lantern, stump table, and mushroom stepping stones in the surrounding water.
- Place the cat character at the grill area with barbecue, pumpkins, and a barrel to complete the grilling setup.
Notes & Precautions
- Precision is crucial in this level. Misalignment can block further steps. Use hints wisely to guide placements.
- If an asset fails to snap, try rotating it or nudging it slightly. Adjust vertical placement gradually until the green indicator appears.
- Pay attention when attaching the nest and swing to the branches, as misalignment can cause clipping issues.
- Save your progress and restart the level if you encounter a persistent bug.
Tips & Tricks
- Place larger structural pieces before smaller items to avoid accidental overlaps.
- Pre-rotate assets in the inventory to minimize adjustments during placement.
- Use strategic zooming to view snap points and fine-tune alignments for small props.
- Memorize placement zones by studying shadowed edges and outlines.
- Use hints sparingly to maintain the challenge while gaining subtle guidance.