Dreamy Room Level 222 Walkthrough & Guide
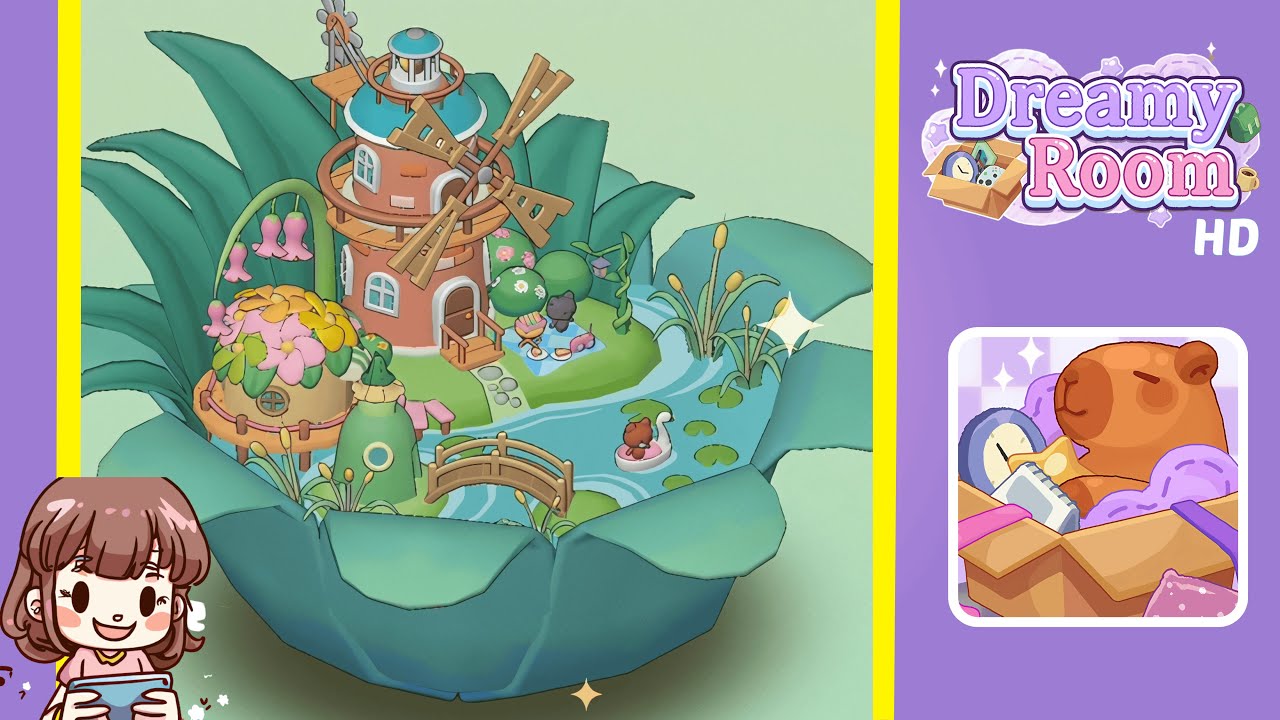
Welcome to the Dreamy Room Level 222 walkthrough. This guide will assist you in creating a harmonious and visually captivating scene within a bowl-shaped room. Follow the steps meticulously for a successful object placement.
Step-by-Step Guide
- Place the winding water stream in the center of the base. Carefully align and orient it to complement the bowl’s curvature.
- Position the windmill house at the rear center of the stream, ensuring it faces slightly forward and is nestled against the bank.
- Set the flower dome house on the left bank, aligning it perfectly with the grass and adjusting the petals for symmetry.
- Position the green cylindrical tower on the front-left bank, ensuring it transitions seamlessly with other structures.
- Install the wooden arched bridge over the stream, aligning it perfectly with the banks and ensuring its ends are flush.
- Scatter lily pads across the water, ensuring varied and organic placement above the water’s surface.
- Arrange cattail clusters along the stream edges, varying their heights and angles for naturalness.
- Install the pink bell-flower arch behind the flower dome, adjusting height and position to ensure visibility and balance.
- Lay stepping stones from the windmill door to the grass, maintaining even spacing and curved alignment.
- Place daisy-topped bushes near the windmill, rotating and lowering them for a harmonious look.
- Add the hanging vine lantern near the daisies, ensuring it casts a gentle light over the scene.
- Spread the blue picnic blanket on the grass, rotating and lowering it for a natural continuity.
- Position two stools and picnic accessories on the blanket, arranging them to create an inviting atmosphere.
- Seat the black bear figurine at the picnic, angling its head toward the cake in anticipation.
- Set the brown bear on the swan float in the stream, orienting them towards each other for a playful interaction.
Notes & Precautions
- Alignment sensitivity: Ensure all elements align perfectly to avoid clipping and unnatural shadows.
- Layer order: Maintain proper layering of elements to ensure realistic presentation.
- Rotation precision: Make small, careful rotations to achieve natural orientations.
- No timer: Utilize the absence of a timer to perfect placements without rushing.
Tips & Tricks
- Snap edges: Use grid snapping for precise alignment of repetitive elements.
- Camera angles: Adjust camera perspectives to identify hidden issues.
- Inventory grouping: Organize the inventory to streamline item selection.
- Soft shadows: Adjust lighting to ensure consistent and natural shadow casting.
- Undo history: Utilize undo history to correct and refine placements.