Dreamy Room Level 337 Walkthrough & Guide
Welcome to the walkthrough for Dreamy Room Level 337. In this level, you will create a picturesque seaside café complete with cozy interior charm and ocean breeze aesthetics. Follow this guide for a step-by-step approach to recreate the scene perfectly.
Step-by-Step Guide
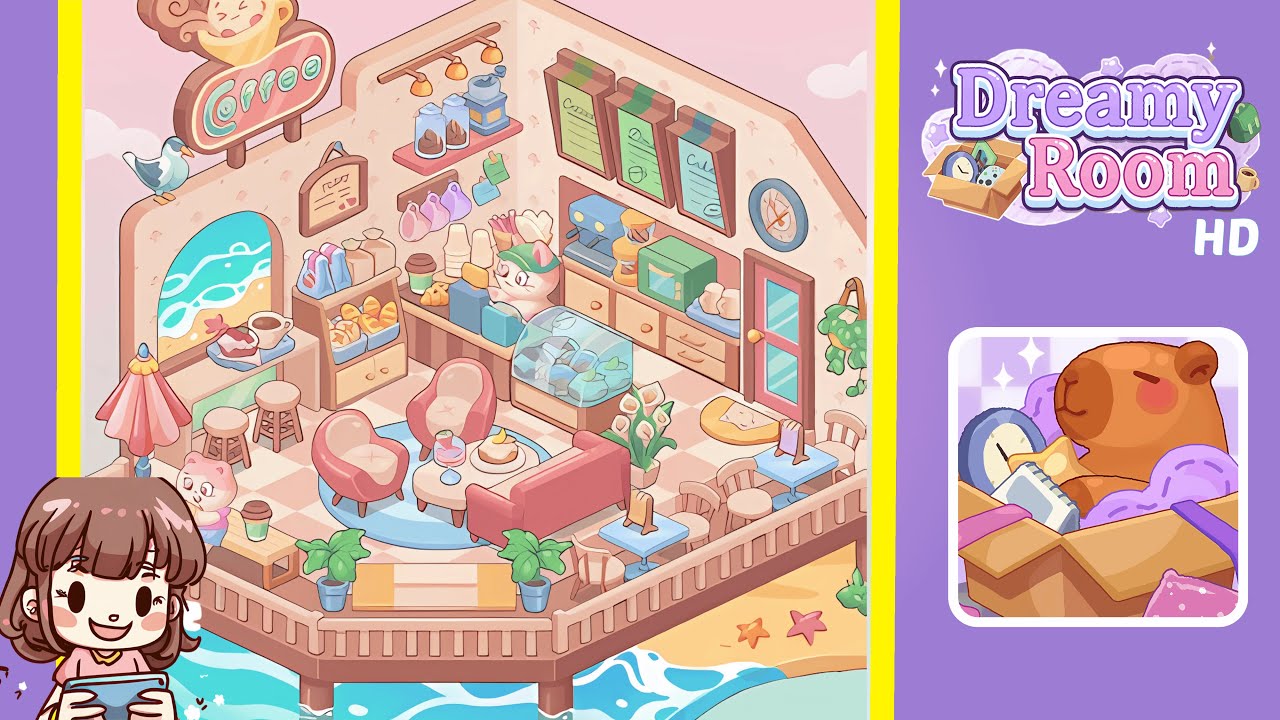
- Begin by setting the structural elements: place the tall L-shaped back wall with pale rose wallpaper along the rear and right sides, creating vertical planes with a visible center-back seam. Add the raised wooden pier platform extending forward, supported by short round pilings docking into the cartoon ocean. Align the large checkered mattress on the platform, ensuring its pattern faces the player and is flush with the platform's front lip.
- Mount the oversized "Coffee" sign high on the left back wall, and install the arched seaside window centered on the left panel. Leave space between the sign and window for a seagull prop perched above the window.
- Construct and stock the counter area at the back-right corner: install a long service counter with drawers and an angled display case. Arrange a coffee machine, grinder, and bread oven on the counter. Mount three vertical menu boards, a wooden hanging rail with pendant lights, and add shelves stocked with jars, cups, and mugs.
- Place the pastry display at the front-right of the counter with colorful pastries inside. Add bread baskets and packaged goods on the low shelving along the back wall. Near the left counter end, place jars of toppings and a cake plate below the window.
- Position the barista character—a cute cat wearing a cap—behind the counter. Arrange the cash register in front of the cat and hang a "Today" chalkboard sign above the left shelving. Add sticky-note menu cards to the right of the sign.
- Lay out the central seating with a round blue rug centered before the counter. Arrange two pink chairs diagonally on the rug's left and front positions, and place a small round coffee table with a dessert plate and drink between them. Set a short pink couch behind the table, parallel to the counter edge.
- Build the outdoor terrace with wooden railing and potted palms at the entrance steps. On the left-front corner, place a pink beach umbrella with a bench and seat a bear customer holding a donut. Position a takeaway cup on the side table beside them.
- On the right-hand side, set three small bistro tables with two chairs each along the railing, evenly spaced. Near the back-right wall, add a hanging plant beside the pink door with its vines draped toward the frame. Ensure the door sits flush with a round clock mounted above and slightly left of it.
- Add finishing small items: two wooden bar stools under the window counter, a cake plate with a slice near the left window seat, and a round clock on the right wall. Arrange hooks for order tickets and takeaway boxes near the bread shelf. Outside, scatter a sandy beach patch with starfish beneath the pier.
- Finalize with accents: place a yellow and white striped mat at the central pier steps, two small potted plants near the entrance, subtle wall details like floral wallpaper motifs, and wood grain textures on the platform. Adjust pendant lights and add small menu boxes on the counter edge.
Notes & Precautions
- Placement precision is crucial; use grid or snap aids for alignment. Small misalignments can disrupt the scene's harmony.
- Grouping similar objects for placement helps maintain order; build from back to front to avoid obstruction.
- Manage collision boxes carefully; test for overlaps and adjust placements slightly if rejected.
- Save checkpoints frequently to avoid losing progress.
- Maintain color balance with pastel pinks and aqua tones.
Tips & Tricks
- Use anchor points such as the rug for centering furniture and preserving symmetry.
- Duplicate and mirror elements where possible to save time.
- Adjust the layer order to avoid accidental overlaps.
- Micro-adjust with keyboard nudges for precise placement.
- Zoom in for close-up adjustments on clustered areas like the pastry display.