Dreamy Room Level 322 Walkthrough
Welcome to the Dreamy Room Level 322 walkthrough. This guide will lead you through each step to create a cozy holiday-themed diorama on a snowy island.
Step-by-Step Guide
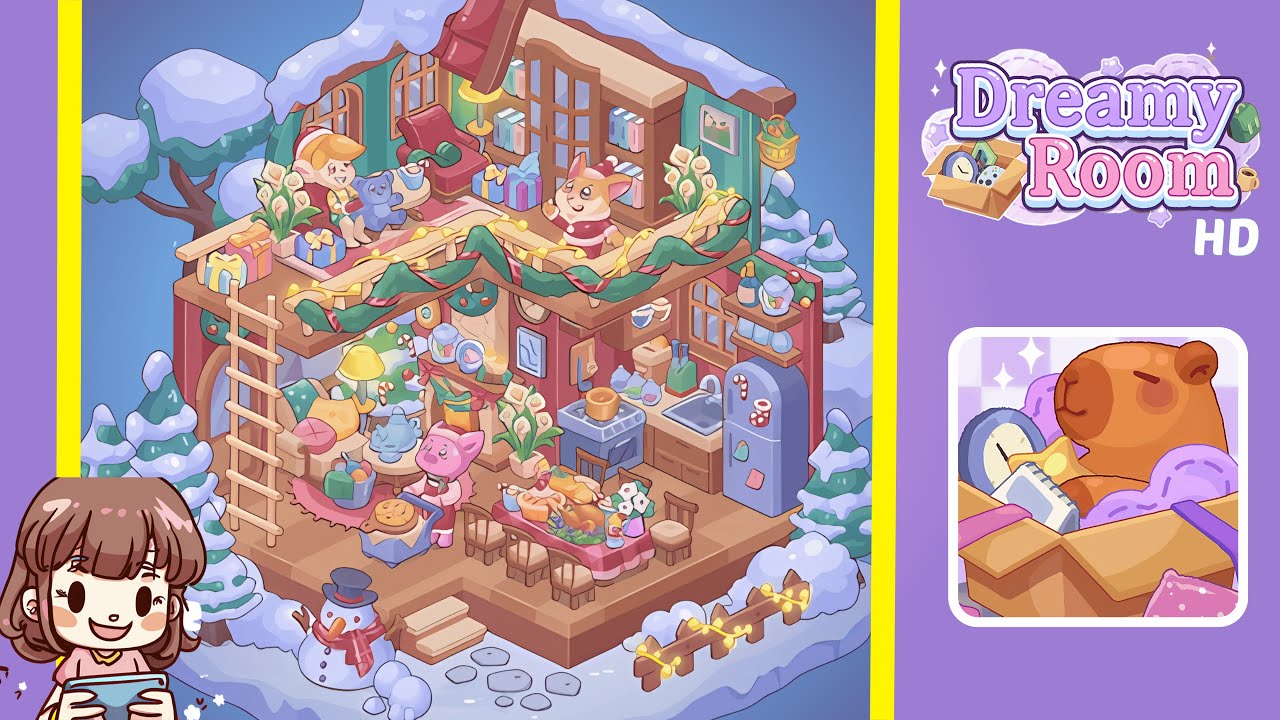
- Set the scene outdoors with a snow island, steps, stones, and trees. Finish the exterior: snap two beige steps to the front lip of the floor, centered with the notch. Place five flat gray stepping stones in a slight arc below the steps. On the left, cluster three conical snow-topped pine trees. On the right, place a small snow-topped tree near the future fence. Build a wooden fence along the lower-right perimeter and string yellow fairy lights over it.
- Raise the structure with the mezzanine, roof snow, and left ladder. Anchor the second-floor mezzanine above the living area. Snap the balcony along the top edge, flush with the left wall, stopping at the right's kitchen volume. Add a low railing around the balcony. Hook the tall ladder to the front-left corner, aligned with lower steps and pines outside. Cap the roof with cream-and-red roofline and snow drifts. A snow pillow should sit above the balcony corner.
- Drape the holiday garlands and warm lighting. With the balcony in place, drape a long green garland from the left railing to the right balcony edge in two swags; weave fairy lights through it. Add a second garland across the room's midline. Hang a green wall lantern with a gold bracket and holly on the upper-right wall. This setup frames upstairs characters and anchors shelves below.
- Populate the upper floor with a child, plush, presents, plants, books, and corgi. Seat a blonde child at the left railing. Set a plush bear/koala to their right. Arrange three presents (yellow, pink, blue bows) along the left rail cap. Place two tall potted lilies—one behind the child and one near the kitchen wall. On back shelves, stack pastel books and a gift box. Stand a corgi in Santa attire on the right balcony.
- Lay out the left living nook with a rug, sofa, pillows, tea set, lamps, shelves, and frames. Center a pink round rug under railing swags. Place a cream sofa at the rug's rear with pillows on ends. Set a low table with a blue tea set in front. Against the back wall, add a console shelf with three lamps, two snow globes. Hang a small picture frame slightly right of center on the wall.
- Build the kitchen on the right with cabinets, sink, stove, shelf, bottles, and fridge. Snap L-shaped cabinets to form a galley with a sink, a stove to its left, and open counter between. Set a fridge with magnets on the right wall. Above counters, mount a shelf with cups and bowls. On the counter, place a cutting board, two bottles, and a kettle. Add a lidded pot on the stove and pin a note on the wall tile.
- Arrange the banquet with a big table, food spread, chairs, and flowers. Center a dining table in front of the kitchen, draped with a red-check cloth. Populate it with roast turkey, loaf, fruit tray, pie, and two soda bottles. Position four chairs: two at the front edge, one inner left, one far right. Add a vase with flowers at the table's corner. Ensure a clear walkway to the fridge.
- Add the center character vignette and remaining exterior details. Place a pink pig on a stool at a side table in front of the banquet. Outside, place a snowman at the steps' bottom-left with a snowball at its base. Ensure fairy lights wave along the right-edge fence. Windows and frames should remain visible around the corgi and lilies.
Notes & Precautions
- Collision order is crucial. Place large structures first to avoid occluding issues.
- Maintain clear pathways to prevent clipping with the vignette.
- Ensure the top-right lantern is above the garland layer.
- Place the trees behind the ladder to prevent snapping issues.
- Gift boxes should be parallel to the balcony edge to keep silhouettes clean.
Tips & Tricks
- Mentally block the space into four zones: left lounge, right kitchen, center dining, and upper balcony.
- Use "pairs" like lilies to anchor items symmetrically.
- Lay lights before props to avoid re-ordering.
- Follow story beats, seating the child and plush first for proper spacing.
- Zoom out after steps to spot overlaps and adjust if needed.