Dreamy Room Level 308 Walkthrough
This guide provides a structured walkthrough of Dreamy Room Level 308, guiding you through creating a picturesque pocket park with seasonal themes and thoughtful arrangements.
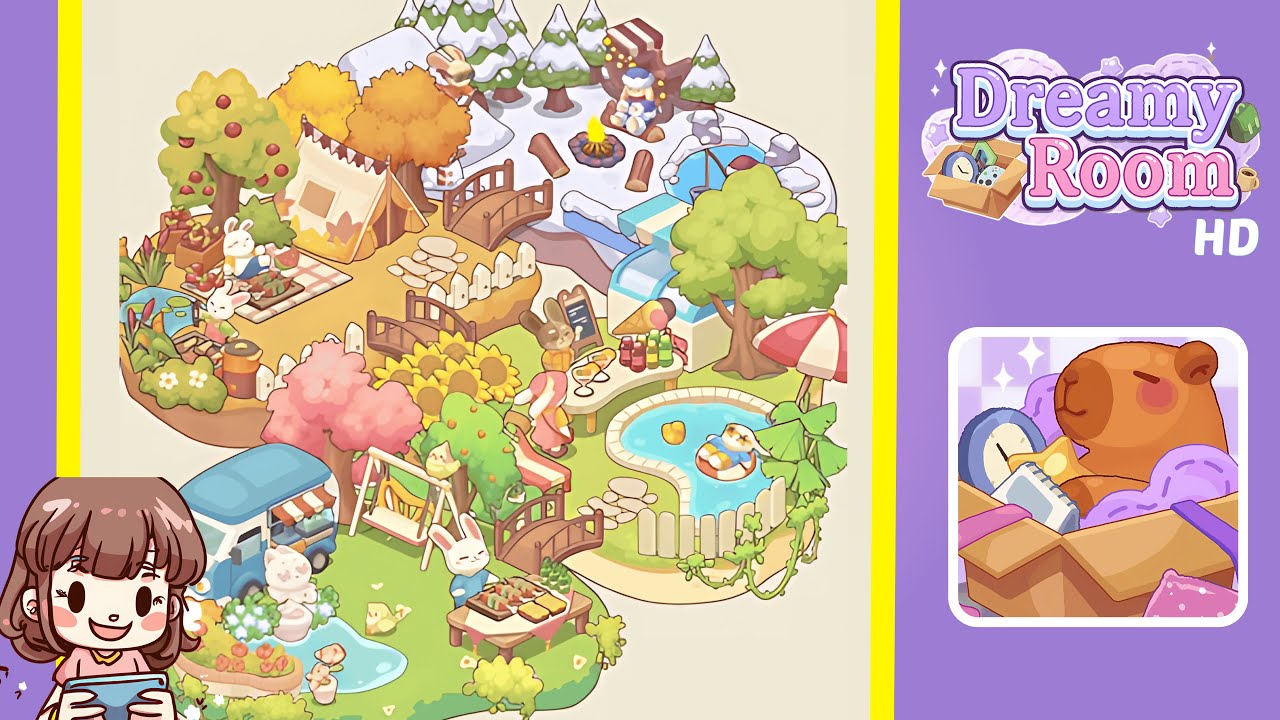
Step-by-Step Guide
- Shape the terrain by forming three terraces: a winter shelf in the top-right, a sandy path plateau in the middle, and a lush green meadow in the bottom-left. Curve the coastlines to create three arched wooden bridges connecting various points and add a short white picket fence around the future pool zone.
- Construct the winter ridge with snow-capped pines, a fairy-lit bench, and a campfire. Set up an ice-fishing area and an ice slide leading toward the pool, completing the snowy section.
- In the autumn campsite, place amber maples behind an A-frame tent and arrange paths and picnic scenes with apples and pastries, bordered by bushes to blend with the middle path.
- Establish the spring swing garden by positioning a food truck, flower beds, fountains, and install a swing set adjacent to cherry and green trees, creating a playful atmosphere.
- Design the summer fair section by planting sunflowers, setting up a lemonade bar and a bench, ensuring all elements guide the view toward the pool area.
- Create the pool oasis by installing a kidney-shaped pool, beach umbrellas, and fence with vine strands. Populate with pool-side decorations for an uncluttered sunny retreat.
- Finalize the grill lawn area with seating arrangements and grilling items, ensuring a cohesive flow connecting back to the truck and swing with correct object layering.
Notes & Precautions
- Place bridges first; adjust them to fix flow issues rather than moving scenery.
- Keep seasonal zones distinct to prevent snapping conflicts.
- Properly fit pool fences to ensure correct fitting of adjacent decor.
- Rotate tents correctly to match scene perspectives.
- Ensure one tile gap between the ice slide entrance and the campfire.
- Use bushes strategically to hide tile seams.
- Save often; small adjustments can make a significant difference.
Tips & Tricks
- Think of the level in a "clockwise seasons" layout for efficient placement.
- Group props together to expedite snapping and spacing.
- Utilize character sightlines to guide viewer's focus across the scene.
- Populate tiny props early for completeness.
- Use additional shrubs and vines to harmonize colors without creating clutter.