Dreamy Room Level 319 Walkthrough
This guide provides a clear and structured walkthrough for completing Dreamy Room Level 319. Follow each carefully detailed step to arrange the elements perfectly and create a cozy café scene filled with charm and functionality.
Step-by-Step Guide
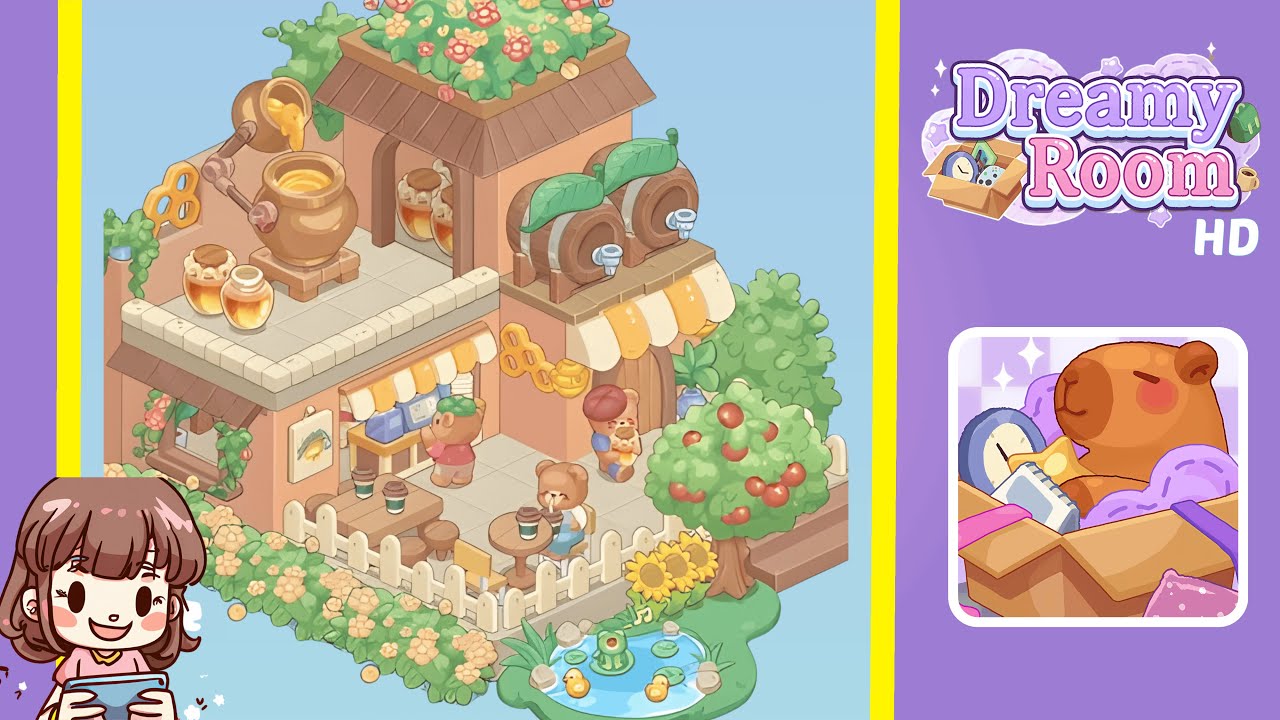
- Begin by placing the building shell and terrace fence. Frame the peach-colored walls along the grid's back and right edges. The lower roofless patio is in the front-left quadrant, and the raised upper deck is at the back-right. Snap the stone coping along the upper deck's edge with a slight overhang. Fit short brown awnings along the lower left and front edges to provide shade above the window and seating area. Outline the patio with a white picket fence across the front edge up to the right side, leaving a small entry opening at the bottom-center. This setup is crucial for determining where tables, stools, and planters can be placed without obstruction.
- Position the counter, register, stools, and café sign. On the lower patio, place the yellow service counter against the back wall under the striped yellow-and-cream awning. Center the blue-screen register on the counter, angled toward the doorway. Hang the framed honey poster on the left wall next to the window. Slide two low square stools under the counter's overhang. Set two round café tables inside the fence; one near the left-front corner and the other mid-center. Place a takeaway cup on each table and a third at the counter edge.
- Focus on the right tower, striped awning, barrels, and arch jars. Build the short tower on the raised right side, leaving its arched opening facing left. Inside, place a shelf of golden honey jars. Attach a second striped canopy on the tower’s right façade. Position two wooden barrels with green leaf caps under the canopy, aligning the taps slightly forward and down. Add small wooden braces under each barrel. Thread a honeycomb-shaped accent tile between the canopies for a visual connection.
- Place the rooftop honey works, jars, and vine window. Center the bronze honey kettle on a pedestal on the upper-left roof. Attach the pipe to curve and pour into a bowl in front. Line three glass honey jars along the roof's front lip. Add a dangling honeycomb key beside the front canopy. On the lower-left wall, place a window with a wooden awning and trail a vine down the jamb.
- Create the top garden, apple tree, sunflowers, pond, and NPCs. The very top hosts a flowered rooftop garden. Outside the fence, plant the apple tree with red fruit facing forward. Position the short back deck behind it and a sunflower clump at the fence corner. Assemble the pond on the grass with a lily pad and ducklings. Add two stray cups on the pond’s rim. Place the clerk behind the counter, a bear at the center table, and a parent with a child near the doorway.
Notes & Precautions
- Ensure elevation accuracy; items for the upper deck must snap to the higher grid.
- Maintain visible fence corners; avoid overlapping vines or posters.
- Barrel taps must point outward.
- Leave a one-tile aisle from the gate to the counter and from the counter to the right doorway.
- Do not place decorative cups on water tiles of the pond.
- Ensure the rooftop garden is centered.
Tips & Tricks
- Anchor large shapes like the fence, tower, kettle, and apple tree first.
- Use shadows as rulers to align barrels and coping.
- If an object won't snap, rotate it 90° and back.
- Group similar tones to guide the eye.
- Place NPCs last to test pathing effectively.
- Keep tables within the fence rails to avoid animation blocks.
- Take a screenshot before making changes to have reference for iteration.