Dreamy Room Level 317 Walkthrough & Guide
Explore the intricate setup of Dreamy Room Level 317, where every item has its place, creating a cozy and delightful bookstore environment.
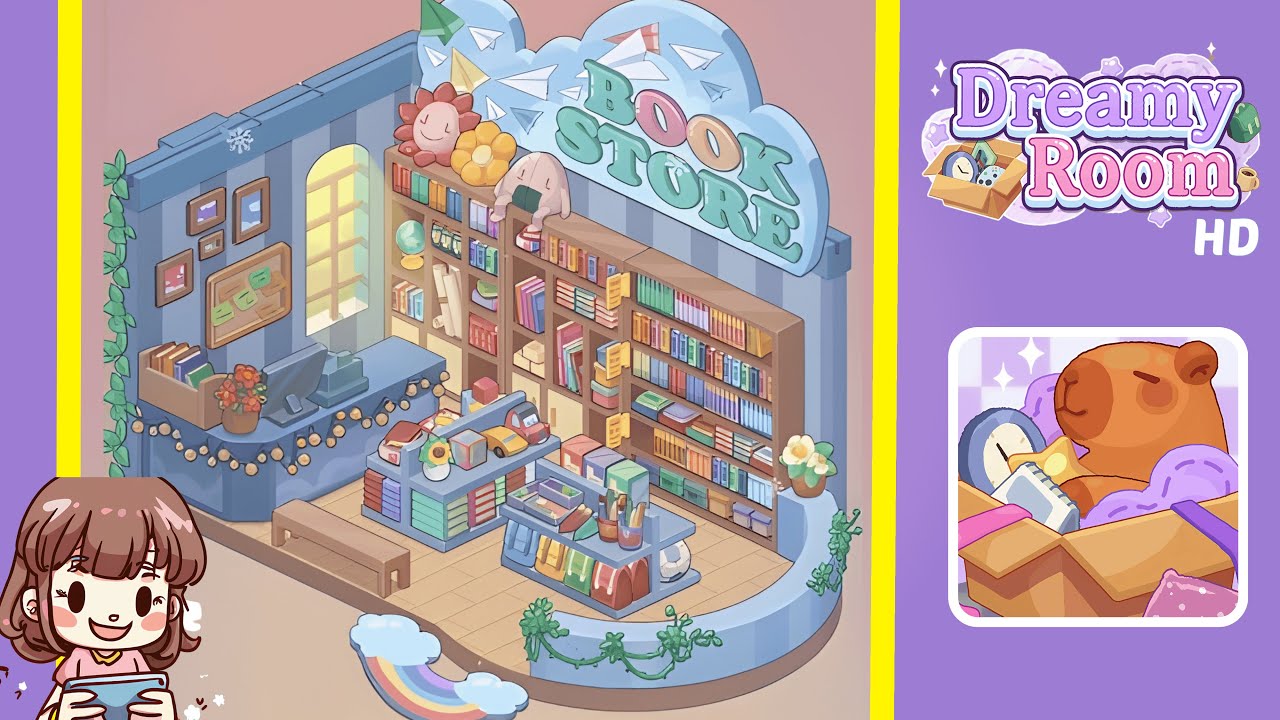
Step-by-Step Guide
- Begin by placing the large brown bookshelf tightly against the right wall, aligning its top edge just beneath the blue cornice. Ensure the shelf spans nearly the full width of the back wall, leaving a narrow gap on the left for the arched window area. Arrange the shelves to mimic a grid pattern with some open cubbies and others filled with books, creating empty bays in the middle for contrast.
- On the left platform, install the glowing arched window along the middle of the back wall's left half. Position the blue checkout counter directly below it, extending from the corner to mid-left. On the counter’s right side, set the register/monitor, and place a small box of upright books on the far left. Center a terracotta pot with red flowers between these elements, and hang warm string lights along the counter's front fascia.
- Hang three frames on the left wall above the counter. Arrange two simple brown frames stacked on the left and a single frame on the right showing pinned green notes. Attach a lush vertical vine at the far left, cascading from the cornice to the floor. Ensure frames and vines do not overlap or intersect with the window arch.
- Place two central display islands slightly offset left-right on the floor. Start with the left island, surrounding it with pastel books and placing a white vase with a small sunflower on top. Include a toy car, another car behind it, a wrapped cube gift, and a red book with a bookmark, ensuring cars face the aisle.
- Position the right island slightly forward and to the right of center, topping it with a long pencil cup filled with colored pencils, a small tray, and neatly fanned notebooks. Adorn the base with book stacks and tuck items like folded pastel bags or sweaters underneath, maintaining a clear aisle.
- Install a low wooden bench just in front of the counter step, oriented left-to-right. Ensure its legs barely overlap the bevel where the raised platform meets the main floor, leaving walking space to the islands.
- Populate the tall bookshelf with an assortment of books, a green globe, toy cars, and yellow memo cards. Maintain a gradient in color arrangement with cooler tones on the right and warmer reds toward the center.
- On top of the tall shelf, place a pink plush figure with a green book, a smiling sun/flower plush, and a cluster of yellow balloon-flowers. Mount the big blue cloud sign above, adorned with whimsical paper airplanes/triangles.
- Along the curved front wall, place a low bluish barrier and hang small vine clusters. Position a potted plant with white flowers at the extreme front-right, ensuring no overlap with nearby items.
- Conclude the setup with a rainbow ramp and cloud puffs at the front-left floor edge, along with subtle snowflakes near the top-left cornice for a magical touch.
Notes & Precautions
- Avoid overlapping edges, especially of the bench, islands, and counter garland.
- Maintain vertical hierarchy: bookshelf first, then characters, then cloud sign.
- Ensure color balance; adjust any skewed color patterns to match the initial setup.
- Pay attention to under-shelf items on the right island; missing these prevents completion.
- Ensure vines are securely attached and not floating.
- Position the rainbow at the floor's edge to prevent clipping with tiles.
Tips & Tricks
- Position the bookshelf, counter, and islands first to prevent micro-adjustments later.
- Use window glow as an alignment cue for the counter and frames.
- Populate the tall shelf by columns for efficient completion.
- Install string lights before placing the bench to avoid it touching any bulbs.
- Ensure cars face aisles for the final check.
- Place the cloud sign last to address any hidden misalignments.