Dreamy Room Level 314 Walkthrough & Guide
Welcome to the Dreamy Room Level 314 walkthrough. Follow this guide to correctly place and arrange every item for the perfect cozy greenhouse diorama experience.
Step-by-Step Guide
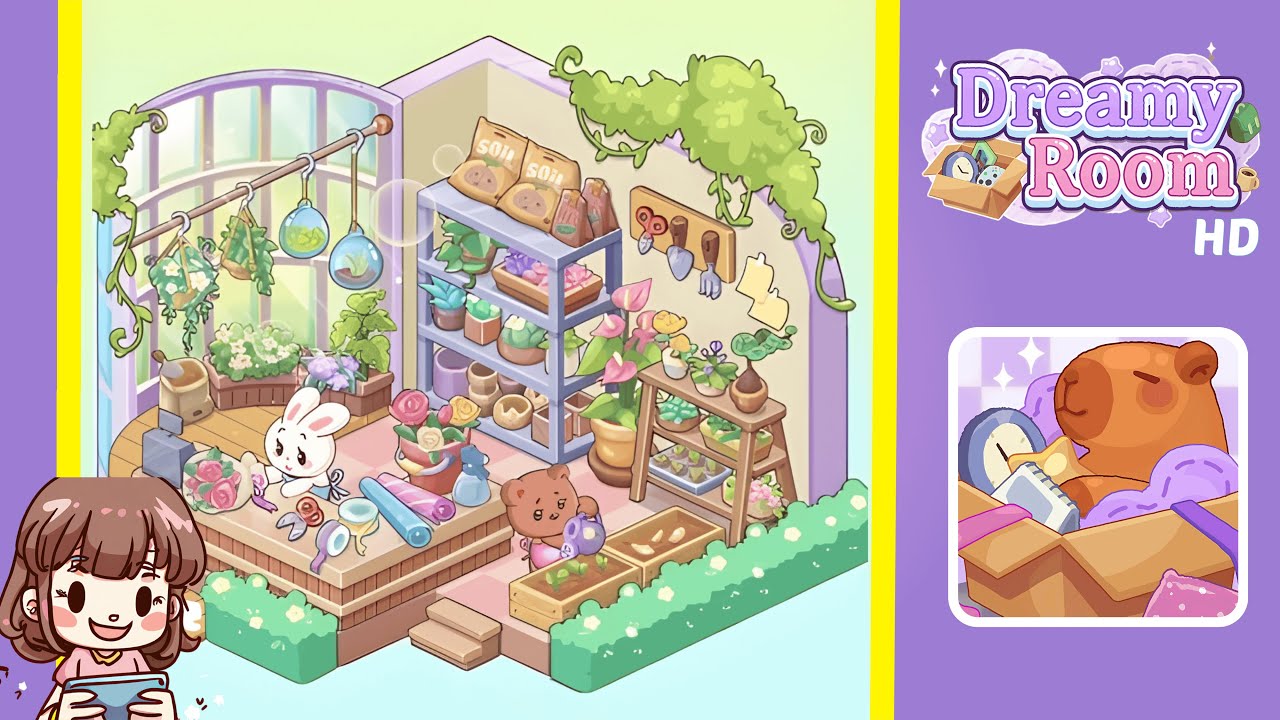
- Place the raised wooden platform and front hedges: Position the large pink-checkered floor tile with the rounded portion on the left and the off-set square notch facing the front. Center the raised wooden platform toward the left half, allowing room for the shelving to the right. Place the stepped wooden entry in front, facing the player, and arrange the low green hedge planters in a U-shape, leaving a gap for the steps.
- Install the left curved window, hanging rail, and terrariums: Place the tall curved window against the left edge, aligning its base with the platform top. Attach a wooden hanging rail across the window arch and hang three glass terrarium globes. On the leftmost hook, hang a triangle bundle of trailing greenery, and on the next, a pot of white-flowering plants.
- Arrange the florist’s workbench items and the white rabbit: Place the workbench on the center-left of the platform, aligning it with the platform bevel. Position the white rabbit at the workbench, facing the front-right corner. Arrange tools such as scissors, ribbon spools, a glue or tape, a blue spray bottle, and rolls of wrapping paper around the rabbit. Add a paper cutter and a spool of twine, and place a floral arrangement on the bench's right side.
- Build the rear shelving unit and add plant supplies: Install the lavender shelving unit in the rear inner corner, slightly to the right. On the top shelf, place two soil bags and a small seed packet with seed bottles to the right. Organize succulents, seedlings, and pots on the middle shelves. Place larger pots and a rolled mat on the bottom shelf.
- Position the right ladder shelf, pegboard tools, and potted groups: Place the ladder shelf angled toward the center, above the front planters. Arrange pots and a tray of starters on it. Mount the pegboard on the wall and hang pruning scissors, a trowel, and a hand rake, with notes pinned below. Add an anthurium plant near the shelving unit.
- Add the front-right planters, teddy, and finishing greenery: Place the planters on the front-right floor area. In them, plant seeds or sprouts. Position the teddy bear behind the planters with a watering can. Add potted roses and mixed flowers between the workbench and rear shelf, and drape a vine from the top right wall corner.
Notes & Precautions
- Precision matters: Ensure exact placement and layering to avoid errors.
- Order of placement: Base items first, followed by structural pieces, then small props.
- Character orientation: Ensure the rabbit and teddy face the correct directions.
- Grouping: Tools must be arranged as described, and soil bags should be grouped with seed packets.
- Performance: Save and reload if the game lags to reset collision detection.
Tips & Tricks
- Use grid snapping for easier alignment of platform, steps, and hedges.
- Zoom in for tiny props placement to ensure accuracy.
- Duplicate items like succulents to preserve scale and rotation.
- Work from back to front to prevent relocating large items.
- Save incremental versions regularly after placing clusters of items.
- Perform visual checks against the final image to prevent tiny overlaps.