Dreamy Room Level 320 Walkthrough
Welcome to the Dreamy Room Level 320 walkthrough. Follow this structured guide to ensure all elements are perfectly placed for a successful neighborhood school scene.
Step-by-Step Guide
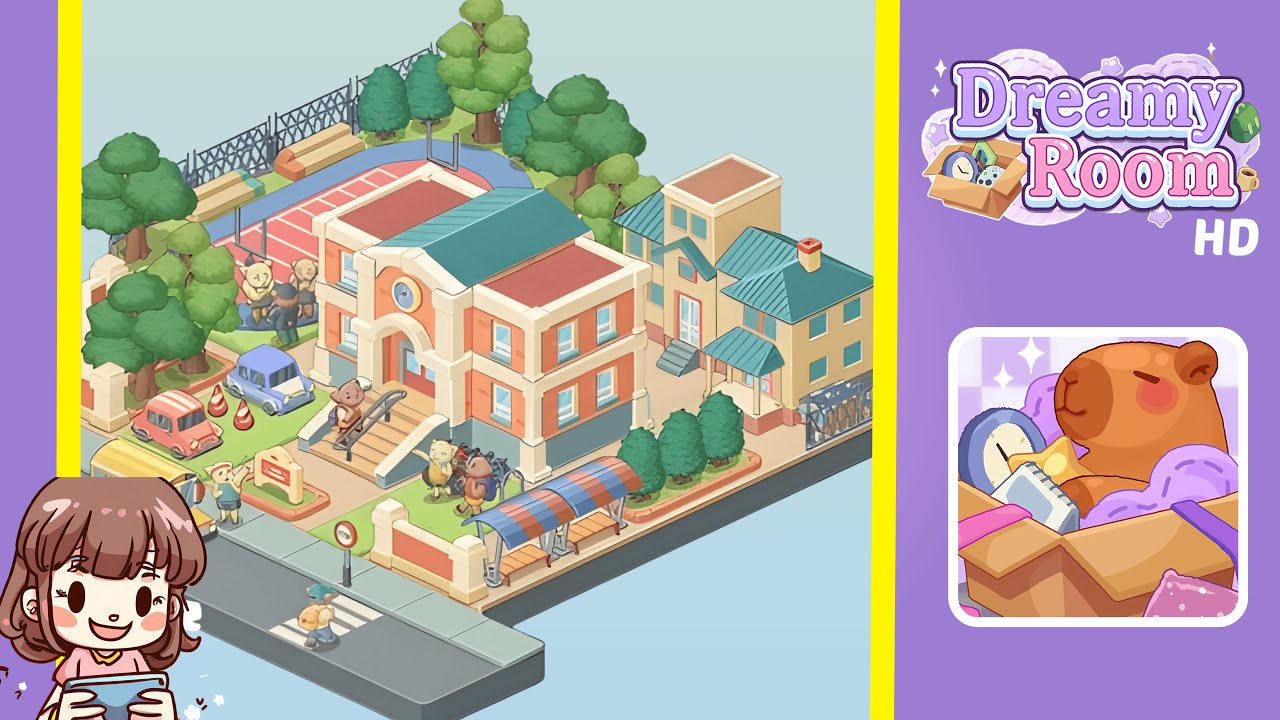
- Place the street, crosswalk, and front sidewalk. Start by anchoring the street along the lower edge of the plot. Align the crosswalk slightly left of center, with space for a bus to stop on the left. Add the “bus stop/no parking” pole near the center opening for the main gate. Ensure sidewalk tiles form a continuous row with no gaps.
- Build the front wall and gate pillars. Drop cream brick gate pillars in the indicated positions and link them with fence segments while leaving a wide central opening. Place a small lawn inside the wall to ensure alignment of later elements.
- Set the main school building in the center. Position the two-story school building mid-plot, ensuring room for stairs and a ramp between the doors and front wall. Align windows squarely to the grid.
- Add steps, ramp, handrails, and the signboard. Place the stair block in front of the doorway with handrails tracing the steps. Add a ramp with matching rail on the left, and plant the school signboard on the left lawn. Place student characters on the landing to check scale.
- Populate the street with a bus, driver, child, cars, and cones. Park the school bus at the far left and add the driver near the door, interacting with a student. Position a child on the crosswalk and park the pink and purple cars inside the campus.
- Install the bus stop shelter and right-front details. Place the bus-stop shelter inside the front wall with aligned benches. Add shrubs behind the shelter and position students near the bike rack.
- Build the right-side houses and the sliding gate. Place the three-story townhouse followed by the teal-roofed house with a porch. Set the sliding gate at the far right boundary.
- Lay out the sports area, benches, hoops, and fence. Paint the athletics zone with perimeter track and court. Place basketball hoops and benches, and erect chain-link fencing. Cluster four characters near the court.
- Plant the tree belt and remaining greenery. Cluster trees along the top and left edges, and add shrubs along the right lawn near the houses.
- Final characters and micro-alignment pass. Add students near the handrails, bike rack, and bus-side. Ensure alignment of all elements and make necessary adjustments.
Notes & Precautions
- Snapping precision is crucial. If a fence won’t attach, rotate a pillar and retry.
- Keep vehicles within their lane or the lawn. Overhanging the curb breaks perspective.
- The bus shelter must be inside the wall to prevent visual glitches.
- Stairs, ramp, and handrails form one unit; reseat in order if needed.
- Characters are decorative but collide. Place them after all props to avoid overlaps.
- Save often to ensure correct placement.
Tips & Tricks
- Anchor the street, front wall, and school to lock every measurement.
- Use “edge stitching” for tree placement to close gaps naturally.
- Color-blocking with roofs, courts, and buses can guide placement.
- For cars, verify the pink car is one tile from the grass edge, the purple car half a tile forward.
- Cluster characters in pairs or fours for best visual effect.
- If a pillar doesn't align, rotate the fence segment instead.