Dreamy Room Level 324 Walkthrough & Guide
Welcome to the Dreamy Room Level 324 walkthrough. This guide will help you accurately set up each element within the scene to create a harmonious and pleasing composition. Follow each step carefully to ensure all items are placed correctly and aligned for optimal gameplay experience.
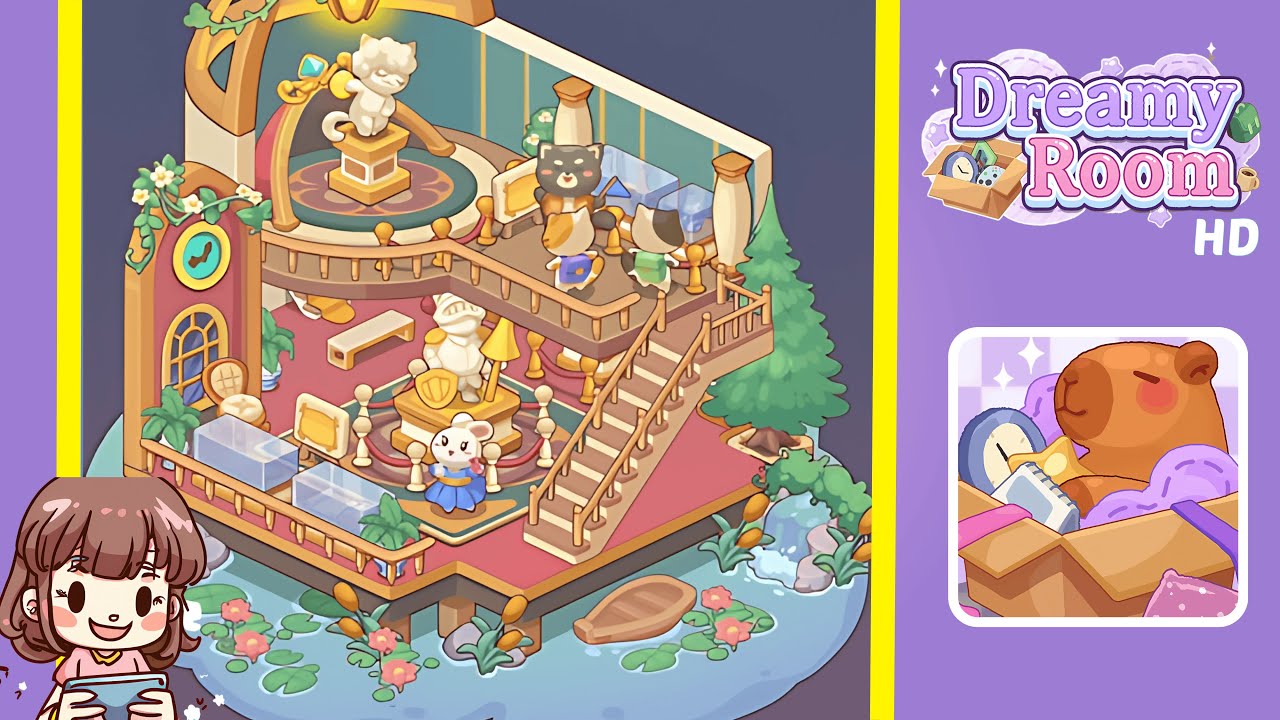
Step-by-Step Guide
- Begin by placing the platform base and the water pool at the bottom center. The floating base platform serves as the room's floor, supported slightly above a blue water puddle. Ensure the platform's notch aligns with the layout, and the wooden legs and water elements are visible.
- Place the rear curved wall and upper back panel at the rear-left of the platform. The wall arches around the upper display level and should align with the platform's rear curve to allow proper placement of other items.
- Position the lower central statue, rug, and small display stands at the middle of the lower deck. The statue on a circular rug should be surrounded by stanchions in an oval pattern and flanked by display plinths, cases, and a small plant.
- On the curved upper platform, place the second circular display, arch, and hanging lamp. Align these items with the upper platform's rear curve while ensuring the cat statue faces forward.
- On the right side, place the staircase, railing, and pillars. The staircase should descend from the upper deck, with tall decorative pillars at the top landing framing the upper display area.
- Place the left ornate panel, clock window, and bench. This configuration anchors the left side, ensuring visual balance with the heavier right-side staircase.
- Position the plants, pond details, lily pads, and a small boat around the water's edge. These elements enhance the floating island illusion while grounding the scene's decorative features.
- Finally, place the characters, small props, and finish details. Each character and item should be thoughtfully layered to maintain the scene's depth and composition.
Notes & Precautions
- Be patient with alignment and layering. Use free movement for precise placements, especially for the curved back wall.
- Double-check statue and stage placements to avoid overlap and preserve sightlines.
- Take advantage of the undo feature to revert any errors in placement.
- Ensure small props never sit behind rails and maintain scale consistency throughout.
Tips & Tricks
- Start with large structures (platform, wall, arch) and work outward to smaller props.
- Use temporary guide objects to map out where items will go.
- Toggle the grid for symmetrical alignment but adjust by hand for curves.
- Lower opacity to check overlaps before restoration for final adjustments.
- Keep multiple saved copies of your progress for easier modification if needed later.