Dreamy Room Level 342 Walkthrough
This walkthrough guides you through precisely setting up Dreamy Room Level 342, ensuring optimal placement of all elements to create a lively circus scene on a floating deck.
Step-by-Step Guide
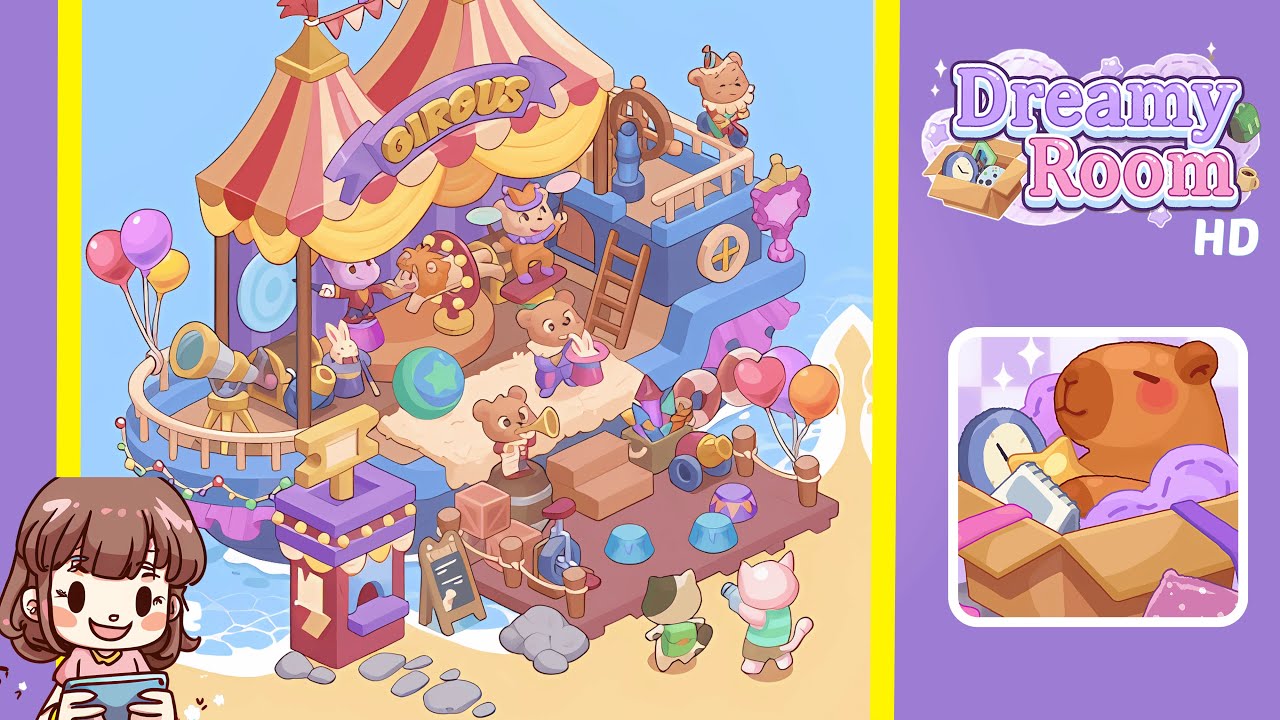
- Place the large striped circus tent and stage canopy in the center-left of the deck. Align the golden finials with the deck’s top rail and ensure the curved yellow scalloped curtains form a small awning. Center the purple "CIRCUS" banner above the curtain.
- Position the stage platform, performers, and rug inside the tent area. Set the round wooden stage disk beneath the tent opening. Arrange the lion prop to the left, the ring-master bunny to the rear-left, and the small bear to the right. Lay the fluffy cream rug covering the front half of the tent floor.
- Add the ticket booth, chalkboard sign, telescope, and string lights to the foredeck. Position the ticket booth on the left front corner, the chalk sign to its right, the telescope to the left railing, and drape a string of lights along the left railing.
- Place the barrels, crates, performer props, and low rear platform with steering wheel. Arrange the barrels and crates near the center-right. Include a trumpet-playing bear and circus supplies. Position the ladder and steering wheel on the raised rear platform, and attach a decorative mirror or sign.
- Add balloon clusters, photogenic props, and two visiting characters at the lower right beach. Position the balloon clusters, and place toys and props accordingly. Position the visiting characters on the beach with the photographer cat slightly to the right.
- Finish with hull trims, pink ruffles, shoreline foam, and final layering checks. Add the purple ruffle trim, decorative panels, and porthole cutout. Place lifebuoy or small figurehead and wooden posts with rope barriers. Ensure all layering is correct.
Notes & Precautions
- Precision in placement is crucial. Use small adjustments to avoid misaligning items.
- Beware of clipping issues; ensure objects do not intersect unnaturally.
- Align elements accurately using snapping or grid options if available.
- Pay attention to colors, rotations, and scale adjustments for the perfect visual alignment.
Tips & Tricks
- Begin with larger structures, and gradually work towards smaller items.
- Use reference landmarks like the ticket booth and steering wheel for alignment.
- Think symmetrically to balance the scene efficiently.
- If available, duplicate items to save time rather than creating new ones.
- Perform a final review zoomed out to catch any misplacements or gaps.