Dreamy Room Level 348 Walkthrough & Guide
This guide provides a step-by-step walkthrough for completing Dreamy Room Level 348, ensuring precise placement for optimal room design and functionality.
Step-by-Step Guide
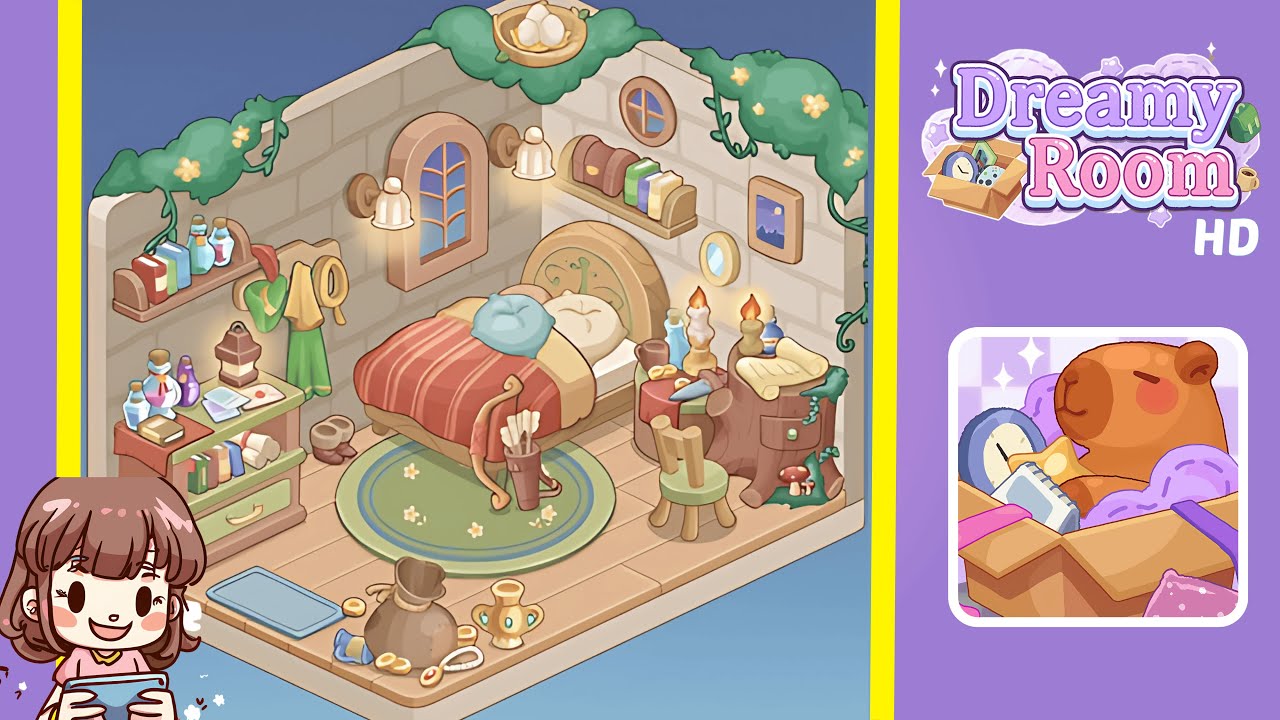
- Position the bed in the center-back against the right wall, with the curved wooden headboard touching the right back brick wall. Ensure the foot faces the front-left corner and the headboard's carved green swirl faces the small round window. The bed should align parallel to the floor planks, resting on the round rug's edge.
- Center the round green rug beneath the bed. It should cover the lower two-thirds, with a visible green border on the front and right sides. Align the floral pattern toward the front-left corner, allowing bed legs to rest on the rug.
- Arrange the pillows, blanket, and bolster on the bed. Fold the striped red blanket with stripes running front-to-back, then tuck a pale yellow folded blanket beneath it. Add a round blue pillow at the top center and a beige heart-shaped pillow slightly offset to the left.
- Place the archer's quiver and boots at the foot and left of the bed. Stand a leather quiver with arrows at the bed's right-foot corner, and position a pair of short brown boots beside the left side near the dresser area.
- Install the left wall shelving, potion bottles, and coat hooks. Position a horizontal shelf about two-thirds up, placing three potion bottles and books on it. Below, add coat hooks with a green cloak, yellow scarf, and hat. Place a lower dresser by the front-left wall with scrolls, a lamp, and books on top.
- Position the front-left mat and treasure pile on the floor. The pale-blue mat should be flush with the floor edge, and above it, arrange an open treasure bag spilling coins, pearls, a jeweled goblet, and a tiny blue pouch.
- Add the right stump table, candles, scrolls, and mushrooms. Place the carved stump table near the right wall with candles, a parchment, and a small pot on top. Set a wooden chair in front-left, facing the stump, and a cluster of mushrooms at its base.
- Install wall windows, sconces, upper shelves, picture, round mirror, and vines with a nest. Place tall windows on the back-left wall and a small window on the right. Mount sconces flanking the arched window and an upper shelf with a small chest and books. Drape vines on the top wall edge, centering a bird's nest.
- Add final touches: a small round mirror on the right wall, a framed starry landscape, and adjust lighting. Place a trinket box on the upper shelf, ensuring the dresser's drawer handle faces the front. Correct overlaps for a cohesive scene.
Notes & Precautions
- Precise placement is crucial; even small offsets can affect item alignment and "snap" functionality.
- Adjust layering order immediately to prevent visual conflicts: rugs should be under the bed, with boots in front of the dresser but behind coins.
- Be cautious of collision zones; place larger objects before adding smaller ones to avoid grid conflicts.
- Frequently save or snapshot your progress to prevent data loss.
Tips & Tricks
- Anchor heavy items like the bed and rug first to simplify spacing.
- Use light previews to check how candle and sconce placement affects depth and make necessary adjustments.
- For repetitive placements, copy and mirror objects when possible to maintain symmetry and save time.
- If an item refuses to snap, try rotating it slightly to free up grid collisions.