Dreamy Room Level 248 Walkthrough & Guide
Welcome to Dreamy Room Level 248, the 248th stage of this serene, story-driven puzzle journey. You begin with an empty two-tiered chamber, ready to become an intricate Egyptian shrine. This peaceful style invites the mindful placement of each item.
Step-by-Step Guide
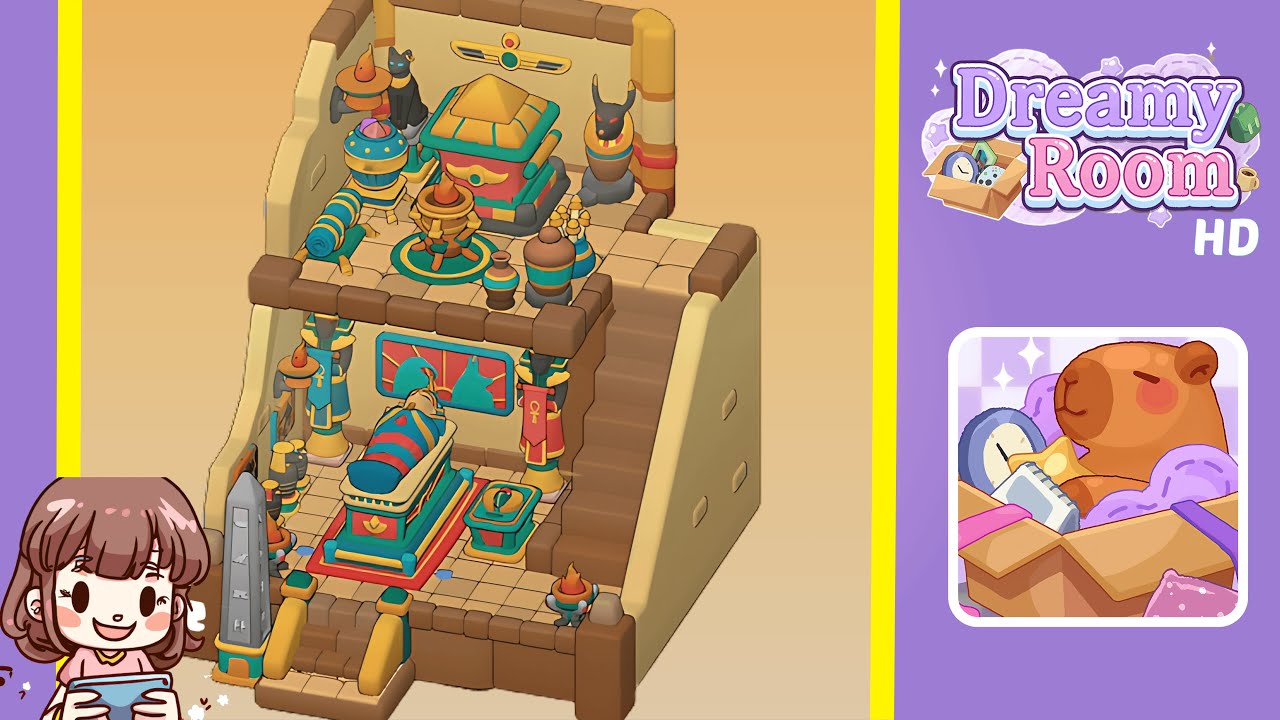
- Place the Obelisk and Front Flame Braziers: Begin by locating the tall grey obelisk in your item tray. Place it flush against the bottom-left corner of the lower platform, directly touching the beige wall. Next, place the two matching flame braziers—one to the right of the obelisk and the other in the bottom-right corner. Follow these instructions precisely to evoke the proper thematic balance.
- Add Wall Plaques and Jar Clusters on the Lower Level: Select the two rectangular hieroglyphic wall plaques and mount them side by side above and to the right of the obelisk. Choose the trio of black-and-gold jars, grouped tightly against the left wall below the plaques. Ensure the jars are evenly spaced to preserve aesthetic harmony.
- Position the Sarcophagus and Basin in the Center: Select the ornate sarcophagus and place it squarely in the center tile of the lower platform. Place the square green pedestal supporting a golden basin one tile to the right of the sarcophagus, aligning perfectly for the chamber’s focal point.
- Install the Guardian Banners on Either Side of the Staircase: Frame the staircase with two Anubis statues holding red-and-turquoise ankh banners. Position one on the left edge and the other on the right edge of the stair’s landing tile, facing forward.
- Arrange the Central Incense Burner and Rug on the Upper Tier: Place the circular green rug in the center tile of the second platform. Set the tripod incense burner in the middle of the rug. Position two decorative vases—one smaller jar to the left and a larger vase on a stool to the right of the burner.
- Decorate the Upper Back Wall with Statues and Plaques: Attach the blue wall-mounted brazier to the left corner of the back wall. Place the black cat statue in the back-left corner. Center the golden winged sun disk plaque high on the wall. Place the Anubis-head jar in the back-right corner.
- Place Remaining Vases, Scroll Cases, and Railing Blocks: Lay the turquoise-and-gold scroll tube on its stand to the left of the large chest. Position the blue-and-gold lidded incense pot beside the scroll tube. Fill the final round blue pot with golden scrolls beside the large chest and railing block. Cover every exposed railing post with a brown cube block.
Notes & Precautions
- Precision Matters: Even a single-tile misalignment can disrupt scene harmony.
- Inventory Order: Items appear in a specific order; scroll carefully if you can't find an object.
- No Undo in This Level: Double-check before confirming placements as there's no undo option.
- Visual Cues: Look for subtle grooves guiding correct orientation.
- No Timer: You have unlimited time; move thoughtfully.
Tips & Tricks
- Plan Your Route: Start with largest items first to reduce backtracking.
- Use Camera Zoom: Helps see exact tile edges for perfect alignment.
- Group Similar Items: Temporarily place similar items together, keeping workflow organized.
- Reference Shadow Guides: Align objects to shadow guides for perfect placement.
- Save Before Finalizing: Save a screenshot after completing major sections for restoration.