Dreamy Room Level 267 Walkthrough
Transform your space in Dreamy Room Level 267 into an inviting garden tea room with strategic placements of decorative elements. This guide provides detailed steps to enhance your gaming experience by creating a cozy, harmonious setting.
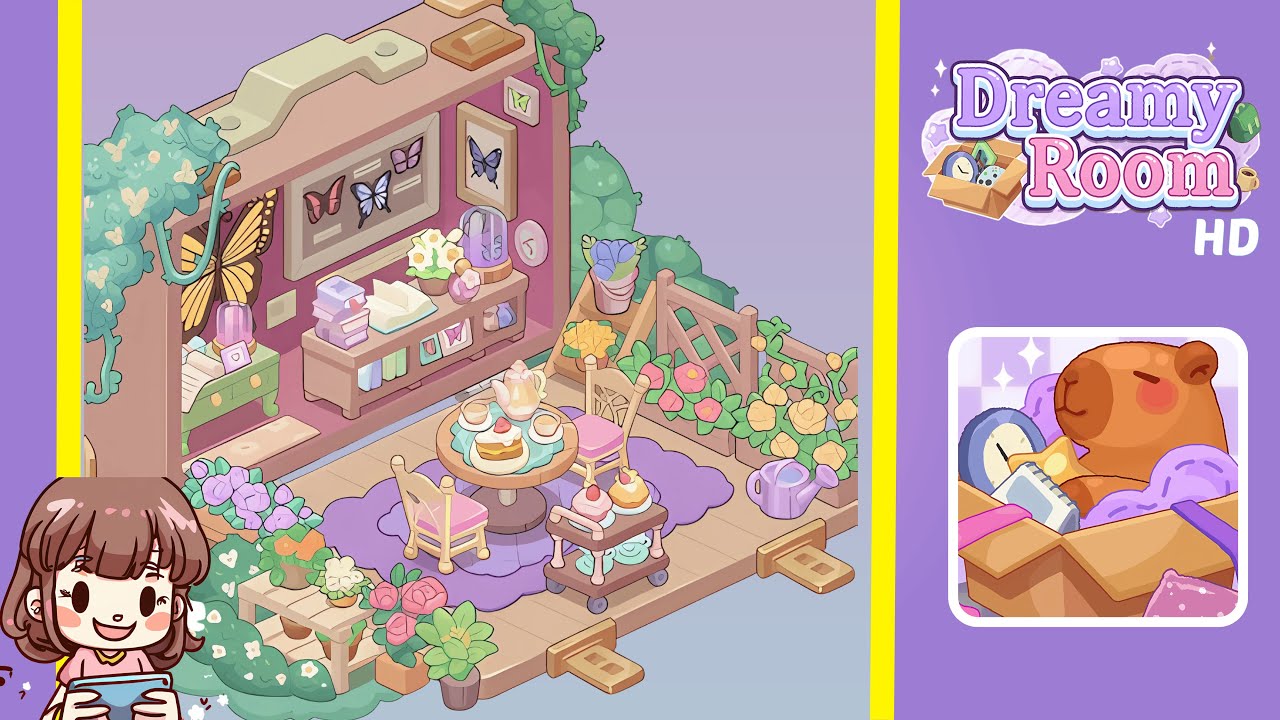
Step-by-Step Guide
- Place the wall structure and background elements. Start by positioning the tall wall piece with built-in shelving at the back left of the platform. This serves as the backdrop for nearly all decor, featuring a muted pink-brown tone with climbing vines from the top left corner. Next, place rounded green bushes—one at the far left corner and another slightly to the right—behind the wall to add softness and create a garden feel. Ensure the foliage peeks just above the wall and frames it without covering the shelving.
- Arrange the butterfly display and books on the shelves. The wall unit features a long central shelf. Place the large butterfly display frame in the center with a smaller butterfly picture to the right. To the left of the large frame, mount a golden butterfly wing decor that slightly overlaps the shelf. Below, set a small wooden table with stacks of pastel books, an open book, and a glass dome covering a decorative object. Achieve visual harmony by balancing the bold butterfly art with the subdued books and flowers.
- Set the tea table and chairs in the center. Position the round wooden table with a purple scalloped-edge rug beneath, slightly right of center. Arrange two pastel chairs opposite each other—pink seat on the right and yellow seat on the left. On the table, position the tea set: teapot in the middle, two teacups with saucers, and a central sponge cake topped with a strawberry. Ensure precise alignment of the items, rotating the cake so the strawberry faces forward and cups angle toward each chair.
- Add the dessert cart and floral touches. Position a small rolling dessert cart to the right of the tea table. Place a cupcake and layered dessert jar on the top shelf, leaving the lower shelf empty for balance. Add vibrant flowers: a pot of purple tulips behind the cart, a yellow flowering bush along the far-right fence, and a pink watering can in front. Ensure the cart doesn't block the table view while integrating into the tea corner.
- Decorate the left corner with the plant bench and blooms. Create a cozy garden nook on the left side by placing a small wooden bench in front of the wall’s lower section, topped with assorted flowerpots in pastel tones. Scatter leafy bushes around the bench to enhance lushness, ensuring the section remains lively without diverting attention from the main tea area.
Notes & Precautions
- Object overlap is critical: Slight overlapping of items is essential for creating depth—avoid gaps that make the design look flat.
- Platform edge safety: Ensure no item floats off the edge of the wooden base to avoid visual glitches.
- Color balance: Evenly spread pastels to maintain harmony and avoid grouping too many similar colors.
- Bush placement: These background elements anchor the room—skipping them will result in an empty looking space.
Tips & Tricks
- Start from the back: Always position large structures and background foliage first to prevent moving smaller items later.
- Symmetry isn’t always literal: Visual weight balance can be achieved without mirrored placement.
- Zoom in often: Aligning the tea set and butterfly frames adds polish, enhancing the game’s scoring system.
- Use edges as guides: Align furniture legs and wall edges with the platform’s planks for natural spacing.