Dreamy Room Level 264 Walkthrough & Guide
Welcome to Dreamy Room Level 264, where you'll transform a circular room into a charming sewing workshop. This guide will walk you through each step, ensuring your room is perfectly arranged to capture the essence of creativity and order.
Step-by-Step Guide
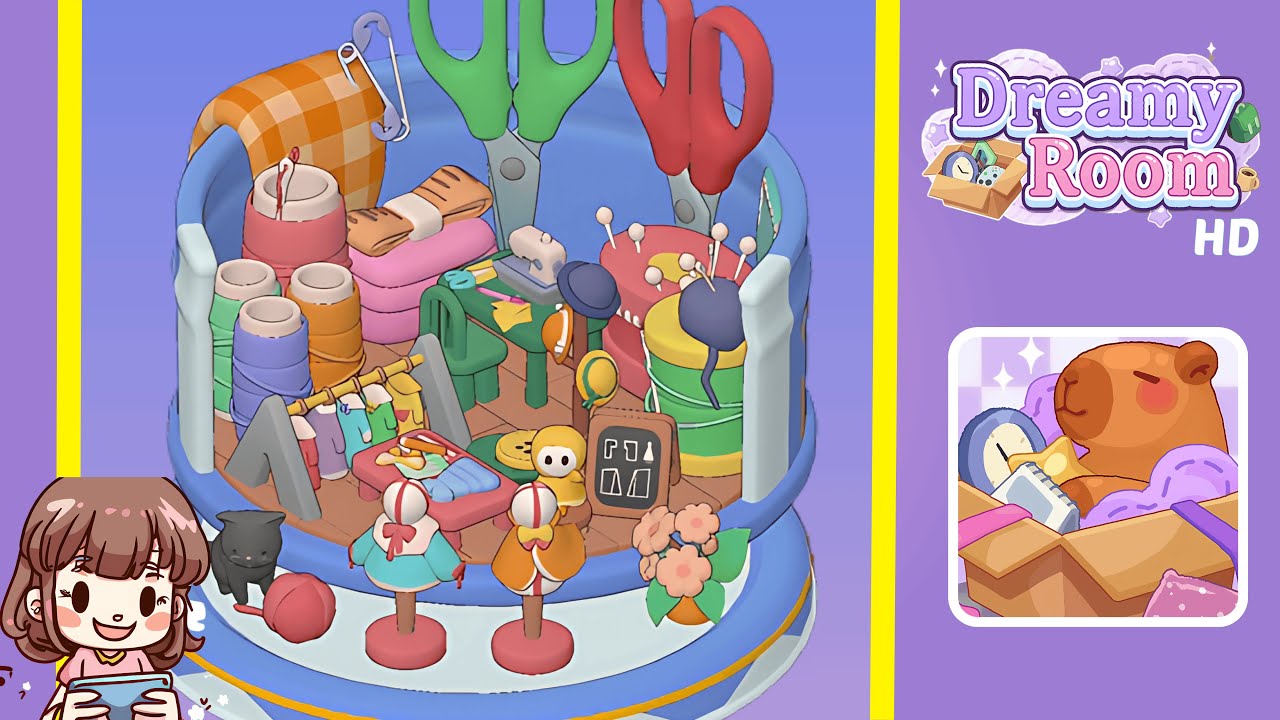
- Set the foundation with the sewing essentials. Begin by placing the wooden floor panel inside the circular room base. Position the green sewing table in the back center of the room, directly against the wall, and place the miniature sewing machine on top, slightly toward the left side of the table. To the right of the machine, arrange two yellow fabric pieces to look like they are in mid-preparation. Ensure the sewing table is exactly centered to help align the rest of your decor.
- Arrange the large background tools by placing the green-handled scissors upright on the back-left wall, with their tips pointing downward. On the back-right wall, position the red-handled scissors in a mirrored stance. Between these scissors, stack two pin cushions—yellow and purple with white pins—on pastel-colored spools. This creates a balanced frame for the sewing table.
- Populate the left section with fabric and thread. On the front-left section, stack three large thread spools—pink, peach, and lavender—vertically, with pink at the top. Behind the spools, drape an orange gingham folded fabric roll over the left support post, with a giant safety pin for detail. Below this setup, position a gray drying rack holding four miniature outfits in pastel shades to add life and warmth to the room.
- Fill the right section with tools and details. In front of the red scissors place three pastel cylindrical boxes—green, yellow, and pink—for storage. Add a chalkboard angled slightly toward the center, ensuring the sewing pattern diagrams are visible. A small flower pot with pink blooms in front of the chalkboard softens the look, balancing the heftier section on the left.
- Add the central decorative elements. In the center front, place three dress mannequins—left in teal with a red bow, center in yellow with a white bow, and right in orange with a red bow—forming a neat arc. Between them and the sewing table, place a red table with an open sewing book, a spool, and small scissors on top. Finally, add a black cat figure playing with a red yarn ball to the front-left of the mannequins, with the yarn curling naturally toward them.
Notes & Precautions
- Exact placement matters—slight misalignments may prevent the game from recognizing the room as complete.
- Be cautious with color order on stacked items since the level often uses specific patterns as a hidden completion requirement.
- Ensure items like scissors and pin cushions are positioned at correct heights to avoid clipping issues.
- When placing the clothing rack, ensure no clothes overlap the front rim to prevent "invalid placement" prompts.
- Avoid placing decorative items before foundational furniture, as they may be harder to align afterward.
Tips & Tricks
- Work from back to front—placing large background objects first ensures you don't block the view for smaller items.
- Rotate the view frequently to check alignment from multiple angles, as misalignments may be hidden until viewed from different perspectives.
- Group similar items in your inventory to save time when searching for what to place next.
- Use trial placements—drop items roughly in place before committing, so you can quickly shuffle them without penalties.
- Memorize thematic color pairings, as many levels use consistent color cues for object grouping.