Dreamy Room Level 273 Walkthrough
Welcome to the walkthrough for Dreamy Room Level 273. Follow this guide to transform barren terrain into a lively prehistoric village filled with character and charm.
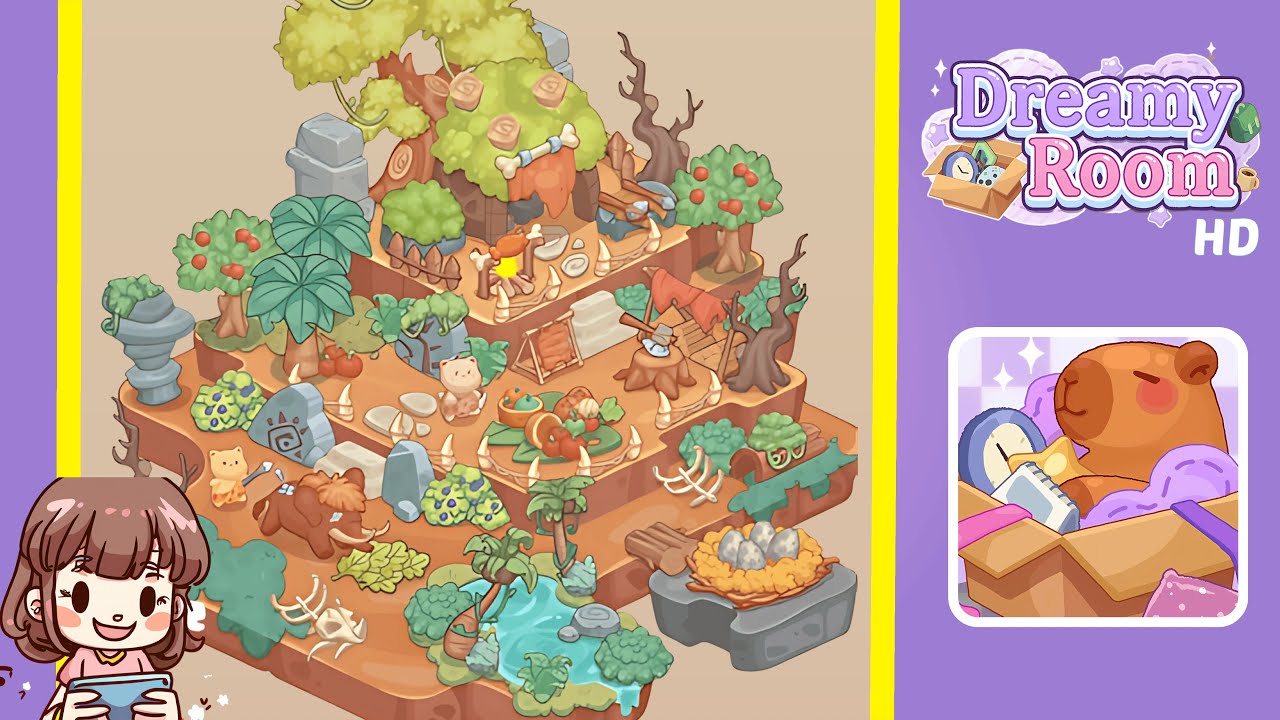
Step-by-Step Guide
- Build the Foundation with Natural Features: Begin by carefully placing foundational elements. The lower level should feature a pond at the bottom-left corner, surrounded by lush greenery and palm trees. A grey rock goes on the right as a base for the dinosaur egg nest, and skeletal remains are placed center-left for a prehistoric touch. This foundational setup is crucial for maintaining environmental harmony.
- Add Trees and Vegetation for Atmosphere: Enhance the scene with vegetation. Place tall fruit-bearing trees on the top-left and right edges. A dense yellow-green tree takes center stage in the upper middle, while smaller bushes and shrubs fill any gaps. The correct placement of greenery sets the aesthetic and layered depth.
- Position Structural Elements and Landmarks: Introduce structures that define the level. Stone ruins should be placed on the edges, with upright decorated slabs forming a central pathway. Position wooden scaffolding and ladders against trees and cliffs, and ensure the wooden drying rack with red fabric fits appropriately.
- Place Characters and Animal Companions: Bring the scene to life with characters. Position a caveman bear near the ceremonial stone pathway and another with a spear guarding the woolly mammoth on the left-bottom tier. Positioning characters correctly enhances the natural storytelling of the settlement.
- Add Decorative and Interactive Items: Complete the level with decorative items. Scatter bones and tusks for thematic reinforcement, place a food platter in the center tier, and ensure the dinosaur eggs in the nest are visible. These final touches ensure a rich, immersive scene.
Notes & Precautions
- Object placement is critical; misalignments can prevent proper placement of other items.
- Place larger objects first to avoid crowding smaller elements.
- Avoid overlapping characters with decorative shrubs to maintain visual clarity.
- Keep the pond unobstructed, as stones placed too close can cause issues.
- Test zoom levels to avoid isometric view misplacement illusions.
Tips & Tricks
- Layer smartly from bottom terrain features upward to prevent overcrowding.
- Maintain symmetry by balancing left and right elements.
- Use trees near landmarks to naturally frame the composition.
- If possible, save before placing critical large items like the mammoth.
- Add bones and tusks in clusters for an organic feel.