Dreamy Room Level 254 Walkthrough
Welcome to the Dreamy Room Level 254 walkthrough! This guide will take you through the steps needed to complete this level, ensuring every detail is perfectly aligned for success.
Step-by-Step Guide
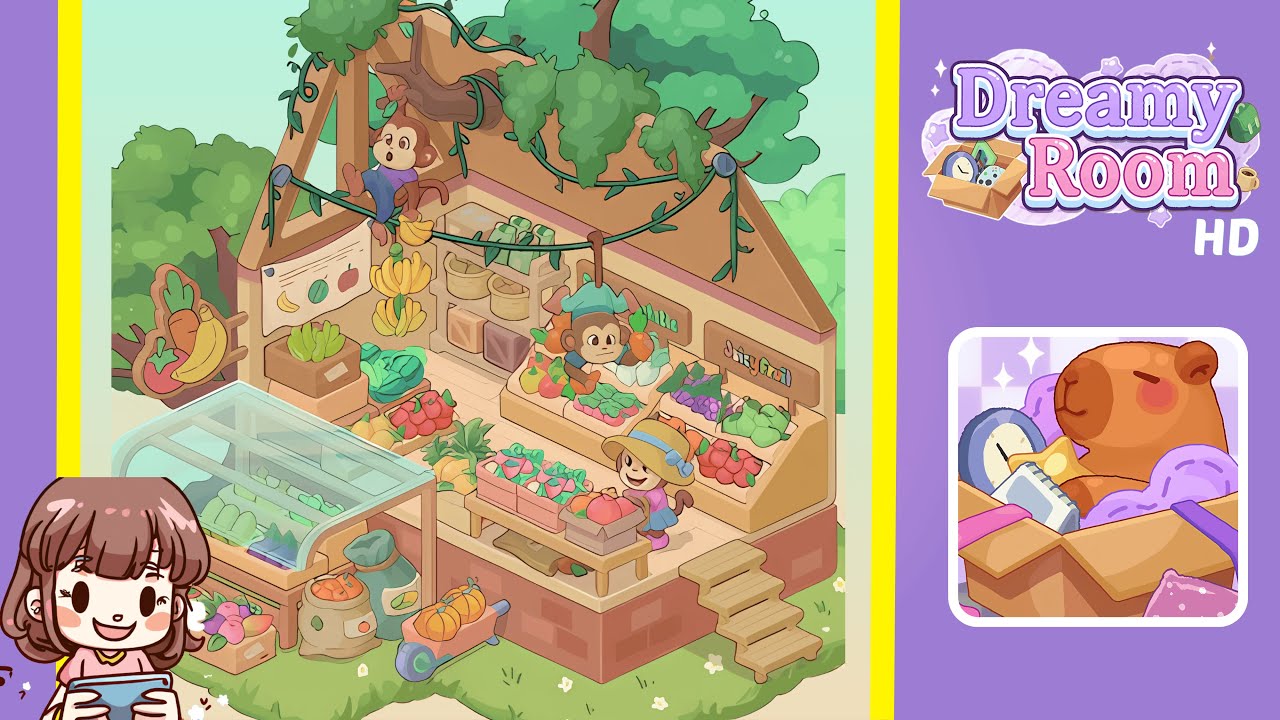
- Start by placing the roof frame and tree integration at the top ridge. Snap the triangular roof frame onto the open front room, aligning the pink ridge with the rear wall’s peak. Pull the big tree trunk through the left roof gap so that a thick branch crosses the ridge line. String the long green vine cable from the left eave to the right eave, ensuring it hangs slightly in the middle. Add leafy clumps around the ridge where the branch passes through. Ensure the vine sits taut across the span for proper placement later.
- Place the stairs, floor zones, and the right display risers. Snap the wooden stairs to the grass on the right edge of the platform, ensuring the top step meets the front floor seam. Drop the large two-tier produce riser just inside the entrance on the right wall with the backboard outward. Ensure the riser’s lower shelf overhangs slightly toward the stairs, creating a gap for small crates. Place the small cashier bench centered behind the front edge, leaving room for a narrow selling table.
- Install the left exterior glass canopy and open-air produce rack. Position the clear glass canopy outside the left wall, with the wooden posts on grass and the curved lid overlapping the floor edge by a tile. Slide the shallow produce rack beneath it, stocked with cucumbers and lettuce. Position a wooden crate of mixed root vegetables and a crate of apples, with a burlap produce sack wedged between the crate stack and canopy leg. Maintain a half-tile walkway between canopy and wall.
- Add interior wall décor, hanging bananas, and upper storage. Anchor the rectangular produce poster to the left interior wall. Beneath, set a low box stand with leafy lettuces, and drop the lidded crate of cabbages. Hang two bunches of bananas from the vine line on the back wall above the risers. Place two wicker baskets and a couple of wooden crates on the top shelf, leaving one crate ajar.
- Position the center selling table, strawberry trays, and under-table storage. Set a narrow wooden selling table just inside the entrance, centered front-to-back. Arrange two pink trays with strawberries on top, leaving a tiny gap between them. Beneath the table, slide two shallow crates with handles facing out. Ensure the table does not block the aisle to the right risers. A faint sparkle will appear when aligned correctly.
- Fill the right risers with fruit and mount the signs. Populate the right risers with red apples, oranges, a tray of green apples/pears, and piles of grapes. Place the green “Vegetable” sign on the upper-left of the riser backboard and the pink “Juicy Fruit” sign on the upper-right. Verify positions to avoid a “category mismatch” flag.
- Place outdoor accents: wheelbarrow, pumpkin bundle, and sack. Park the wheelbarrow with pumpkins on the front-left grass. Drop a burlap sack and lean a scoop against it, and scatter a crate of oranges near the canopy. Keep one tile clear for pathing. Add tiny flowers if decorative flora is available.
- Position the characters: cashier monkey, rooftop monkey, and the customer. Seat the cashier monkey behind the right risers. Place the rooftop monkey on the vine line near the left roof triangle. Add the customer girl at the center table holding a piece of fruit, ensuring alignment for animations to trigger.
- Finalize with the left signboard and greenery. Position the wooden market signboard on the far-left grass and loop an extra strand of vine along the roof edge. Plant shrub tufts behind the roof triangle to complete the scene.
Notes & Precautions
- Most items have micro-snaps. If something won’t place, rotate or reposition until it does.
- Keep a walkable strip between the center table and right risers to allow customer pathing.
- Ensure the “Vegetable” and “Juicy Fruit” signs are on the correct sides to prevent completion errors.
- Make sure hanging bananas clear the cashier monkey’s head to avoid overlap.
- The glass canopy should overlap but not collide with the floor edge to maintain visibility of the crate hotspot.
Tips & Tricks
- Place structures first, then fixtures, decor, and finally characters to avoid replacing items.
- Group similar colored fruits together for better "satisfaction" pings.
- Use the vine as a guide for symmetry with bananas, the rooftop monkey, and leafy clumps.
- Check cursor pathing from stairs to table before adding the customer character.
- After completion, toggle off the UI for better screenshot compositions.