Dreamy Room Level 135 Walkthrough
Welcome to the Dreamy Room Level 135 walkthrough. This guide will assist you in assembling and decorating this whimsical level featuring a two-tiered pastel environment. Ensuring precise placement is key to achieving a harmonious setup.
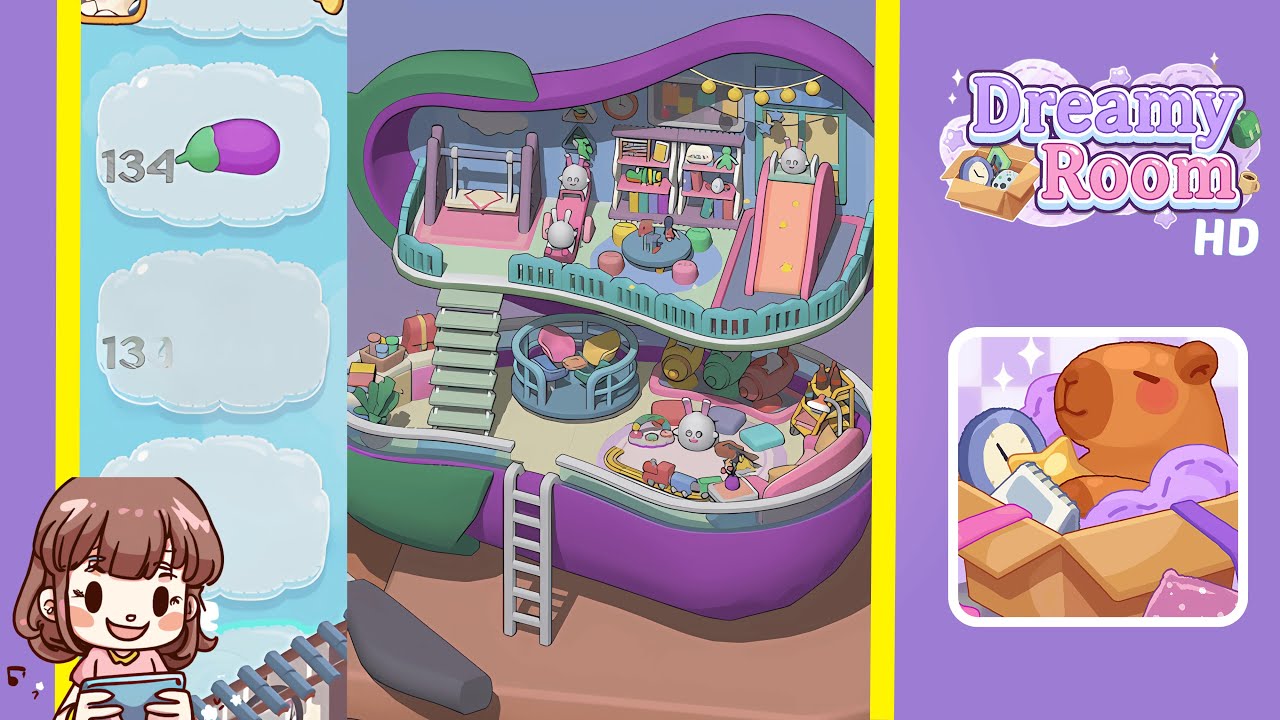
Step-by-Step Guide
- Install the top and bottom shell halves in Dreamy Room Level 135, ensuring they form the iconic purple capsule. Next, place the two mint-green floor panels properly inside each shell half, ensuring no gaps or misalignments.
- Attach turquoise railings around the perimeter of both floors. Begin with the top floor, ensuring each segment snaps securely before moving to the lower level. Position the staircase accurately to connect the floors seamlessly.
- Set up the main furniture on the top floor, positioning the pink swing below the cloud decal, the ride-on toy to the right of the swing, and align the slide on the right with the star decals facing outward.
- Organize the top floor centerpieces by placing the round pastel blue table, stools, shelves, and wall decor carefully. Ensure orientation and spacing avoid any overlaps.
- Complete the top floor with string lights and finishing touches, adding yellow globe lights and refining details around the slide and swing areas.
- Arrange the main bottom-floor furniture including the playpen and cushions, ensuring they align properly under the turquoise railing.
- Add bottom-floor accessories such as hangable containers, books, and plants, maintaining proper alignment and visual flow.
- Create the bottom-floor entertainment zone with a sofa, train set, food platter, and decorative items, ensuring cohesion with the overall theme of Dreamy Room Level 135.
Notes & Precautions
- Align snapping points exactly; use camera angles to ensure proper placement.
- Check floor panel stability regularly to avoid later misalignments and clipping.
- Adjust camera angles often to ensure items don’t overlap or misalign.
- Mind overlapping zones to prevent interference between top and bottom floors.
- Use fine-tune placement tools for precision in positioning objects.
- Rotate items before finalizing to ensure the correct fit without clipping.
- Save progress often to mitigate the absence of an undo feature for major errors.
- Look for hidden interaction points, particularly when placing hanging objects.
Tips & Tricks
- Begin with large structural pieces to anchor the level before adding smaller items.
- Use ghost previews to ensure alignment before finalizing placements.
- Group similar items to avoid misplacement during assembly.
- Arrange accessories prior to placing figurines to minimize disruptions.
- Use keyboard shortcuts for micro adjustments and precision alignment.
- Watch for overlapping snap indicators and adjust accordingly.
- Complete one floor entirely before moving to the next to ensure continuity.
- Keep a reference image handy to maintain accuracy and detail in placement.