Dreamy Room Level 136 Walkthrough
Welcome to the ultimate Dreamy Room Level 136 walkthrough! In this level, you will transform a simple pink-walled space into a cozy, pastel bakery-meets-living-room scene. The main challenge here is determining the correct placement for every object. Follow this step-by-step guide to recreate the exact layout of the final image. Let’s begin!
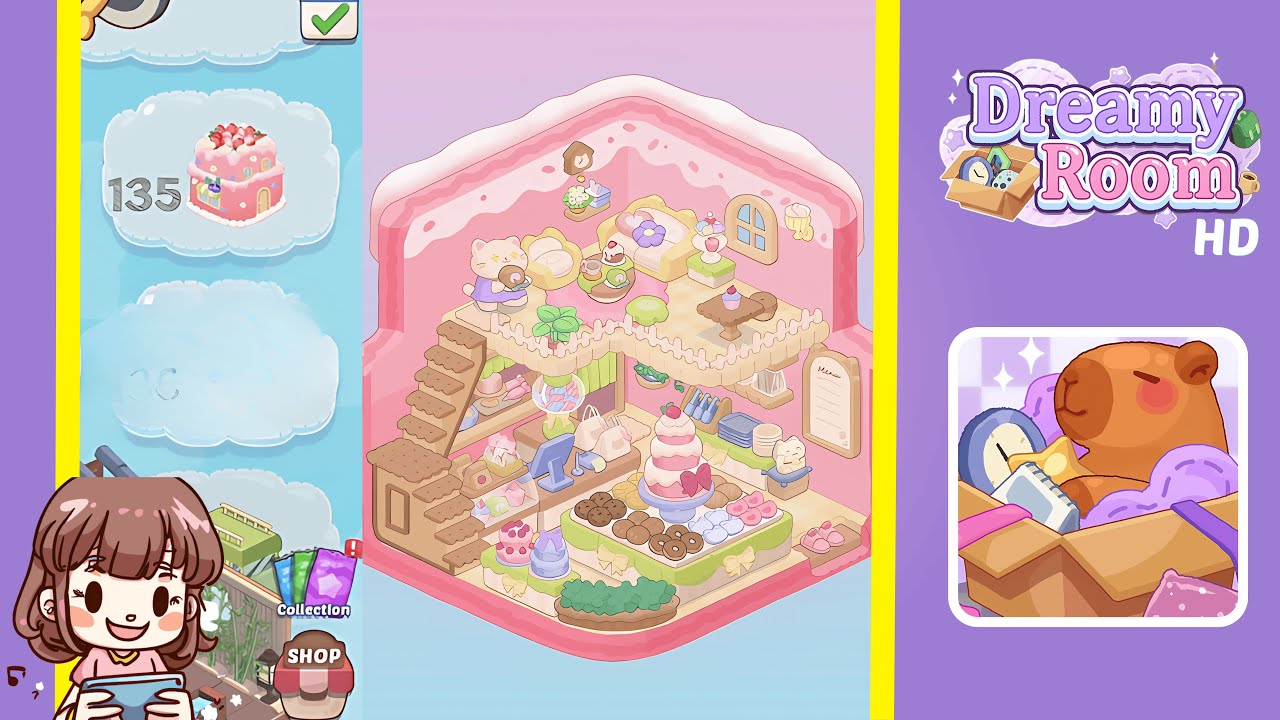
Step-by-Step Guide
- Place the large brown staircase against the left wall with the white picket railing around the upstairs platform.
- Mount the cuckoo clock, floating shelf, window, and ice cream sconce on the upstairs back wall.
- Arrange the plush cat, beige armchair, coffee table, and accessories on the left side of the upstairs.
- Position the yellow daybed, pillows, and teacup tower on the right side of the upstairs platform.
- Add the clover plant and green round rug to the upstairs platform.
- Place the small wooden table with a cupcake on the upstairs right center.
- Place the green curtain and hanging vine under the upstairs platform.
- Add the three blue-handled spatulas and stack of plates on the back wall.
- Mount the triangular pastry display shelf on the back wall right.
- Attach the menu board and small cat figurine on the right wall of the first floor.
- Place the counter under the stairs, with a monitor and payment terminal.
- Add gift boxes, gift bags, and a cupcake display on the counter.
- Position the gumball machine under the stairs.
- Arrange the large tiered cake and assorted donuts on the counter front.
- Place small tiered cakes on the front-left floor space.
- Place pink pastries on the front-right floor space.
- Add the green planter at front center.
Notes & Precautions
- Alignment Precision: Ensure every object's placement is exact to maintain the final aesthetic.
- Object Overlap: Avoid overlapping objects to prevent placement errors.
- Z-Ordering: Maintain the correct layering of objects for visual depth.
- Wall-Mounted Items: Ensure items are flush against the wall to prevent awkward floating.
- Symmetry Checks: Ensure symmetrical objects are equidistant and balanced.
- Furniture Clearance: Ensure the staircase does not crowd the counter.
- Lighting and Shadows: Use different camera angles to confirm natural lighting.
- Patience Is Key: Approach each step methodically to avoid rushed placements.
Tips & Tricks
- Grid Snapping: Activate grid snapping for precise alignment.
- Layer Locking: Lock position of significant items to avoid accidental moves.
- Use Reference Mode: View rooms side by side for accurate object placement.
- Small Increment Nudges: Use arrow keys for fine adjustments.
- Color Palette Matching: Ensure objects blend with the pastel palette.
- Save Frequently: Save your progress regularly to prevent data loss.
- Start with Large Items: Position large structures first, then add smaller items.
- Tidy Up Inventory: Remove surplus décor to speed up object selection.
- Simultaneous Holding: Group small objects for consistent placements.
- Final Walkthrough Review: Rotate the camera to spot any misalignments.