Dreamy Room Level 329 Walkthrough & Guide
Welcome to the walkthrough for Dreamy Room Level 329. Follow these steps meticulously to set up the scene with precision. Each element contributes to the overall ambiance and interactive gameplay of the level.
Step-by-Step Guide
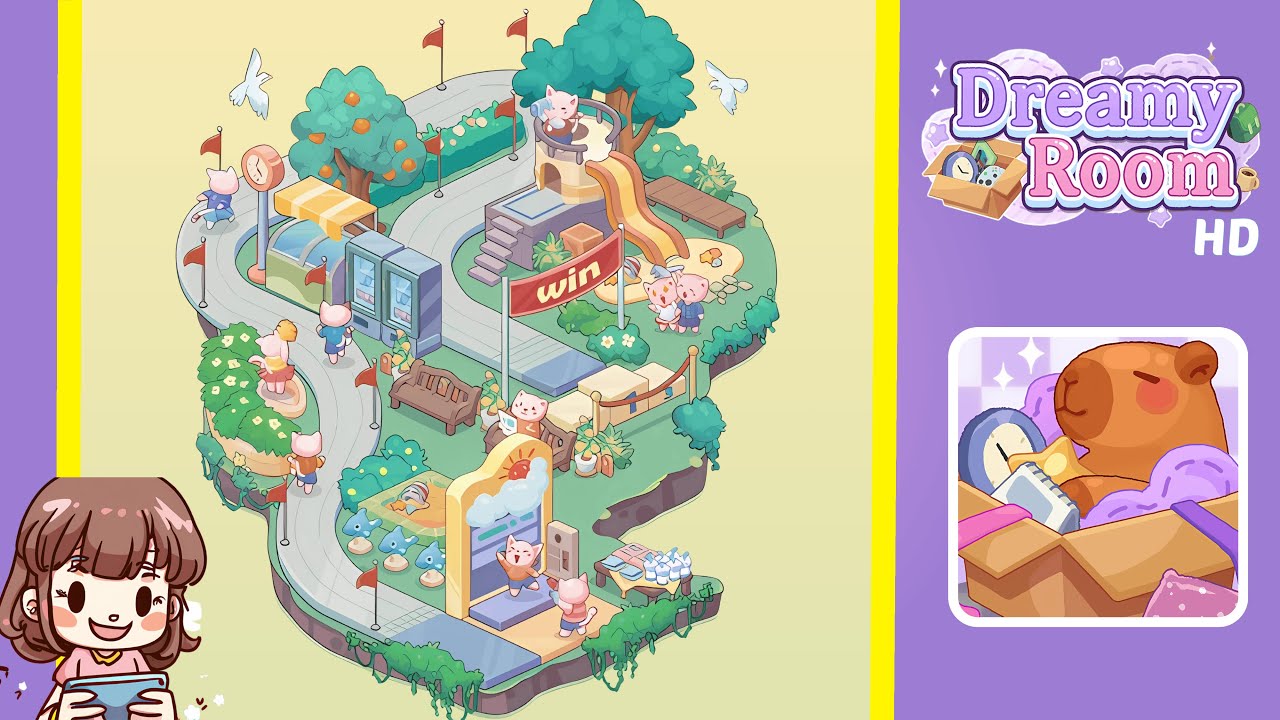
- Start by placing the looping path and flag posts around the island. Lay the pale-gray walkway that loops from the front edge to the far back and around again. Adjust the path slightly inward on the left to create a raised flower knoll, and let it bow outward on the right for the slide area. Insert slender poles with red triangular flags at regular intervals along the curb. Include one near the front-left, one beside the photo arch area, a few along the back straightaway, and one near the right bend. Trim the island edges with dangling green ivy in the front-center and add square pavement tiles at the front-left corner where the path touches the edge.
- Next, place hedges, flowers, and birds for atmosphere. Fill the inside of the track with a neat line of low hedges with yellow blossoms along the back straightaway. Mirror this with a rounded hedge patch on the left-front knoll packed with white-yellow flowers. Tuck small shrub clumps near the front edge under the arch area, and scatter tiny green tufts on the grass. For motion and charm, place two white doves high in the sky area: one upper-left and the other upper-right, both angled toward the central tower.
- Now, place the large trees, central tower, steps, and slide. Plant the orange tree with fruit on the left-back corner just inside the loop and place a broader-canopy green tree on the right-back, slightly behind the tower area. Build the castle-like play tower in the upper-middle-right with stone steps leading up from the center of the island. Add the round balcony on top and attach the curving yellow slide descending into a sandy play pit at the right-middle. Ring the sandy area with a rope barrier and connect a red “win” banner across the path just in front of the pit.
- Focus on the left and place the awning, greenhouse roof, clock, vending machines, and bench. Slide the yellow-and-white striped awning above a curved glass greenhouse roof under the orange tree. Align two gray-blue vending machines to its immediate right, facing the path. Place a round-faced street clock on a tall gray pole to the left of the awning, and add a wooden bench on the inner grass to the right of the vending machines, oriented horizontally.
- At the front-center, place the sunshine photo arch, control box, duck row, toys, and front shrubs. Position the tall sunrise photo arch with a cloud motif flush with the path edge. Attach the small coin/controls box to the right of the arch. On the front-left meadow near the tiles, line up five small blue duck statues like a parade, curving gently with the curb. Between the duck row and the arch, lay a tiny play patch with a striped beach ball and a fish toy half-buried.
- Complete the right side by placing the bench, flowers, leaves, and water table with papers. Position a second wooden bench behind the slide’s sandy pit, parallel to the back hedge. Plant a flower bed with yellow blossoms ahead of this bench. Scatter a few star-shaped fallen leaves on the grass to the right of the slide’s landing area. On the front-right corner, set a service table with bottled water and a small pile of newspapers or brochures.
- Finally, place every character in their exact spots to bring the park to life. Position a cat inside the sunshine arch, a striped-sweater cat at the control box, a confident cat with a megaphone on the tower balcony, and two kittens wearing ribbons in the sandy pit near the slide exit. Seat a tiny cat peeking from the middle steps and position cats along the left path.
Notes & Precautions
- Ensure no bench, table, or machine overlaps the walking surface or the “win” gate.
- The tower and slide must sit slightly right of center to avoid visual collision with the left-side amenities.
- The duck statues must arc along the curb for aesthetic alignment with the island’s curve.
- Characters should not block entrances; keep gaps before stairs and the photo arch.
Tips & Tricks
- Start by anchoring large silhouettes such as trees, towers, and arches. This helps in visual balance.
- Utilize mirroring techniques for better spatial balance between left-side utility and right-side play zones.
- Flags are useful for spacing judgments regarding benches and banners.
- Place doves last to prevent snapping to unintended layers.
- If a character isn't readable, adjust a nearby shrub; storytelling takes precedence.