Dreamy Room Level 169 Walkthrough & Guide
In Dreamy Room Level 169, you begin with an empty isometric space. This guide helps you decorate with precision to achieve the perfect airport vibe.
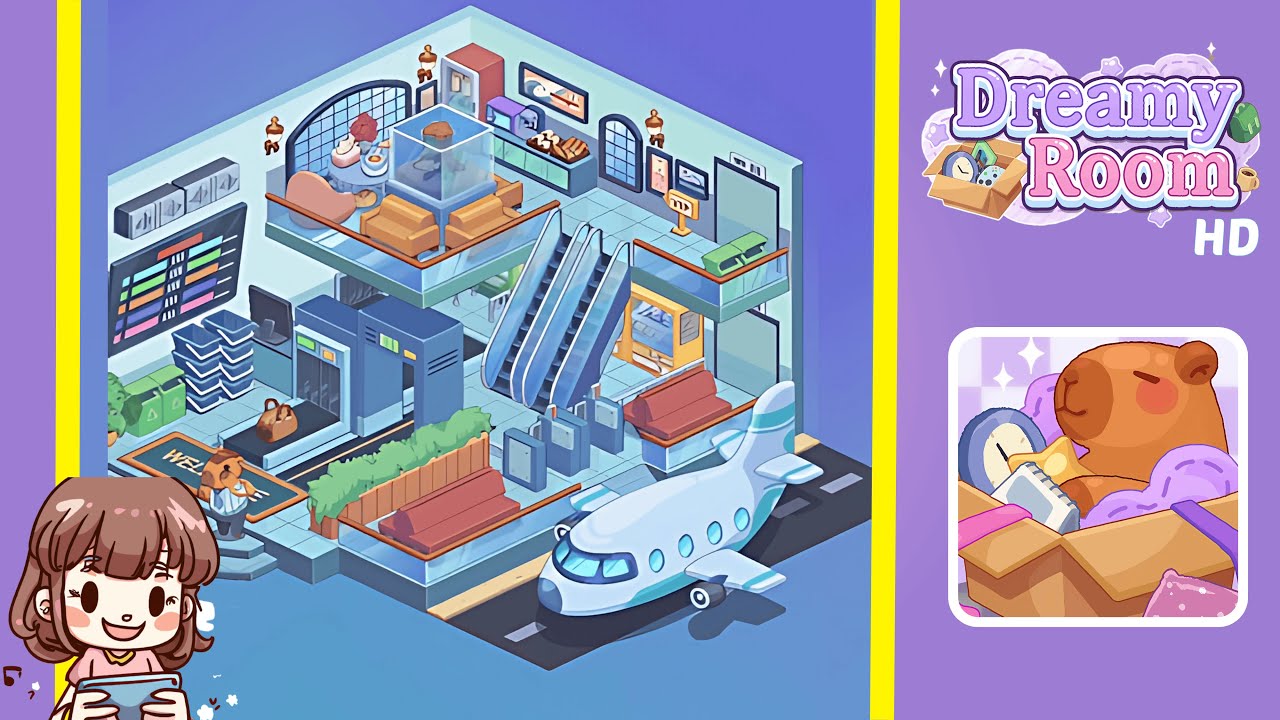
Step-by-Step Guide
- Position three gray rectangular ventilation units evenly along the upper third of the left wall, two feet below the ceiling. Center the large black digital display board beneath these vents, leaving half a foot above the tiled floor. This creates a focal point and sets the foundation for further decoration.
- Place the security scanner in the bottom left third of the floor grid, two tiles from the left wall. The conveyor belt should extend towards the room’s center, with its entrance two grid squares inward. Position a stack of dark gray trays next to the scanner’s exit for optimal flow.
- Enhance the entrance by placing a rectangular WELCOME! floor mat in front of the security scanner, with lettering facing inward. Add a bear receptionist figurine two grid squares to the left of the mat and set a pair of green recycling bins three tiles to the left of the scanner.
- Construct a seating area by positioning the wooden planter partition three tiles from the scanner. Attach a wooden bench to the planter's face, and add two red seating benches on the opposite side, spaced two grid squares apart for balance.
- Install three gray turnstile gates in a straight line at the base of the raised platform. Position twin escalator modules behind the turnstiles, mirrored symmetrically. Place a yellow vending machine against the right wall, two tiles from the escalators.
- On the upper balcony, arrange two mustard-colored sofas facing each other with a two-tile gap. Place a transparent glass fish tank centered in the gap, followed by a round coffee table adorned with a tissue box, coffee, and flower arrangement.
- Set up the refreshment corner by placing a green countertop against the rear wall between two arched windows. Position a refrigerator on the left end of the counter, followed by a coffee machine and microwave. Arrange trays of sushi rolls and bread loaves on the counter.
- Install two golden wall sconces on each side wall. Fit arched windows on both sides, aligning their bases with the walls' stripe band. Position a VIP sign near the right door and place an airplane nose outside the front platform on the runway extension.
Notes & Precautions
- Align objects precisely to prevent clipping through walls.
- Place larger background elements first to avoid occlusion errors.
- Check symmetry regularly for balance.
- Save progress frequently, especially after complex arrangements.
- Ensure sufficient space between items to avoid clutter.
- Use the preview function to check for collisions before finalizing placement.
Tips & Tricks
- Activate grid snap to ensure precise item placement.
- Rotate the view to better judge depth and spacing.
- Group similar items for faster placement.
- Preview item layers to check for hidden props.
- If an item misaligns, reloading a previous save is often quicker than manual realignment.