Dreamy Room Level 180 Walkthrough
Welcome to the walkthrough for Dreamy Room Level 180, a three-tiered space filled with complex design tasks. This guide will lead you through the precise steps needed to complete the level successfully.
Step-by-Step Guide
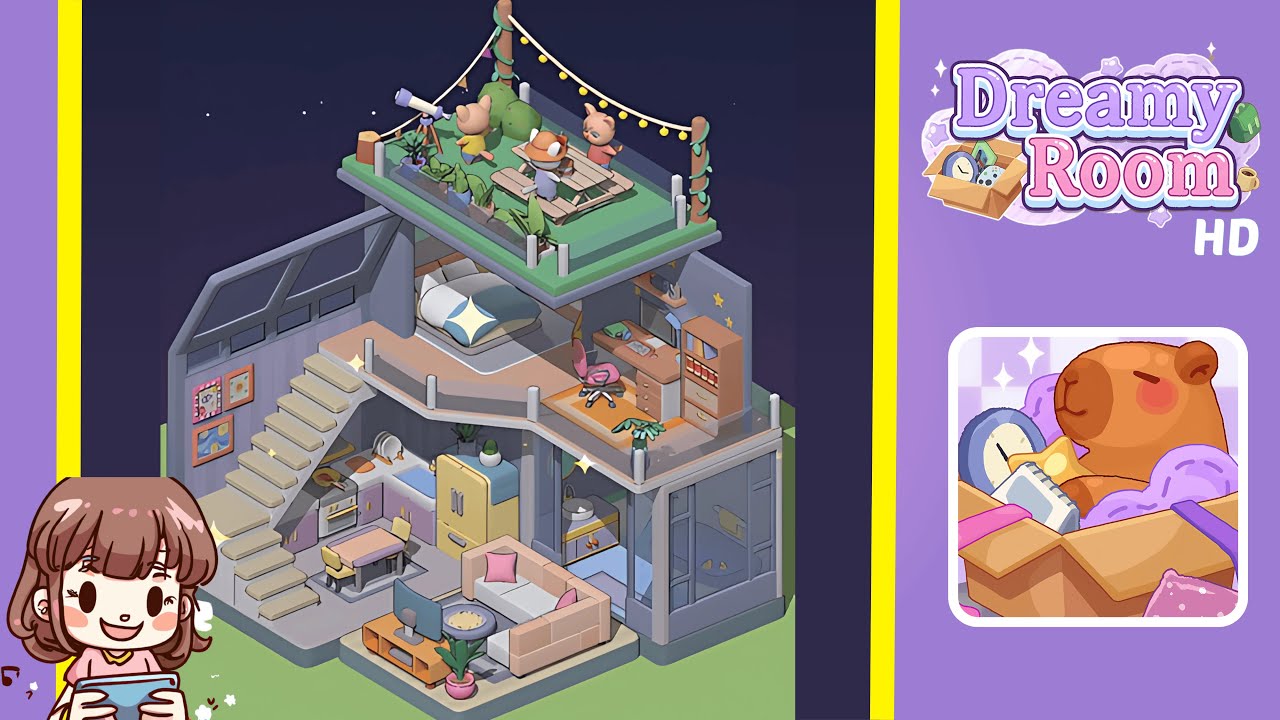
- Place the staircase along the left wall. Position the modular staircase along the bottom-left edge of the main floor platform, ensuring it hugs the front edge of the left panel and each step clicks into place without gaps.
- Install the kitchen sink and countertop under the stairs. Locate the lavender-and-white sink module, fitting it snugly beneath the second and third stair treads. Attach the matching countertop piece to the right, forming a continuous surface.
- Position the pastel yellow fridge to the right of the sink. Ensure the fridge aligns flush with the platform edge and does not overlap with the countertop or sink.
- Add the dining table and chairs on the bottom floor. Place the small pastel dining table with stools on the front-center of the left bottom panel, aligning the legs with the panel's bevel.
- Position the TV stand and television on the right bottom panel. Place the low wooden TV console against the back edge of the right platform and center the flat-screen television on top.
- Place the L-shaped sofa on the bottom floor. Drag the cream-colored sofa to the front-left corner of the right bottom panel, aligning it with the panel edges.
- Arrange the bed on the middle floor. Place the soft-blue-and-white bed module against the left-side back wall, ensuring the headboard touches the grey support.
- Set up the study area with desk, chair, and bookshelf. Position the wooden desk to the right of the bed, tilt slightly for a natural look, and add the chair and bookshelf without overlap.
- Furnish the bathroom behind the middle floor. Position the toilet module and glass shower enclosure properly, with the bath mat outside the shower door.
- Decorate the rooftop terrace. Center the wooden picnic table and arrange five potted plants along the railing. Hang string lights and place a telescope and whimsical cat figurines for decor.
Notes & Precautions
- Always check snap guides before finalizing placement to avoid floating or colliding objects.
- Use the orthographic camera view to verify depth placement.
- Beware of invisible collision zones; test walkability around objects.
- Small angular adjustments during rotation prevent clipping errors.
- Save progress after each major zone completion to avoid loss of meticulous placement.
- If an object refuses to snap, rotate or elevate it slightly to bypass hidden blocks.
Tips & Tricks
- Begin by positioning large structural pieces before adding smaller furniture.
- Enable grid snapping for precise alignment, especially in kitchen and bathroom areas.
- Use the favorites panel to bookmark commonly used items for quick access.
- Mirror-clone items to ensure perfect symmetry.
- Place lightweight decor on the rooftop last to prevent accidental dislodging.
- Map custom camera angles for each floor for quick view switching.