Dreamy Room Level 187 Walkthrough & Guide
Welcome to the immersive world of Dreamy Room Level 187, where your challenge is to meticulously recreate the office space. This guide provides a detailed step-by-step process to help you achieve the perfect layout.
Step-by-Step Guide
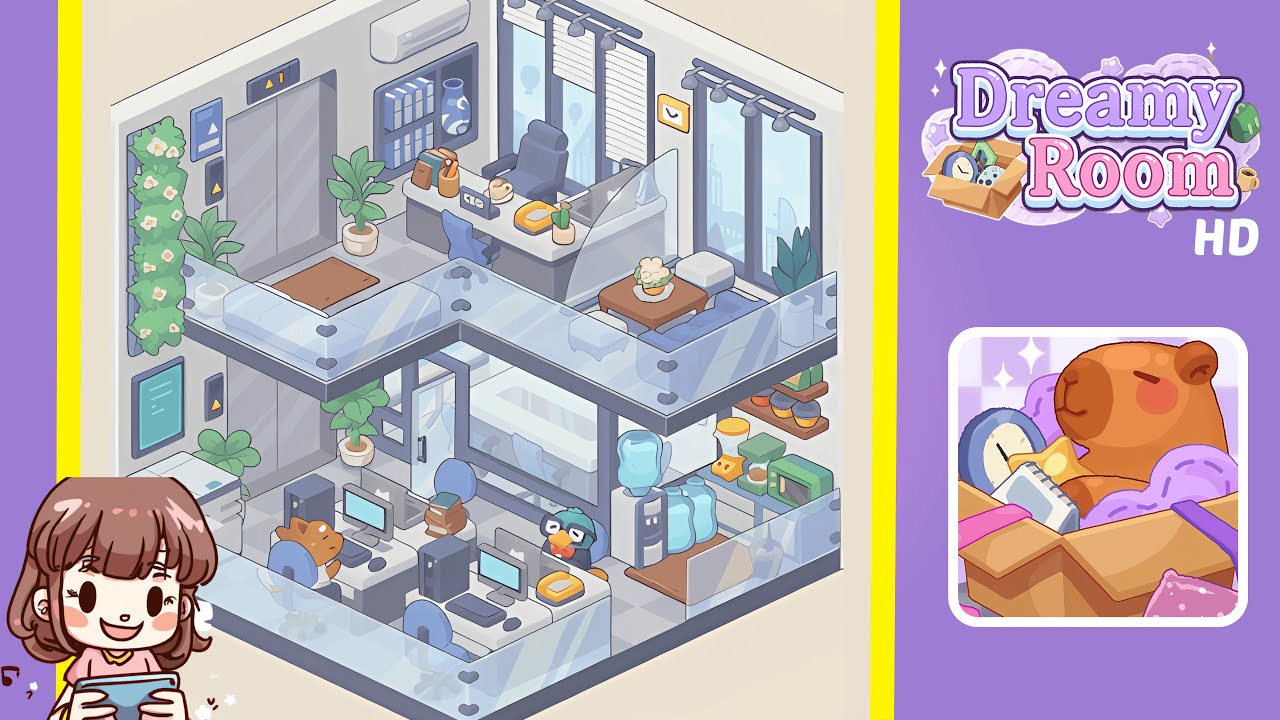
- Place the elevator system precisely on the left interior wall. Align the twin silver elevator doors flush against the left wall tiles, making sure panels match the grid. Above, affix the rectangular floor indicator displaying “1” with its yellow triangle. Install the black button panel (up and down arrows) to the right. On the adjacent left wall, mount the blue-framed notice board at eye level. Lay the rectangular brown doormat in front of the elevator doors and place a small potted plant to the right of the mat.
- Build the glass-enclosed meeting room at the center of the lower level. Set four dark grey metal posts on the floor grid, forming a rectangle. Attach transparent glass panels to each post for seamless walls. Install the sliding glass door with a black handle, ensuring it glides smoothly. Position the white conference table centrally inside, with four light blue swivel chairs evenly around it. Place a potted plant outside the entrance.
- Arrange the workstations, computers, chairs, and character figures on the ground floor. Align two white desks side by side against the front glass railing with a gap between them. Place a blue swivel chair at each desk, facing the meeting room. On each desk, set a black PC tower to the right of the monitor, centering the monitor, keyboard, and mouse in front of the chair. Add a dog figurine on the left desk and a penguin figurine with glasses and a red bowtie on the right desk.
- Set up the kitchenette and hydration station on the right side of the lower level. Position the white water cooler base against the right wall, topping it with a transparent blue jug. Place two extra water jugs on the floor next to it. On the blue countertop, arrange a yellow blender, green coffee grinder, and green microwave. Above, install two wooden floating shelves with three round storage jars. Place a clear plastic cup with a straw near the glass railing.
- Add transparent glass railings around both lower and upper levels. Clip each glass panel segment along the front edge of the lower platform using dark grey corner connectors for stability. Continue this along the left and right edges of the ground floor. Mirror this on the upper walkway, aligning panels and connectors precisely.
- Furnish the upper walkway lounge with a bench, table, and plants. Place the grey cushioned bench against the right walkway’s glass railing. Set a small white ottoman beside it and add a dark wooden square coffee table in front. On the table, arrange a potted plant on a lace doily. Position a tall leafy plant in the far right corner near the windows.
- Decorate the CEO office with a desk, chair, accessories, windows, and lighting. Place the dark grey L-shaped desk beneath the air-conditioning unit on the back wall. Add a high-backed executive chair behind the desk. On the desk, arrange a black “CEO” nameplate, yellow corded telephone, ceramic coffee mug, wooden pencil holder, two upright books, and a small potted cactus. Mount the air-conditioning unit above. Install two tall windows with roller blinds and spotlights on the right wall. Hang a yellow wall clock between the windows and complete the bookshelf with a decorative vase.
Notes & Precautions
- Precision placement is essential to unlock the next level. Objects often snap to an invisible grid, making alignments crucial.
- Check floor tile edges when placing large elements like glass railings or desks to avoid misalignment.
- Zoom in to accurately select smaller accessories such as the miniature cactus or decorative jars.
- There's no timer, so take your time to ensure each item clicks into place with a confirmation highlight.
- Every object carries meaning and must sit correctly to complete the level’s tableau.
Tips & Tricks
- Begin with the largest structural elements like the elevator doors and glass railings.
- Use the zoom function for precise placement of smaller accessories.
- Rotate furniture in 90-degree increments for perfect alignment with the grid.
- Take a mental screenshot of successful layouts before rearranging complex sections to avoid starting over.
- Group similar tasks to maintain a clear workflow.