Dreamy Room Level 177 Walkthrough & Guide
Welcome to the comprehensive walkthrough for Dreamy Room Level 177. This guide will help you transform the empty hexagonal corner into the vibrant party pool scene as depicted in the final image. Every placement in Dreamy Room Level 177 is crucial, with the main challenge of finding the perfect spot for each object. This walkthrough is based on the official Dreamy Room design instructions.
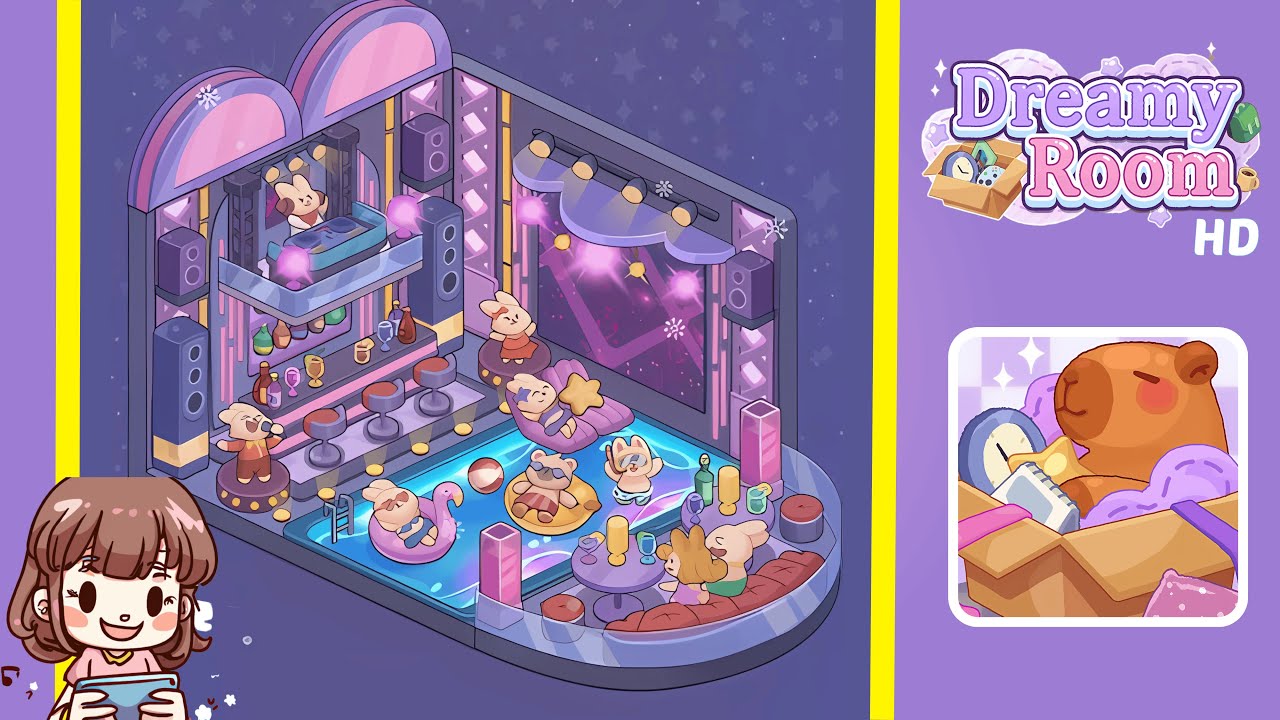
Step-by-Step Guide
- Place the hexagonal floor frame in the corner. Lay down the light-gray border frame, ensuring it aligns perfectly with both walls and the floor seam at the corner. Rotate by 60-degree increments until the edges sit flush against the junction of the floor and walls.
- Position the back corner walls. Attach the pale mauve-colored wall panels with star-patterned wallpaper to the frame edges. Ensure they are perfectly vertical using the alignment tool if necessary.
- Install the twin pastel arches and DJ booth platform. Mount the lavender and pink trim arches on the back-left wall and snap the acrylic DJ platform onto the mid-wall brackets. Align arches with the platform for balance.
- Set up the bar counter and display bottles. Attach the two-tiered bar counter below the DJ platform, and arrange green, brown, and red bottles on the shelves with glasses for an achievement.
- Arrange the bar stools along the counter. Place three round stools evenly in front of the counter, ensuring each stool faces the counter at a 45-degree angle to avoid glitches.
- Position the DJ bunny and singer on pedestals. Place the DJ bunny with headphones on the DJ platform and the singer bunny with a microphone on the bar area pedestal. Ensure proper orientation for achievements.
- Mount the LED screen, truss towers, canopy lights, and speakers. Affix the LED screen, vertical truss towers, pink orb lights, canopy piece, and gray speakers in their designated spots for stability and symmetry.
- Place the shell chaise lounge, dancer bunny, and star pillow. Position the chaise lounge, dancer bunny, and star pillow in the lounge nook, ensuring alignment for the “Cozy Corner” achievement.
- Fill the pool with water, add the ladder, and place floaties with bunny guests. Position water, ladder, and floaties accurately to fit in the space without glitches.
- Set up the seating area with a curved bench and round table. Place the bench and table opposite the bar stools and arrange the bunnies with drinks for a “Friendly Hangout” animation.
- Scatter snowflakes and floating orbs for the finishing touch. Use varying heights and depths to place snowflakes and orbs, ensuring the “Ambient Glow” effect is activated.
Notes & Precautions
- Avoid overlapping large items like the LED screen and arches to prevent glitches.
- Use the alignment grid for precise placement of small accents.
- Check for green snap indicators to ensure objects are correctly aligned.
- Save frequently to prevent loss of progress due to occasional freezes.
- Rotate items incrementally for consistent placement.
Tips & Tricks
- Pre-arrange floating items off-screen to reduce UI clutter.
- Use the “duplicate” feature for batch-placing identical items.
- Enable hidden guide lines for visual harmony.
- Complete related object groups consecutively to trigger achievements early.
- Adjust decorative orbs and floats using keyboard shortcuts to prevent clipping.