Dreamy Room Level 171 Walkthrough & Guide
Welcome to Dreamy Room Level 171. This guide will help you navigate the intricate setup required to complete the level with ease. Follow the step-by-step instructions carefully to ensure every piece is properly placed.
Step-by-Step Guide
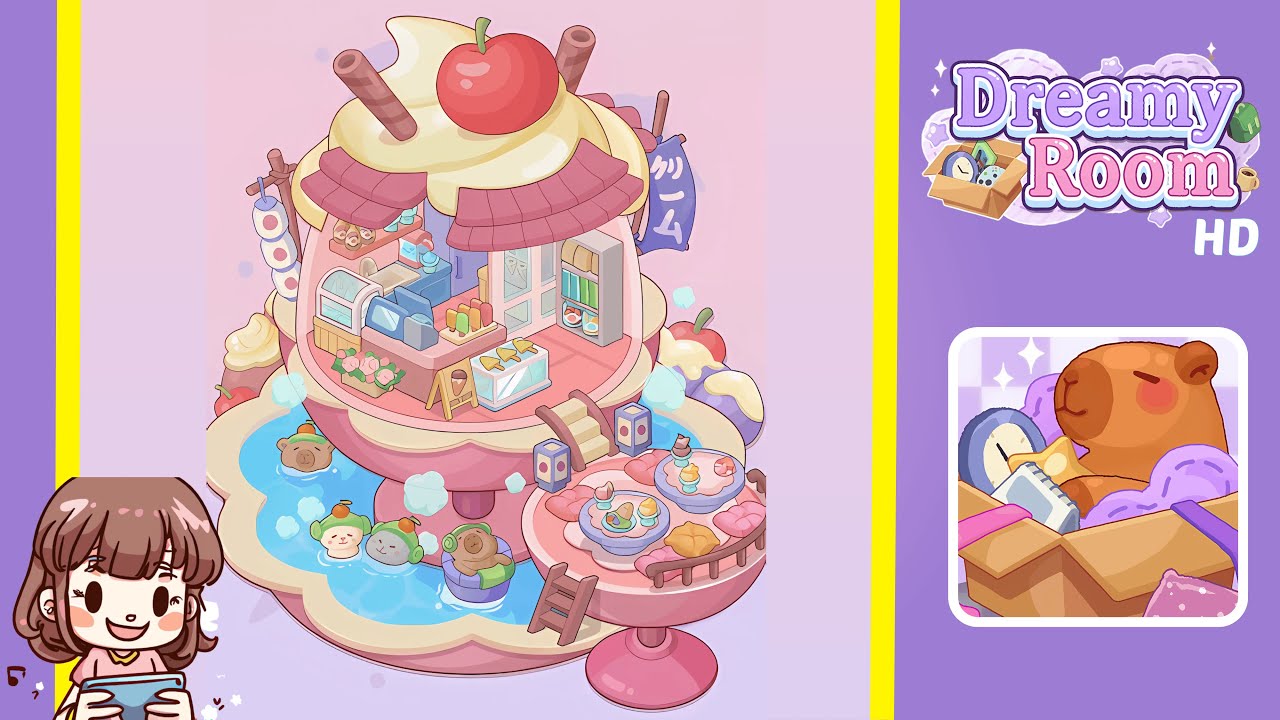
- Place the glass dome, whipped cream swirl, and wafer sticks on the top platform. Begin by selecting the glass dome from your inventory and align it precisely on the pink pedestal. Then, center the whipped cream swirl atop the dome. Finally, insert the wafer sticks into the cream, angled outward.
- Add the cherry and fruit decorations to finalize the top platform. Position the cherry at the whipped cream's peak, nestled between the wafer sticks. Place the apple on the left and the purple fruit on the right of the platform's inner rim.
- Hang the dango skewer and banner to frame the shop entrance. Attach the dango skewer with pastel dumplings to the left interior rim. Then, hang the purple banner on the right, ensuring both elements align.
- Install the awnings and glass doors for the storefront façade. Attach the pink canvas awnings symmetrically below the dome's curve. Secure the glass doors within the vertical guide rails to ensure smooth operation.
- Arrange the display case, register, and popsicle rack in the interior. Slide the refrigerated display case into the left corner, place the cash register beside it, and position the popsicle rack in front for visual appeal.
- Add the triangle dessert stand, flower basket, and signboard to the countertop. Center the dessert stand with cake slices. Place the flower basket on the front-left and the signboard against the right edge.
- Position the tall refrigerator in the right interior corner. Ensure its base is flush against the wall with the glass doors facing outward, displaying the contents attractively.
- Surround the base with water, whipped cream puffs, and animal floats. Apply the water effect evenly, placing whipped cream puffs intermittently. Assign each animal float to its own bay to maintain order.
- Connect the side platform with a ladder and decorative cubes. Position the ladder against the side platform and place two decorative cubes symmetrically at its base.
- Arrange the side pedestal tables with desserts and cushions. Distribute the tables evenly and surround them with alternating pink and yellow cushions.
Notes & Precautions
- The primary challenge is precise placement within boundaries. Utilize zoom and grid snapping for accuracy.
- Ensure transparent elements like the glass dome are above others, and water effects are beneath decorative elements.
- If an item doesn't align, try rotation or slight nudges and check shadow previews for adjustments.
- Watch the rim's color indicator, which turns green upon perfect placement.
Tips & Tricks
- Start with large objects to define the space for smaller decorations.
- Keep the inventory panel anchored for easy access, using keyboard shortcuts for precise movements.
- Adjust lighting to highlight placement guides if necessary.
- Save progress after completing major segments to streamline error correction.