Dreamy Room Level 163 Walkthrough
Welcome to the Dreamy Room Level 163 Walkthrough. This guide provides a detailed step-by-step process to achieve the perfect design layout for Dreamy Room Level 163. Follow these instructions closely to transform your space into a harmonious pastel haven.
Step-by-Step Guide
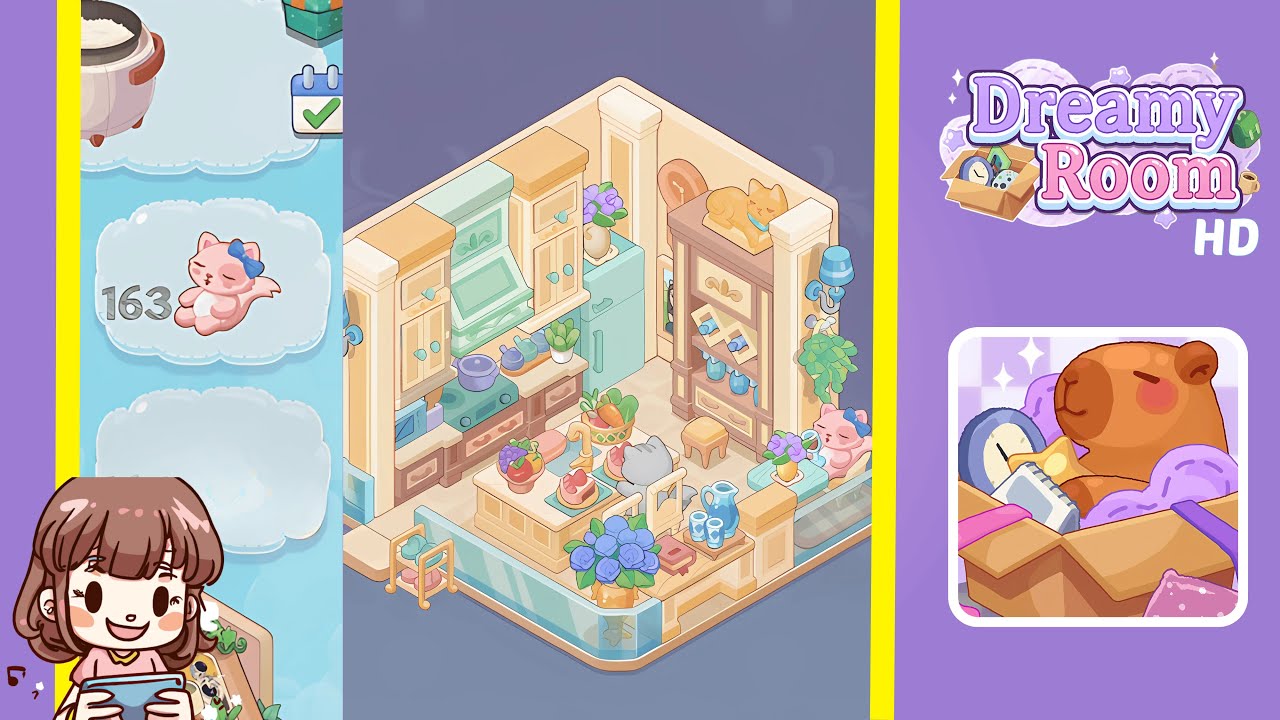
- Position the left tall cream-and-yellow wall cabinet flush with the left wall. Slide it so its edges align perfectly with the corner seam of the beige walls. Then, attach the central cabinet with the mint-green range hood to the right of the first unit, ensuring the molding is seamless. Confirm both cabinets are level and knobs are outward. Toggle the camera angle before locking them into place.
- Focus on the right wall and position the second tall cream-and-yellow cabinet flush with the corner. Place the aqua refrigerator next to it, ensuring the handle is inward and the fridge top matches the cabinet height, leaving a small gap at the base for the floor.
- Under the range hood, place the mint-green stove, centering the burners. Arrange the purple pot on the left burner and two blue teapots beside it. Slide the aqua microwave onto the left lower shelf of the brown cabinets and place the potted succulent beside it. Maintain spacing and orientations for each item.
- Position the wooden brown rack against the right wall. Place the golden cat figurine on the top, the photo slots on the middle tier at a backward tilt, and arrange blue glass bottles on the lower shelf, ensuring the drawer is closed and aligned.
- Center the cream-and-yellow island table over the diamond motif on the floor tile. Install the golden faucet into the sink, ensuring it snaps into place securely. Verify the sink is clear and the faucet rotates smoothly.
- Decorate the island with a fruit bowl filled with grapes and apples on the front-left corner, a vegetable basket behind it, and two slices of pink cake on aqua plates along the right edge. Align each item to maintain balance.
- Add seating by placing the cream chair at the island's near-right side, the gray cat figurine on the opposite side, and the wooden stool under the island's left overhang, adjusting for even spacing.
- Arrange the blue ceramic pitcher and mugs on a wooden tray on the island's front-right corner. Place the yellow vase with purple flowers on the right bench table and rest the red book at the island's front edge. Adjust spacing for a cohesive look.
- Clip the left blue wall sconce to the left wall panel and mirror this on the right. Hang the green potted plant beneath the right sconce, and place the framed picture between the fridge and shelf. Ensure all align symmetrically.
- Position the large yellow vase with blue roses at the room's front center, near the glass railing. Angle the bouquet slightly toward the island and adjust blossoms for a natural spread. Survey the entire layout for a harmonious composition.
Notes & Precautions
- Accuracy is crucial; all objects must snap perfectly into place. Look for outlines or glows for valid points.
- Avoid overlapping items. Use undo and reposition tools if necessary. No timer is imposed, so take your time.
- If items do not snap, rotate the camera to find hidden anchors. Manually save progress as the game does not autosave.
Tips & Tricks
- Start with larger furniture to anchor your layout, then proceed to smaller accessories.
- Use camera controls to discover hidden snap points and adjust item orientation early to save time.
- Group colors for harmony—greens near the stove, blues on the shelf, yellows with vases.
- Use the quick-slot toolbar for one-click placements and practice in sandbox mode to perfect your layout.