Dreamy Room Level 4 Walkthrough
Below is a comprehensive walkthrough for Dreamy Room Level 4, guiding you from an empty space to a fully decorated, cozy kitchen scene. The main challenge is figuring out the precise placement of each object, so follow these steps carefully. Each item must be placed exactly as described for a perfect completion.
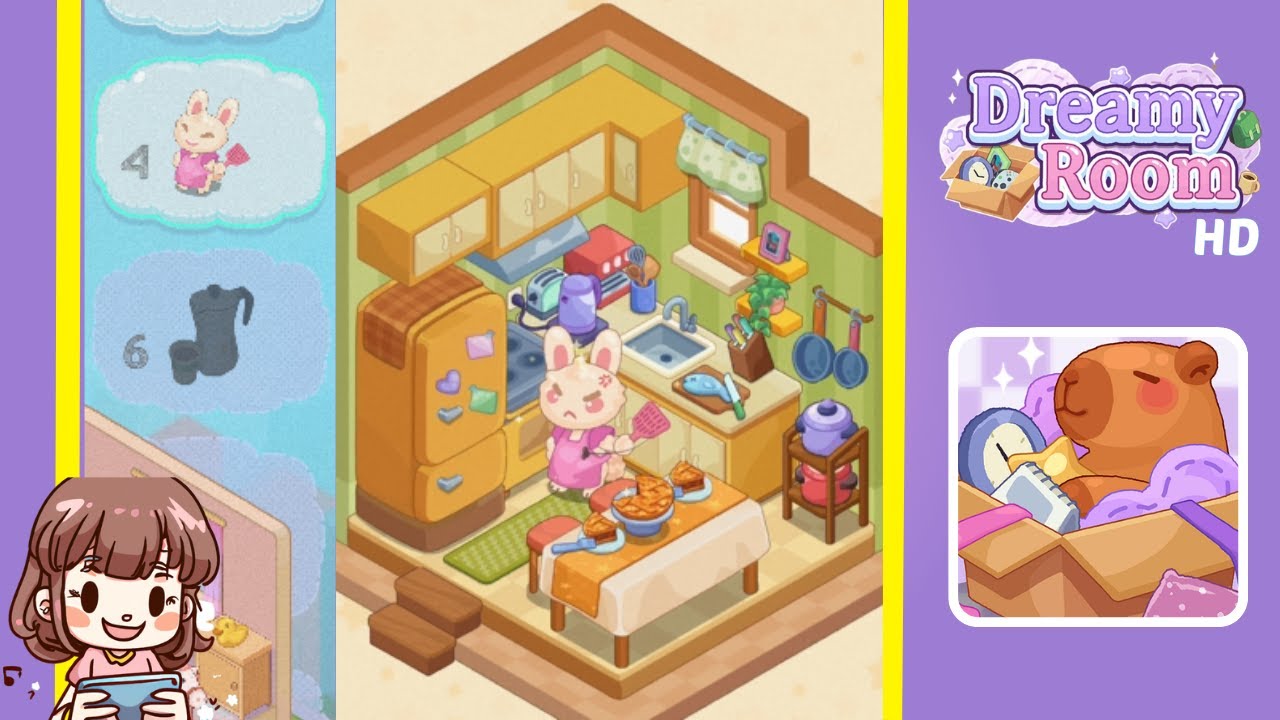
Step-by-Step Guide
- Place the Fridge in the Left Corner: Position the large, orange refrigerator against the left wall, flush with the corner. Ensure the fridge door faces inward toward the room. Attach colorful notes or magnets to the fridge door.
- Install the Overhead Cabinets Above the Counter: Directly to the right of the fridge, install the row of yellow overhead cabinets along the top portion of the wall. Proper alignment is crucial for the rest of the kitchen setup.
- Set the Counter, Sink, and Stove Beneath the Cabinets: Place a continuous counter under the overhead cabinets, leaving room for a built-in sink in the middle. Add a stovetop with a frying pan on the far right section of this counter. Ensure accurate placement to fit other items.
- Add the Window and Short Green Curtain: Above the sink, position the small rectangular window. Attach a short green curtain on top to match the wallpaper, leaving wall space on the right for hanging utensils.
- Hang the Utensils on the Right Wall: On the right side of the window, hang a small rack of cooking utensils, including a spatula, a ladle, and a frying pan or pot lid. This utilizes available wall space efficiently.
- Position the Table and Tablecloth in the Center: Place a rectangular table with a white or cream-colored tablecloth in the center of the room, ensuring enough space on all sides for your character, the pink bunny.
- Arrange the Bowls and Serving Dishes on the Table: Place multiple bowls and a large serving dish on top of the table. Precise placement completes the cooking and dining theme.
- Include the Bunny Character (Optional Decoration): Add the pink bunny character in front of the table, holding a spatula. This whimsical figure enhances the room's final scene.
- Place the Rice Cooker (or Teapot) and Plant on the Right Side: To the right of the stove area, set a small counter or stand holding a rice cooker or teapot. Place a green potted plant near the wall, close to the window.
- Final Touches: Rugs, Floor Mats, and Tiny Details: Put a small rug or mat in front of the sink to tie the color scheme together. Double-check each item’s location for perfect accuracy.
Notes & Precautions
- Accurate Placement: Misaligning the sink or stove can prevent other objects from fitting.
- Object Overlaps: Avoid overlapping items like the fridge and the cabinets to prevent completion issues.
- Cabinet Installation: Place overhead cabinets before adding the counter and sink for correct alignment.
- Save Frequently: Save your game progress to prevent losing your layout.
Tips & Tricks
- Preview the Layout: Zoom out to visualize how each piece fits, speeding up success.
- Rotate Items: Some objects can be rotated for better alignment in tight spots.
- Use the Grid: Utilize the grid or snapping mechanic to avoid uneven gaps.
- Decorate in Layers: Start with larger items, then move to smaller decor for simplified placement.