Dreamy Room Level 132 Walkthrough
Navigate the intricate details of Dreamy Room Level 132 with this comprehensive guide. Follow each step carefully to create a stunning layout that combines functionality with decorative flair.
Step-by-Step Guide
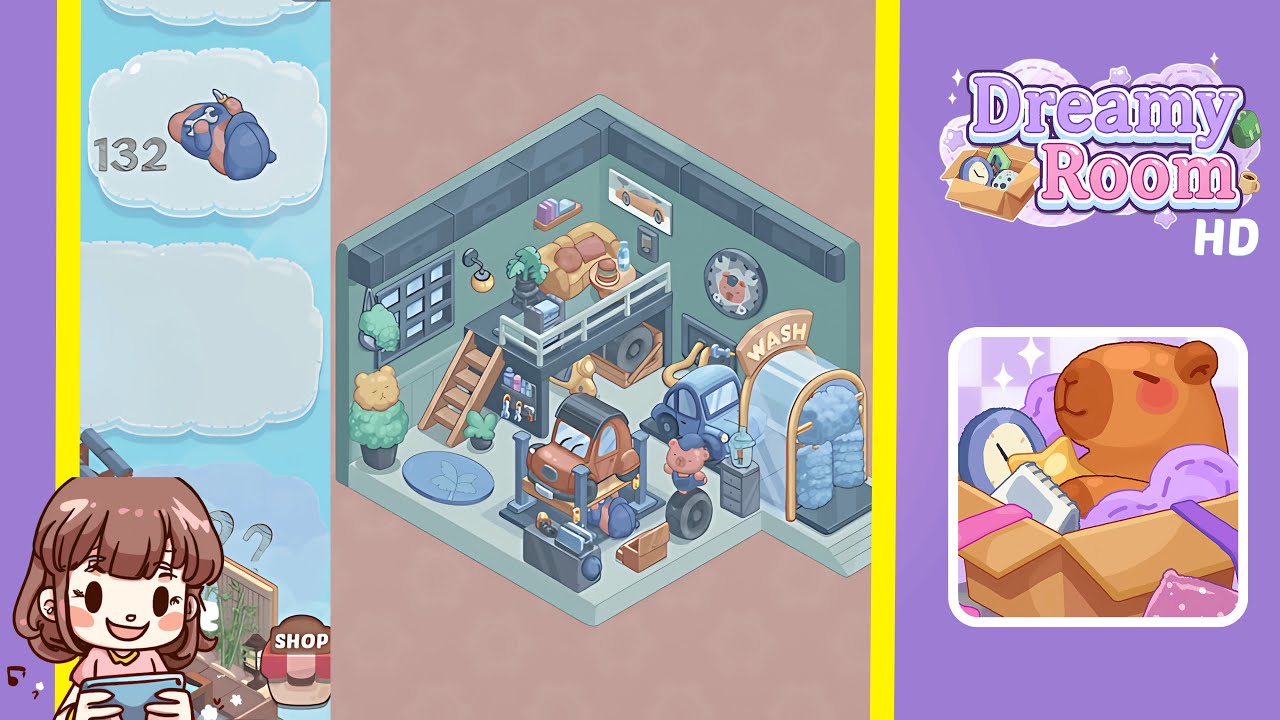
- Place the loft platform against the left wall. Begin by dragging the loft platform base from your inventory and position it flush against the left wall of the room. Align the platform’s support columns equidistant from the corners, ensuring the built-in railing faces inward. If the snap guide doesn't appear, adjust slightly until you see the green outline.
- Place the ladder, mat, and topiary. Snap the wooden ladder to the platform rail’s front edge. Position the butterfly-patterned floor mat on the ground to the left of the ladder. Set the two-tiered topiary in the back-left corner, ensuring the yellow-flowered top is above the green foliage layer.
- Place the plush couch, potted fern, and book stack on the loft. Drag the golden couch onto the loft platform, aligning it with the back railing. Place the potted fern to the left of the couch and the stack of pastel books to the right, slightly overlapping the couch seat.
- Arrange the wall art, clock, lamp, and hanging plant. Snap the orange sports car poster to the right wall at eye level. Place a black-framed photograph beneath the poster. Align the industrial clock above the doorway. Attach the hanging lamp above the window grid and snap the trailing vine planter into the window’s leftmost pane.
- Set up the workshop bay and mechanic figures. Snap the hydraulic lift platform under the loft, centering it horizontally. Position the orange hatchback car onto the lift. Place the mechanic doll under the car. Position the blue compact car beside the hatchback, with a black tire upright in the gap and a brown toolbox in front. Add the silver air compressor beside the toolbox.
- Install the car wash arch and final touches. Position the golden wash station arch on the right side, aligning its base with the entrance steps. Snap each foam brush cylinder correctly. Place the transparent water dispenser to the right of the arch and clip the curly yellow hose behind the blue car into the dispenser spout.
Notes & Precautions
- Watch for green snap indicators; misaligned pieces can block progress.
- Rotate objects fully before placement to engage hidden snap points.
- Avoid overlapping zones, as furniture and décor cannot share grid cells.
- If an item doesn’t snap, check adjacent objects for encroachments.
- Save frequently as you place key pieces to avoid accidental resets.
Tips & Tricks
- Complete the loft and wall décor first to avoid camera angle issues with floor items.
- Use the rotate command to preview hidden snap hooks before final placement.
- Utilize the quick save feature to test multiple layouts and compare visual effects.
- High-contrast grid mode assists in aligning complex objects like the car lift and wash arch.