Dreamy Room Level 151 Walkthrough & Guide
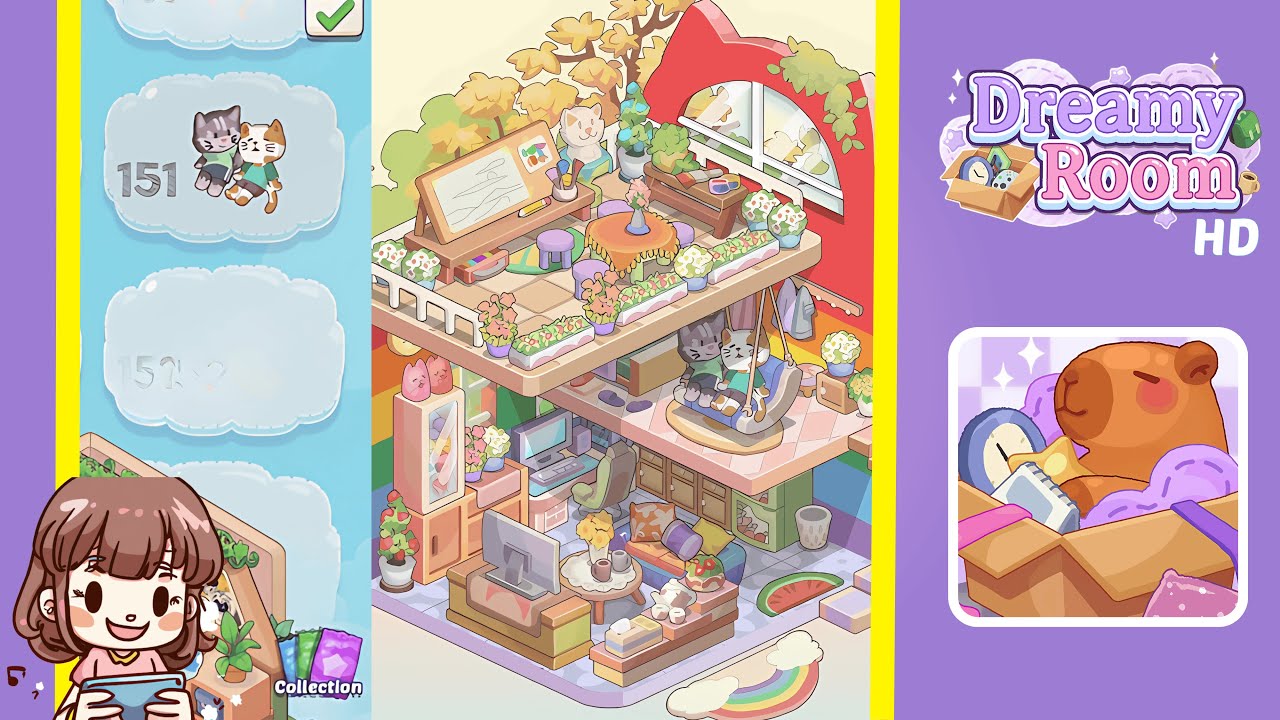
In Dreamy Room Level 151, you will create a vibrant, two-tiered sanctuary imbued with pastel charm and botanical accents. The challenge lies in the precise placement of objects, starting with foundational rugs that define the spatial layout for the entire room decor.
Step-by-Step Guide
- Place the watermelon slice rug and rainbow cloud rug on the floor. Begin by positioning the watermelon slice rug on the patterned tile in the lower right corner of the base area. Align its curved edge with the rainbow stripe wall. Next, position the whimsical cloud and rainbow runner rug under the future staircase location, ensuring the edges align with the grout lines.
- Place the rainbow staircase against the right wall. Select the cube-style rainbow staircase and set it against the right wall, aligning the bottom step with the grout line matching the watermelon rug. Ensure the stairs rise evenly toward the upper deck without overlapping future planter boxes, keeping the half-circle window unobstructed.
- Place the hanging swing with two cat figures near the staircase base. Attach the cozy double swing to the underside of the upper platform, right of the staircase base. Hang it at a height where the cat figurines sit comfortably without touching the floor or planter ledge.
- Arrange the rectangular planters and potted flowers along the upper deck perimeter. Space six white rectangular flower planters evenly along the top deck's front edge, filling each slot with white blossoms with red centers. Intersperses taller purple-flowering pots between planters, leaving gaps to prevent leaf overlap.
- Position the drafting table, wooden bench, art supplies, and cat plush on the top deck. Place the large wooden drafting table along the left side of the upper platform, and slide the matching bench behind it. Arrange art supplies on the tabletop, tucking a white cat plush under the table's left edge.
- Place the round table with cloth and purple stools on the top deck center. Position the circular orange table with a fringed cloth slightly right of center on the upper platform. Set four purple stools evenly around the table, placing a bud vase with pink flowers at the center.
- Place the fridge cabinet, bunny jars, rose plant, computer desk, and gaming chair on the lower left. Position the pastel pink and white fridge in the back-left corner under the deck, adding two ceramic bunny jars on top. Place a tall potted rose bush next to the fridge. Arrange a vintage computer desk and gaming chair at a slight angle.
- Place the TV stand, sofa, coffee table, tea table, coat rack, and side table on the lower right floor. Set the modern TV stand against the bottom-central wall, followed by the sofa to the right. Position the coffee table in front of the sofa, and the tea table with flowers to the left. Add a coat rack under the overhang and a side cabinet nearby.
Notes & Precautions
- Attention to alignment is crucial; misplaced rugs or planters can prevent other objects from snapping into place.
- Double-check that base rugs and staircase risers align with grout and stripe patterns before moving on.
- Position hanging swings and heavy items carefully to avoid clipping through adjacent objects.
- Place small item clusters gently, one at a time, to prevent accidental resets.
- There is no undo button for snapped placements; corrections must be made manually.
Tips & Tricks
- Start from the top deck and work downward to ensure clear placements later.
- Prioritize staircase and foundational rugs to set spatial reference points.
- Use gridlines and stripe divisions to snap items precisely.
- Nudge objects gently against neighbors for alignment rather than rotating them.
- Avoid placing objects too close to the half-circle window to ensure proper furniture placement.
- Group decorative items by color palette before placement for aesthetic consistency.
- Preview placements with a rotatable camera view to catch unseen misalignments.