Dreamy Room Level 155 Walkthrough
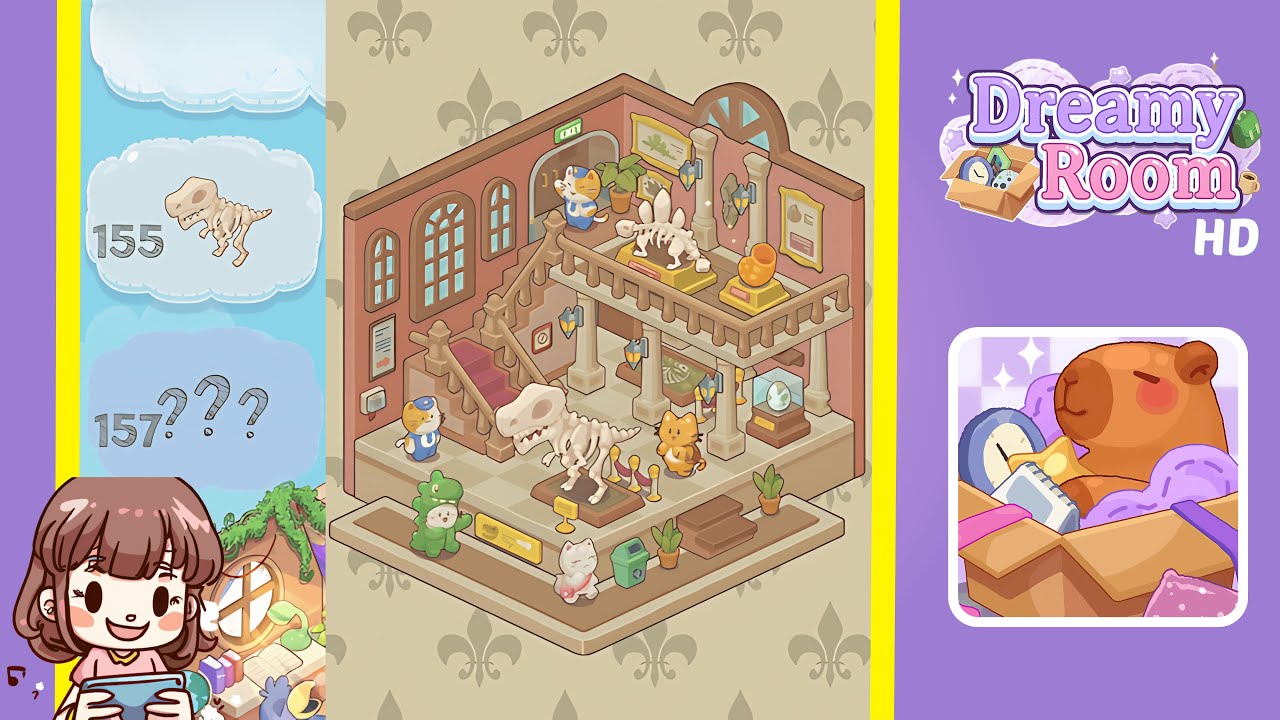
Welcome to the Dreamy Room Level 155 walkthrough, where you will meticulously design a two-tiered museum room using an isometric grid layout. Follow each step carefully to create a visually stunning space filled with prehistoric wonders and charming details.
Step-by-Step Guide
- Place the windows on the walls. First, select the tall, multi-pane arched window and position it flush against the left wall, three grid squares from the lower front corner. Next, place the narrower, rectangular window to the right of the arched window with one grid square between them. Finally, set the semi-circular transom window centered on the right wall, two grid squares down from the top edge.
- Place the exit sign above the doorway. Select the illuminated green and white "EXIT" sign and position it centered horizontally above the double-doorway opening on the upper left wall.
- Place the staircase on the left side. Select the tan-wood stair unit with a red carpet runner, aligning the bottom step with the front edge of the lower platform, two tiles in from the left corner, leading up to the upper veranda.
- Place the pillars and veranda railings. Position four ivory-stone pillars evenly under the upper veranda, two at the front and two at the back. Attach matching wooden balustrade pieces along the balcony edge to form the railing.
- Place the wall lamps. Attach two wall-mounted lanterns on the left wall, one above the midpoint between the windows and the other under the upper veranda. Place two matching lamps on the right wall, evenly spaced between the semi-circular window and the corner pillar.
- Place the T-Rex skeleton and rope barrier. Position the T-Rex skeleton on a brown pedestal in the center of the lower platform, then arrange four posts with red velvet ropes around it.
- Place the Stegosaurus skeleton and snail shell. Position the Stegosaurus skeleton on a golden pedestal on the upper veranda, leaving one grid square on each side. Snap the spiral snail shell onto its pedestal to the right of the Stegosaurus.
- Place the display case and framed fossils. On the lower platform, place a glass display case with a dinosaur egg inside, one tile right of the supporting pillar. Mount the framed fossils on the right wall, aligning them with the wall pattern.
- Place the directional sign, recycling bin, and small plant. Position the yellow directional sign, green recycling bin, and small plant along the front edge of the lower platform, ensuring equal baseline alignment.
- Place all cat figurines around the room. Position the cat guard in a blue uniform inside the exit doorway on the upper level and the orange-striped cat to the right of the T-Rex skeleton. Place the green dinosaur-costume cat to the left of the T-Rex and the white cat with a pink purse near the recycling bin, all facing main exhibits.
Notes & Precautions
- Grid Alignment: Use the grid overlay and zoom to avoid half-tile errors.
- Layer Order: Place background elements before foreground items to prevent overlap.
- Object Rotation: Rotate objects only when necessary to maintain alignment.
- Snapping Sensitivity: Move objects slowly and watch the preview for precision.
- No Undo Limit: Feel free to backtrack with unlimited undos for perfect placement.
Tips & Tricks
- Grid Shortcut: Press “G” to toggle the grid overlay quickly.
- Grouping Saves: Group similar objects in inventory to place multiple items efficiently.
- Snap Radius Adjustment: Adjust snap sensitivity in settings for finer control.
- Preview Camera: Use the free-camera preview to check for overlaps before finalizing.
- Batch Placement: Place all floor décor, then add main exhibits to avoid layer confusion.