Dreamy Room Level 159 Walkthrough & Guide
Dreamy Room Level 159 is part of the Dreamy Room series, where players unpack memories and craft inviting interiors. Dreamy Room is more than a game; it’s a heartfelt journey that reminds us of the beauty in life’s quiet, ordinary moments.
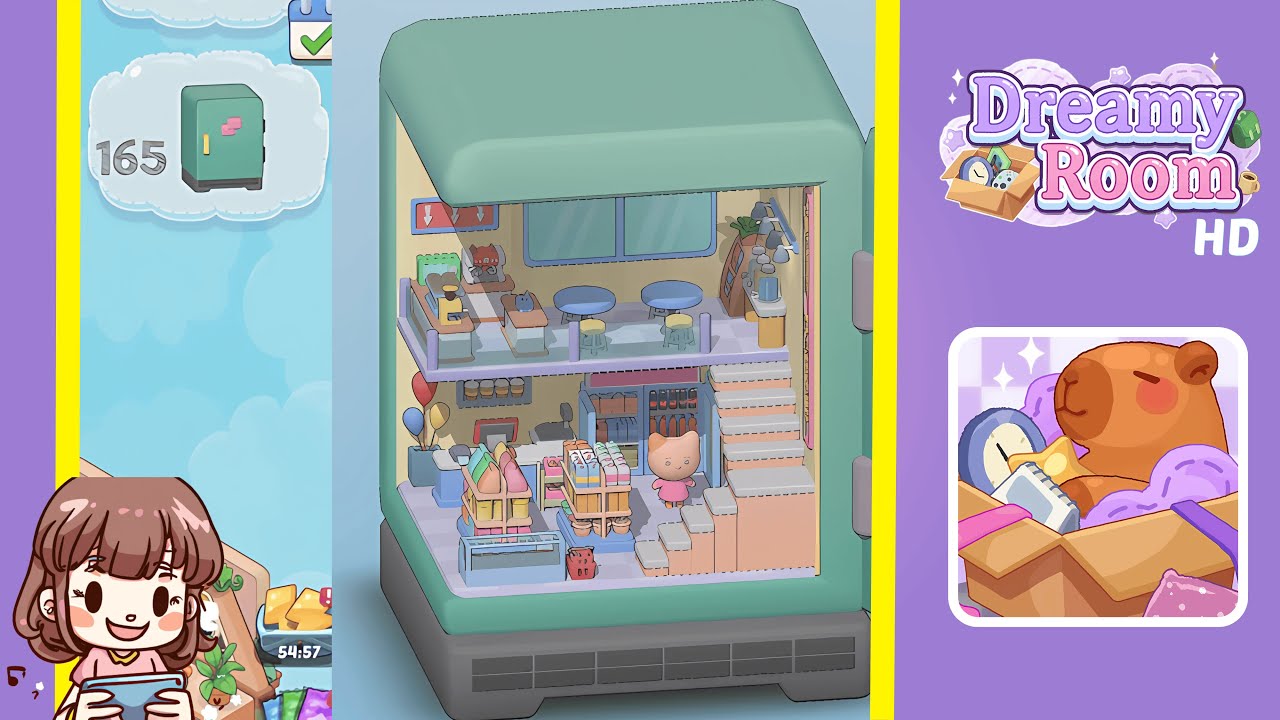
Step-by-Step Guide
- Place the “Super Market” neon sign on the right wall. Carefully align the signature piece with the beige wall corner where the staircase will connect. Ensure it snaps into place for the cozy mini-market ambiance.
- Place the pastel peach staircase on the right floor. Align the base with the floor grid under the neon sign to ensure stability and unlock new snap points.
- Place the purple-mezzanine railing on the second floor. Start from the staircase landing and work toward the left wall, clicking each post into the floor slots.
- Place the coffee machine, grinder, and green storage box on the mezzanine counter. Align the assembly with the counter for a balanced and functional appearance.
- Place the pastry platter next to the coffee machine on the mezzanine. Ensure it fills the gap between the espresso machine and the railing, sitting flush with the countertop.
- Place the large window on the back wall of the mezzanine. Center the assembly just above the platform floor, ensuring alignment with the wall panels.
- Place the row of track lights above the mezzanine. Position the metallic rail under the ceiling, angling lamps to highlight key zones.
- Place two round tables and matching stools on the mezzanine floor. Position tables and stools to create a natural flow and prevent clipping.
- Place the tall jar shelf with a plant on the mezzanine corner. Secure the shelf in the floor slots and place the plant on top for a stable fit.
- Place the cluster of three balloons in the left corner of the ground floor. Click the stems into the slot to maintain the desired height without blocking views.
- Place the blue-and-white checkout counter on the left side of the ground floor. Snap it into the wall groove with the payment terminal facing outward.
- Place the first wooden display rack with pastel bag products in the center of the ground floor. Center the rack on the platform for neatness and to open slots for the second rack.
- Place the second wooden display rack with colorful carton products next to the first rack. Align bases to sit parallel, grouping similar colors.
- Place the refrigerated beverage fridge under the mezzanine near the back wall. Slide the base into the groove and click the glass doors in place.
- Place the small cat figure next to the fridge on the ground floor. Position it to face the display racks, ensuring no clipping.
Notes & Precautions
- Precision is crucial. Misaligning can cause items to overlap or float.
- Check for highlighted slots before placement to ensure accuracy.
- Avoid placing heavy objects first to prevent snapping issues.
- Be mindful of the interactive grid’s sensitivity to drag direction.
- Adjust the camera angle to locate hidden snap points and ensure proper placement.
Tips & Tricks
- Start with large structures like the staircase for a stable coordinate grid.
- Toggle the snap-to-grid feature for precise decoration placement.
- Use the shadow-casting preview for clear object positioning.
- Memorize slot positions for faster completion as they remain consistent.
- Zoom out when placing transparent objects to achieve precise alignment.