Dreamy Room Level 149 Walkthrough & Guide
Welcome to the Dreamy Room Level 149 walkthrough, where you will transform an empty layout into a charming miniature medical suite. Follow each step carefully to ensure precise placement of every item, creating a cohesive and balanced design.
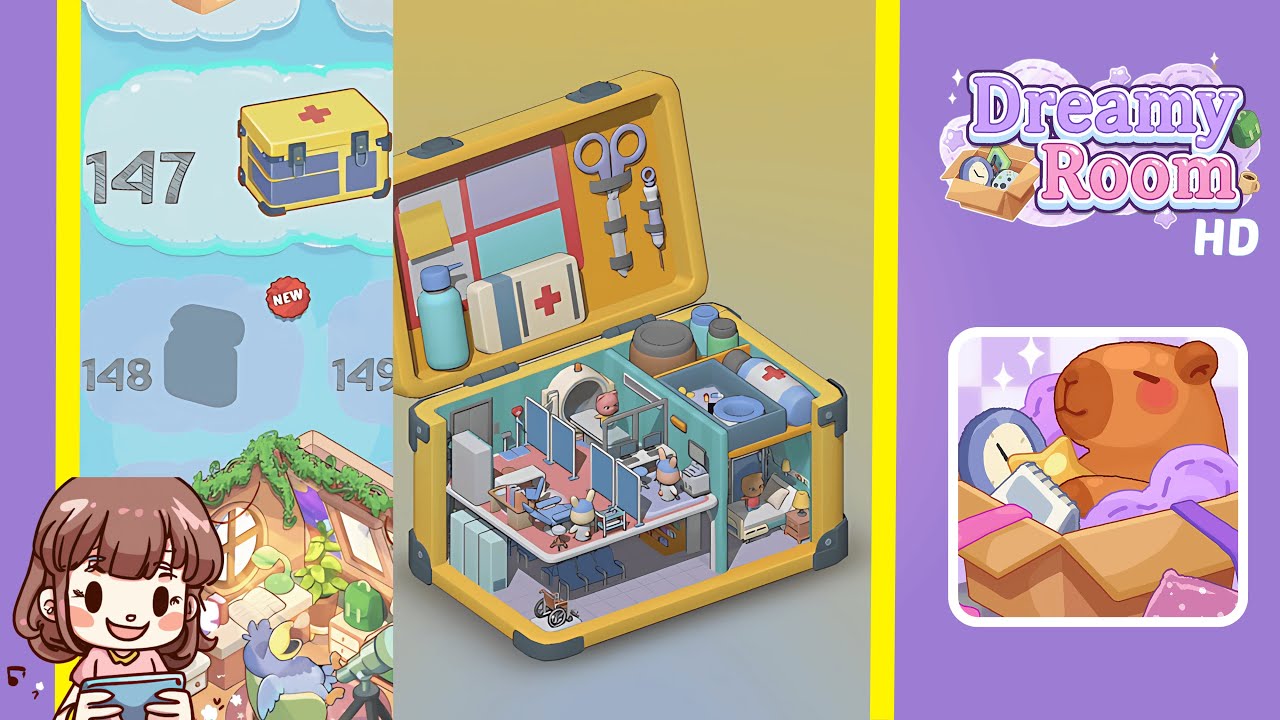
Step-by-Step Guide
- Place the teal partition wall in the center dividing line. Install it with its arched doorway facing the right side. Align the wall along the floor grid and press firmly until it locks in place.
- Place the sticky note board on the left interior of the lid. Arrange a yellow post-it note and four pastel rectangles (purple, teal, pink, and blue) neatly in a 2×2 grid within the board's red frame.
- Attach the medical scissors and syringe to the right interior of the lid. Secure the scissors under the upper strap and the syringe under the lower strap, ensuring proper orientation.
- Position the sanitizer bottle and first aid kit box in the lower left corner of the lid compartment. Ensure the sanitizer bottle’s nozzle faces forward and the first aid kit box sits snugly beside it.
- Organize the pill jars and cylindrical pill bottle in the upper right shelf area. Place the larger jar in the leftmost slot, followed by the smaller jars side by side, and the cylindrical bottle in the front-right corner.
- Place the waiting bench seats and wheelchair on the lower left floor. Align the bench with the floor grid against the left wall and position the wheelchair diagonally toward the partition wall.
- Set the dental chair and bunny dentist in the left treatment zone. Position the dental chair in the corner and place the bunny on the seat. Add the dental instrument cart nearby, facing the bunny.
- Arrange the MRI scanner and pink teddy bear in the central area. Align the MRI scanner with the floor grid and place the teddy bear inside, ensuring it’s centered.
- Set the bunny operator at the computer desk in the central area. Place the desk and monitor against the wall, seat the bunny on the stool, and add keyboard accessories.
- Complete the right room section with the patient bed and bear character. Align the bed against the wall, place the bear on the mattress, and add a bedside table and lamp.
Notes & Precautions
- Verify each slot’s compatibility before placing items to prevent misalignment.
- Ensure the teal partition wall is precisely aligned, as it affects further placements.
- Check all orientations, especially under straps, to avoid disruptions and rework.
- Double-check secure closures when finishing the level to prevent loose items.
Tips & Tricks
- Start with the largest items to build a structural framework first.
- Use the snap-to-grid option for fast and accurate furniture alignment.
- Group similar-colored items before arrangement to reduce repositioning.
- Employ camera tilt sparingly for multi-angle alignment checks.
- Use 45-degree rotation increments for efficient orientation adjustments.