Dreamy Room Level 84 Walkthrough & Guide
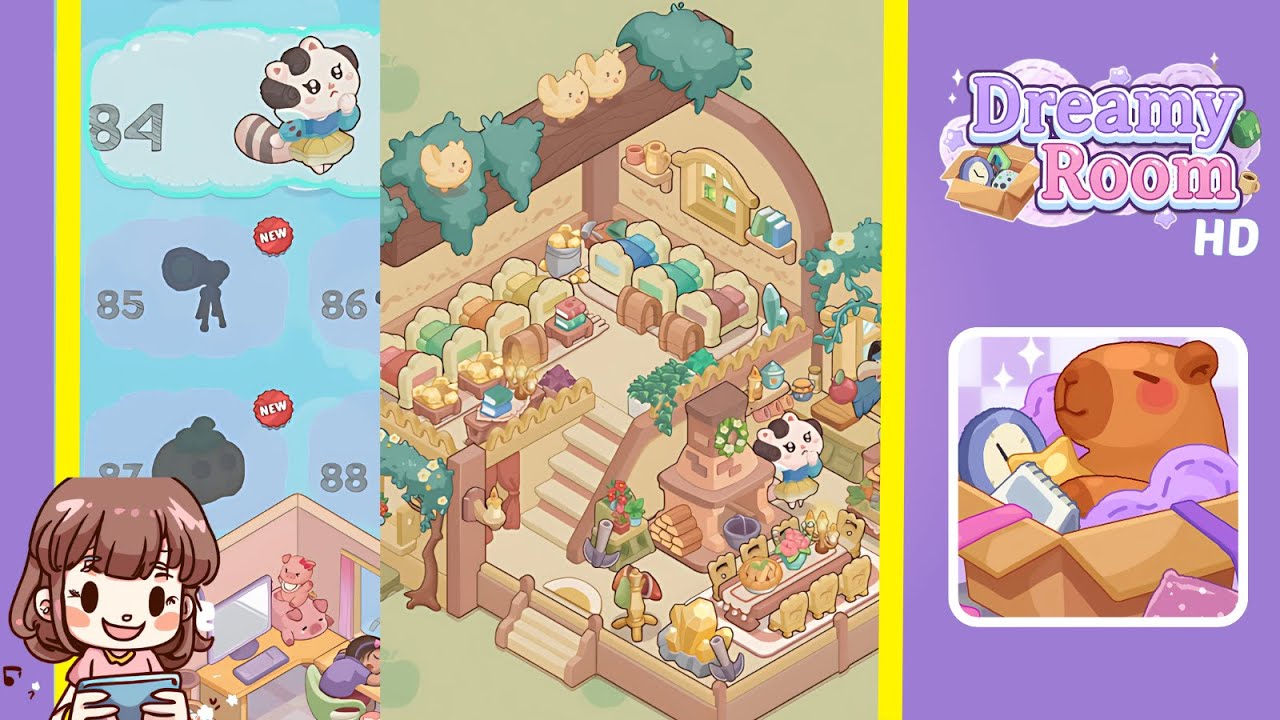
Welcome to the comprehensive walkthrough for Dreamy Room Level 84! In this level, your mission is to transform the empty two-story space into the cozy, detail-rich room depicted above. The main challenge is figuring out the exact spot for each object—no hints, no timers, just mindful placement. Follow these steps carefully to position every item perfectly.
Step-by-Step Guide
- Place the pastel seating set and chests upstairs. Arrange the seven pastel-framed chairs on the upper floor. Line up four chairs flush against the back wall (left to right: mint, lemon, peach, rose) and three chairs along the left wall (mint, lemon, peach). Position a matching wooden chest in front of each chair so that the chest centers align with the chair legs.
- Hang the vine-draped beam with birds. Install the long wooden beam across the ceiling of the upper room. Drape the teal vine over the beam so it cascades on either side. Perch the three yellow bird figurines evenly along the top of the beam—one at each end and one in the center.
- Place the bucket of linens. On the right side of the seating area, set the small wooden bucket filled with rolled pastel linens against the wall. Ensure it sits flush with the chair at the end of the row.
- Add the corner side table with crystals and candles. At the corner where the back and left seating meet, place the low mahogany side table. On it, arrange a golden candelabra and a purple crystal cluster so they face the room’s center.
- Install the wall shelf and mugs above the window. Mount the small curved shelf just above the window frame on the right wall. On this shelf, position two ceramic mugs (pink on the left, yellow on the right) and two hardcover books (green then blue).
- Set the arched window and crow. Embed the arched wooden window into the right-hand wall opening. Then, place the little crow figurine on the sill, facing inward toward the dining area.
- Arrange the under-window side table. Beneath the window, position the round wooden side table. On top, place a red apple, a blue jar, a green jar, and the mortar and pestle, neatly spaced.
- Place the central staircase. Center the pink-and-cream staircase, ensuring its top step aligns with the upper floor and its bottom step connects cleanly to the lower level.
- Position the fireplace. Against the right interior wall (just below the railing), install the cream-and-pink fireplace, ensuring the chimney stack lines up with the ceiling.
- Add the companion side table next to the fireplace. To the left of the fireplace, set the square wooden table. Top it with a golden lamp and a small stack of glowing crystals.
- Place the potted plant by the stairs. At the base of the staircase, on the lower floor, add the medium-sized green potted plant to the left side of the steps.
- Arrange the dining table and golden chairs. On the lower interior, position the long rectangular table (white cloth with pink trim) between the two pillars. Surround it with six golden chairs—three on each side—with chair backs facing outward.
- Add the pumpkin centerpiece and florals. Center a small pumpkin on the dining table. Flank it with two flower vases (pink blooms) and place two tiny candleholders on either side of the pumpkin.
- Set the watering can and trowel. Just to the left of the dining table’s leg, lay down the green watering can and the hand trowel, with handles pointing toward the railing.
- Drape the exterior vine on the porch beam. Outside the upper right archway, attach the curved wooden beam and drape the white-flowered teal vine so it wraps around the arch.
- Position the bench and flower pot on the porch. Under the vine-covered branch, place the cushioned bench against the left porch wall. In the built-in railing planter above, nestle the red flower pot.
- Add the red-flowered bucket by the entry. On the porch floor to the left of the stairs, set the wooden bucket filled with red blossoms.
- Place the golden crystal on its pedestal. At the lower right corner of the porch, rest the golden crystal cluster atop the square stone pedestal. Lean the hammer and pickaxe against its side.
- Set the panda figurine by the hearth. Finally, on the hearth next to the fireplace, position the panda plush figurine facing toward the room for that heartwarming touch.
Notes & Precautions
- Grid Snapping: Each item snaps to a hidden grid. Misaligned placement may block future objects.
- No Rotation: Objects cannot be rotated—orientation comes fixed. Place carefully.
- Single-Drag Limit: You can only drag one item at a time. Plan your sequence to avoid backtracking.
- Overlap Warnings: If two objects occupy the same grid cell, one will disappear until you adjust placement.
- No Timer: The level is untimed. Rushing increases errors; take your time.
Tips & Tricks
- Work Outside-In: Start with large furniture (staircase, fireplace, table), then add decor.
- Use the Overlay: Toggle the transparent placement preview to check for overlaps before dropping.
- Undo Is Your Friend: Click undo quickly when you misplace an item—it’s faster than manual repositioning.
- Sectional Completion: Finish one floor at a time to keep track of which objects remain.
- Save Often: If manual saves are offered, lock in your progress after each major section.
- Ambient Focus: Play with music off or use headphones to concentrate on spatial arrangements.