Dreamy Room Winter Town Level 12 Walkthrough
Explore the enchanting Dreamy Room Winter Town Level 12. Follow this detailed guide to create a picturesque setting in this winter wonderland.
Step-by-Step Guide
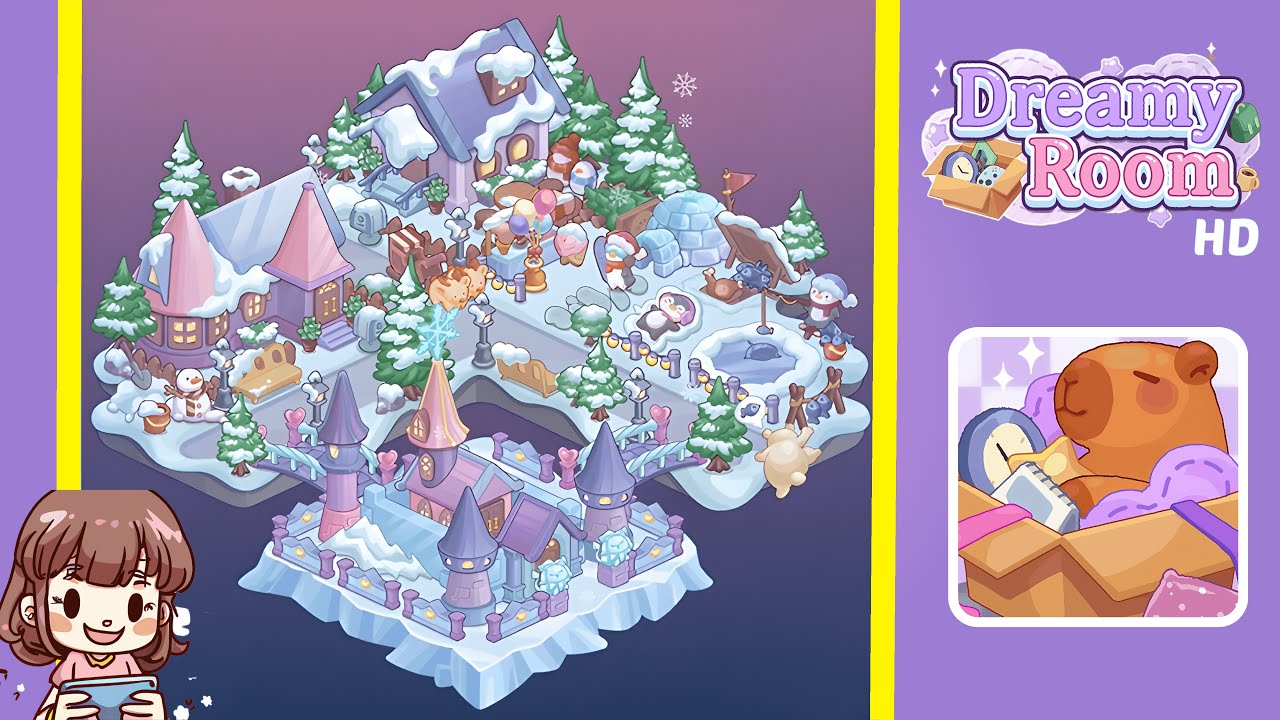
- Place the ice castle on the lower iceberg. Start the level by securing the pastel ice castle on the smaller iceberg. Position the rectangular ice plaza on top and attach three towers: the left tower with a lilac cone roof, the central keep with a pink-and-gold spire, and the right tower with a blue conical roof. Add lavender posts topped with warm yellow lights at the edges, placing two blue lion statues at the front corners. Leave space for bridges on the upper-left and upper-right of this platform. Ensure the castle's gate faces upward toward the main island.
- Place both heart-rail bridges to the main island. Connect the realms by snapping the left arched bridge from the castle’s left parapet to the upper island's left edge. Match it with the path curving toward the turreted cottage. Mirror this with the right arched bridge from the castle to the upper island’s lower-right entry. Bridges should fit neatly under snow lips with even gaps between posts and ice.
- Place the left residential block at the upper island’s southwest. Position the lavender house with a pink turret on the far left ledge, slightly angled. Add a cream bench and tiny lamppost in front, and a small pine behind. Above, place the blue-roof cottage with the snowy dormer near the island's ridge. Use brown picket fencing to create a yard, with a stair and two green planters at the cottage’s porch. Add a snowman at the lower-left beside a boulder.
- Place the cross-shaped icy avenue and center snowflake lamp. Align the pale, cross-shaped avenue diagonally with the island. The lower arm should face the castle bridges, the upper arm toward the cottage garden. At the intersection, place the tall streetlamp with a glowing blue snowflake. Border the avenue with short posts, string lights, small pines, and a low golden barrier.
- Place the plaza stalls, balloons, and animal mascots at mid-right. Right of the central lamp, position the stall with candy and cocoa. In front, add a balloon cluster with pink and blue spheres and two fluffy tan sheep mascots. Behind the stall, add hay bales and a covered sleigh. Border the area with bollards and string lights, placing a small pine against the right fence.
- Place the igloo camp, snow angel, and fishing corner at the far northeast. Position the igloo with its entry leftward. Add a red pennant behind it, a blue sled nearby, and a fishing stand with rod over the ice hole. Add a bucket and two fish pieces along the edge. Add a penguin-shaped snow-angel figure left of the hole, with a bundled child. Frame with logs, rope stakes, and shrubs. A helper stands on the right.
- Ring the scene with snow pines and sky accents. Place tall, snow-capped pines around the island: behind left houses, along the rear ridge, around the igloo, and near the cliff above the bridges. Add a small pine at the lower-left by the bench and a stone near the snowman. Hang two snowflakes in the sky and float a golden sheep balloon on the lower-right edge.
Notes & Precautions
- Ensure accurate placement of objects, especially the castle to prevent bridge misalignment.
- Maintain perfect alignment for the avenue's cross to ensure proper spacing for light posts.
- Do not flip houses; the turreted home must be on the left with its porch facing the road.
- The igloo must face left, and the fishing rod should point toward the ice hole.
- Maintain clear walking lanes around the balloon stall to avoid character overlaps.
- Your trees must never block doorways or the snowflake lamp.
- Nudge floating edge items one grid inward for stability.
Tips & Tricks
- Begin with placing tall anchors like the castle, houses, and igloo, followed by mid-height elements, and finally, low clutter.
- Use mirrors of left-right elements to quickly spot drift.
- Rotate items incrementally to create depth and hide railings under snow lips.
- Group trees by height to guide the eye to focal points like the lamp.
- Align edges to the avenue’s diagonals for a hidden grid to follow.
- Save often and compare against silhouette thumbnails to catch one-tile errors.