Dreamy Room Undersea Level 8 Walkthrough
Welcome to this detailed guide for Dreamy Room Undersea Level 8. In this level, empty basalt ledges and fumaroles transform into a thriving glass-domed seabase linked by crystal tubes. Unlike other levels, there’s no timer, allowing you to enjoy placing each object in its perfect spot. The primary challenge lies in determining the correct placement for each object to match the completed image exactly.
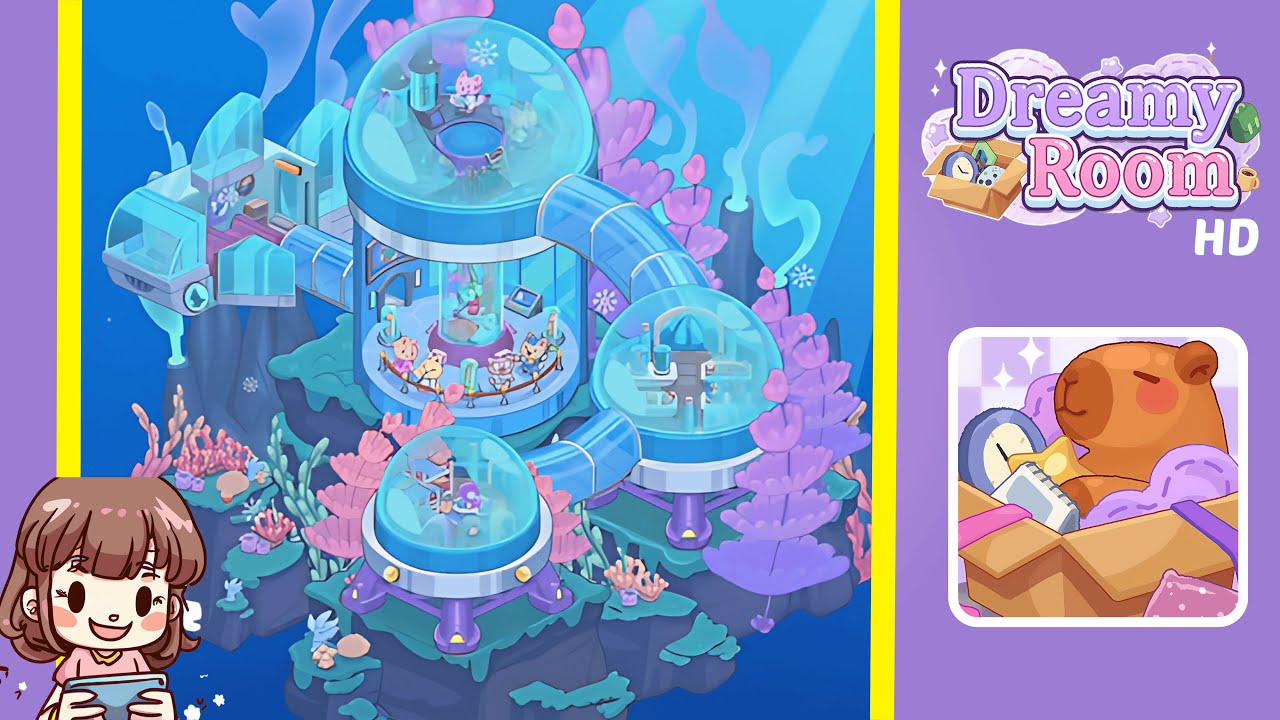
Step-by-Step Guide
- Place the central research dome on the highest middle platform. Anchor the biggest glass dome at the center of the broadest rock shelf. Ensure the silver-ringed base sits flush with the green mossy cap so the door arch faces slightly left. Inside the lower floor, place the circular mermaid aquarium in the center and flank it with two glowing specimen cylinders, one on each side. Add the entry arch on the front wall with a tiny touchscreen kiosk just to the right, and ensure purple coral bushes rise behind the dome on both sides.
- Place the upper control deck and characters inside the main dome. Set the swirl-pool console at the rear center on the upper mezzanine and seat the pink cat at the console, with two small crew critters to its right and left. Hang a snowflake decal on the dome’s front glass, floating slightly above eye level. Ensure the aquarium below is visible between the railings.
- Place the left access corridor and the small arrival module. Attach a transparent arched tube from the dome’s upper-left exit to a hallway on the left spire, then cap it with a small module that has a sloped glass roof and side windows. Position the sliding door panel with an orange EXIT sign above it and park a tiny supply trolley with a brown box inside. Prop open the small exterior window flaps.
- Place the right laboratory dome and connect its tube. Connect a curved glass tube from the main dome’s mid-right outlet to the medium dome on three silver-purple legs over the right platform. Center a gray hex-tile reactor pad and arrange three blue energy cylinders. Add a compact console near the top-right interior wall and hang a snowflake decal on the dome’s front glass.
- Place the lower living dome with bedroom furniture and base legs. Connect a tube from the main dome’s lower-right exit to the smallest dome on the front-center platform, giving it three purple legs with yellow bolts. Inside, arrange the furniture and set a seated purple critter at the desk. Ensure the bed is visible from the front with the pillow pointing right.
- Place exterior details: corals, vents, supports, and tiny figures. Decorate the landscape by clustering coral, planting leaflike corals, positioning other corals, and adding drifting snowflake particles. Ensure that hydrothermal spires emit soft pastel plumes.
Notes & Precautions
- Alignment is crucial; tubes only snap when the main dome is perfectly centered and the door arch faces slightly left.
- Avoid rotating domes after attaching tubes to prevent breaking fits and misplacing snowflake decals.
- Place corals before finalizing the left arrival module to prevent overlap.
- Keep character heads below glass curves to avoid clipping in screenshots.
- If an item appears too bright, lower it by one pixel.
- Focus on correct placement rather than inventory management; resist dropping extras not visible in the completed image.
- Save after each connection to lock the geometry.
Tips & Tricks
- Build from “spine to skin”: place the central dome first, then all tubes, dress interiors, and add coral.
- Use the aquarium as a sightline anchor; if you can still read the kiosk beside the entry arch, the mezzanine isn’t crowding the view.
- Check symmetry using the three-leg pattern of lab and living domes.
- Nudge items in half-steps by picking them up and rotating twice to adjust tube arcs accurately.
- Drop snowflakes last for depth and avoid covering characters.