Dreamy Room Dreamy Park Level 9 Walkthrough
Navigate through Dreamy Room Dreamy Park Level 9 with precision by following this step-by-step guide to build a serene, pastel-themed carnival setting that highlights a harmonious arrangement of structures and decorations.
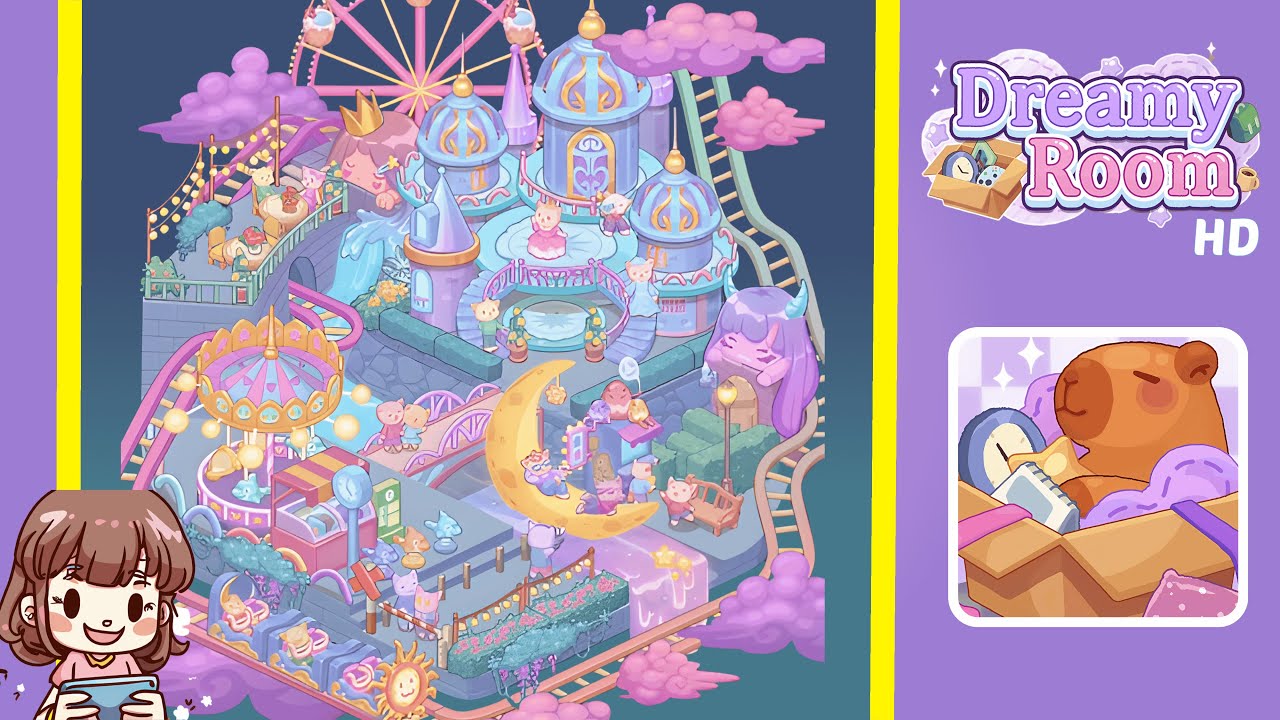
Step-by-Step Guide
- Place the three-domed pastel castle at the upper-center platform. Ensure alignment so that the castle’s front semicircular staircase matches with the stone railings leading into the park plaza.
- Position the Ferris wheel slightly to the left behind the castle, ensuring its gondolas are visible above the domes and maintain spatial balance with other structures.
- Lay the roller coaster track around the platform’s outer edge starting from the lower-left corner, ensuring all track segments join snugly to define the scene’s perimeter.
- Set up the carousel and ticket booth at the lower-left plaza, creating space for small cat character placements while maintaining walkway accessibility.
- Position the luminous crescent moon at center-right, accompanied by benches and a lamppost. Ensure the moon casts light over the pathway and balances with surrounding structures.
- Add the purple sleeping monster and park bench area at the right edge, carefully positioning it to integrate with adjacent paths and scenery.
- Place the waterfall princess head, hedged bridges, and terraced picnic area at the upper-left, creating an attractive overlook that integrates seamlessly into the park’s layout.
- Finish by adding details such as the sun-face car, ride cars, statues, clouds, string lights, and plant pots, ensuring all objects anchor the composition harmoniously.
Notes & Precautions
- Follow the placement order meticulously: start with the castle, proceed to major verticals like the Ferris wheel, then fill in mid-ground attractions and finish with decor.
- The snapping grid is sensitive; ensure precise placements to avoid overlaps that hinder further placements.
- Avoid scaling attractions beyond their designed size to prevent snapping issues and maintain proper object registration.
- Backup your progress by keeping track of the order in which items are placed for easy correction if misalignment occurs.
- Some decor items are auto-aligned; place them last to ensure accurate positioning.
Tips & Tricks
- Utilize the castle and Ferris wheel as foundational references to build outward in a stable arrangement.
- Toggle the grid and zoom in for finer control over alignments, particularly with the roller coaster track and hedges.
- Group small props for symmetric patterning to save time and achieve balanced aesthetics.
- If difficulties arise with snapping, adjust surrounding pieces temporarily to facilitate proper placement.
- Use the glow of the moon and water features to subtly disguise minor misalignments.
- Take screenshots periodically to track progress and facilitatemore precise adjustments.