Dreamy Room Life of Pets Level 5 Walkthrough & Guide
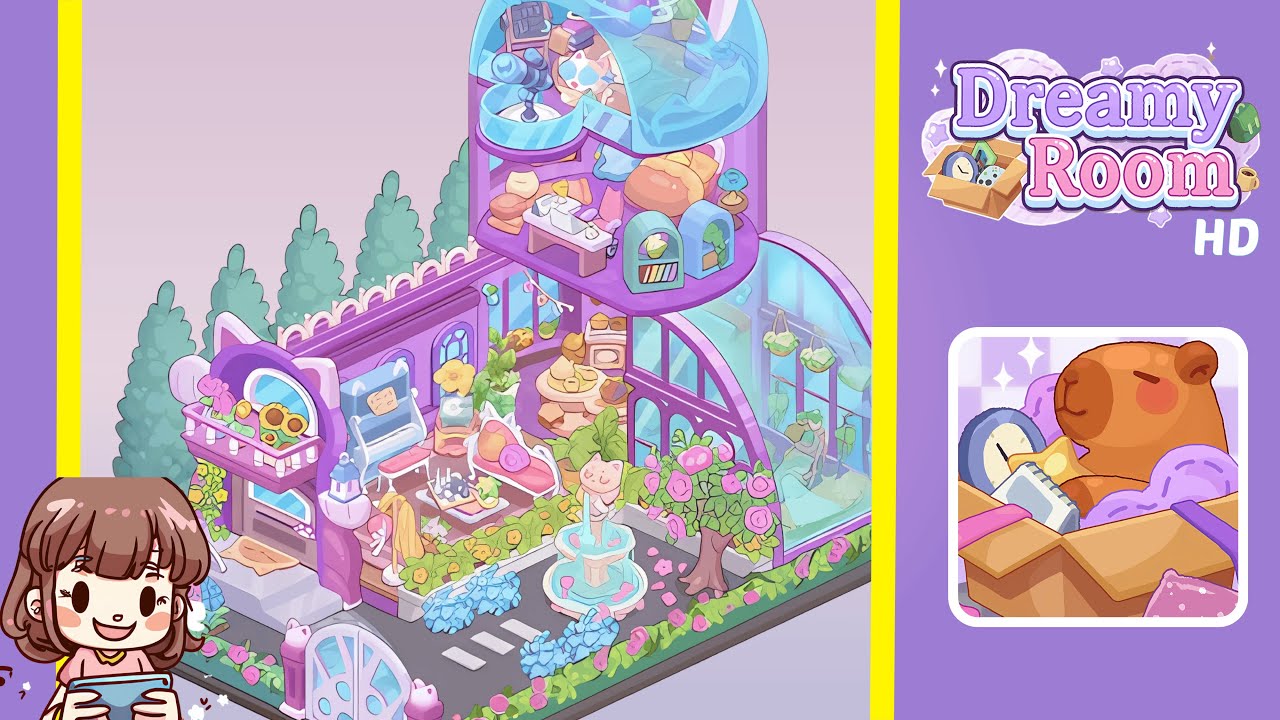
Welcome to Dreamy Room Life Of Pets Level 5! This walkthrough will guide you in designing a whimsical, cat-themed space with precision. Follow these structured steps carefully to ensure every piece fits perfectly in place.
Step-by-Step Guide
- Begin by organizing the structure. Place the tall striped lavender back wall at the rear edge and the shorter left wall with a shelf-like ledge to form an L shape. Install the peach herringbone floor panel so it runs flush against the left wall, creating a semicircle cutout on the right. Fit the lilac flower-print half-round carpet into this curved area, ensuring the dark border aligns with the wall’s curve. Use the walls and rugs as fixed references to maintain precise alignment on the isometric grid.
- Next, frame the exterior with a garden border. Use alternating pink rose hedges and low blue blossoms around the lot’s base. Install the white gate with teal panes at the front-left corner, flanked by cat statues on the gateposts. Lay a short driveway of dark asphalt with two white crosswalk blocks just inside the gate. Behind the house, plant a row of tall teal evergreens and finish by placing a tidy doormat at the front door and a slim white railing on the left path.
- Move on to decorating the left façade. Secure the purple wall with an arched sign above the door and place a turreted pillar with a cone roof and lantern to the right. Above the entrance, attach the rounded balcony and position the blue inset arch and a planter box of sunflowers forward-facing. Tuck a small flower cluster at the base of the pillar. Ensure all elements align to avoid discrepancies in later placements.
- Decorate the ground floor interior by placing a light-blue upright piano under the round window on the left wall. Position the coat stand with a yellow dress slightly forward-right of the piano. In the center courtyard, create a hospitality area with a pink table for tea, cakes, and pet treats, surrounded by potted greenery. Against the mid-right interior wall, add the pastry display cabinet and a stack of bread/croissants. Include a viney plant column to enhance the visual flow.
- Construct the second floor, starting with the scalloped white fence along the roof edge from left to mid. Create a dessert-and-pet-care station with a long table at the center-left, complemented by a small rolling cart or sideboard. In the far right upper nook, install the curved-window pod with a mint cat bed, a rounded bookshelf, and a stack of folded blankets. Ensure the glass bridge connects smoothly to the greenhouse.
- Attach an arched glass greenhouse to the right side of the structure. Its curved roof should align smoothly with the building’s silhouette. Inside, hang three planters along the top beam and place a leafy stand plant at the back-right. Verify that the curved glass tunnel meets the greenhouse’s upper landing smoothly.
- Cap the tower with the sky-blue dome featuring pink-lined cat ears, and position it precisely. Inside, arrange a round bed with a pet, a control console, and a telescope. Complete the area with a nightstand and below it, maintain a tidy prep counter with bowls and a sink.
- Finish by refining edges. Run the white roof trim across the mid spine and position the purple finial above the pillar lantern. Place additional flower cushions near the central lawn and adjust flower clumps for symmetry on the driveway. Add a pet scratching post and toy basket near the vine column, and ensure all planters align perfectly with the roses.
Notes & Precautions
- Arrange straight pieces first, then add curved elements to prevent clipping. Maintain consistent vertical stacking (balcony → fence → dome).
- Leave a tile of grass around the fountain to accommodate its splash radius.
- Use mirror checks regularly to ensure no objects appear to float. If alignment issues persist, adjust from the darkest corner of the object.
- Avoid random rotations and align all elements carefully as per the precise placement requirements.
Tips & Tricks
- Utilize “dummy” plants to reserve spaces before filling them with actual furniture.
- Place clusters of items (like piano and coat stand, dessert table, and cart) together to maintain balance.
- Use the teardrop gap between the bridge and greenhouse as a guide for alignment.
- Position the dome last to use its shadow as a guide for placing counters.