Dreamy Room Zombie Land Level 4 Walkthrough
Welcome to the Dreamy Room Zombie Land Level 4 walkthrough. This guide will help you arrange the level’s various elements with precision, ensuring a seamless completion. Follow each step carefully to create the perfect survival diorama.
Step-by-Step Guide
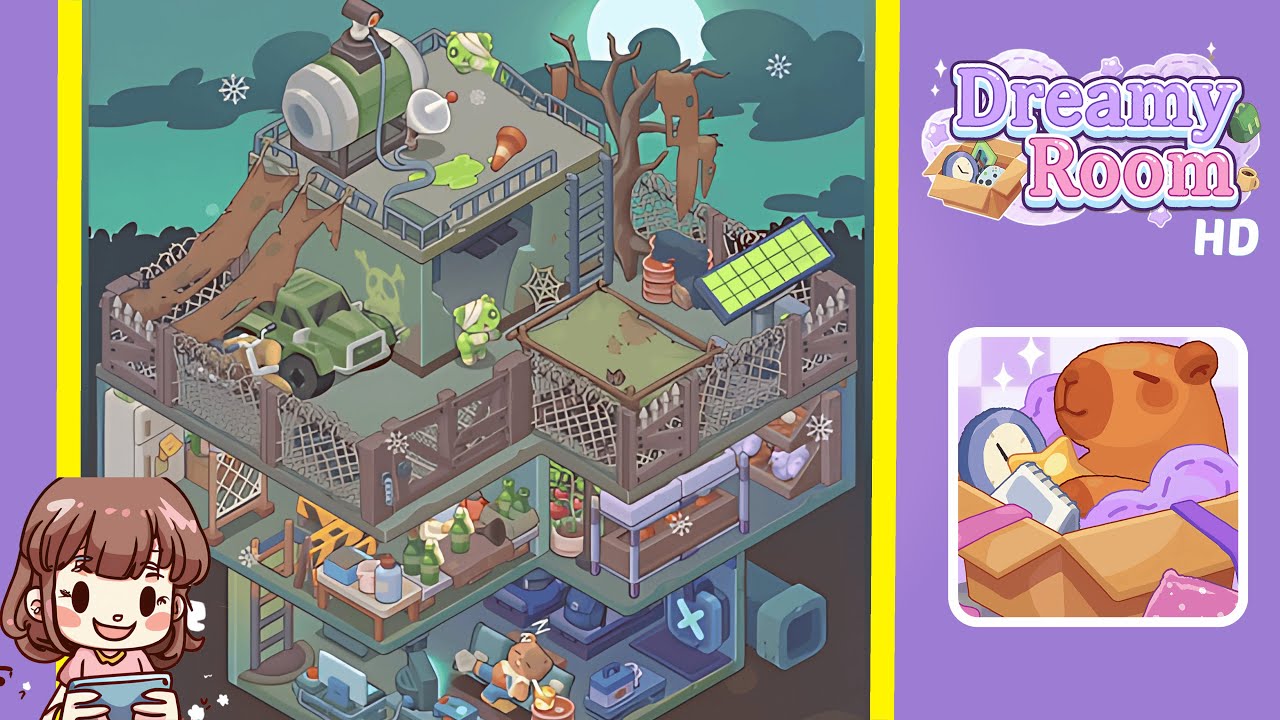
- Place the multi-level shell and outer fences on the platform. Snap the three-floor bunker shell onto the hexagonal platform. Ring the top deck's perimeter with chain-link fencing, leaving a gap near the front left for the wooden ladder. Add purple fence posts and rusty gates along the front and right edges. Ensure the middle floor's left front edge is open for the ladder, with mesh rails at the rear and right sides.
- Build the basement tech bay and med bay on the lowest floor. Position the basement ladder at the back-left corner. Arrange coiled cables, power conduits, and floor pipes leading to a glowing console. Place a small rolling robot/tool unit near the ladder, and a tray with food items at the center. Install a blue medical alcove and tool case on the far right wall.
- Set the survivor’s rest nook and clutter piles in the basement. Place a makeshift cot slightly right of center, with a dozing survivor and a small ottoman. Stack red metal drums and add a cup of noodles and sandwich plate. Position a lantern-like blue device near the power conduit for illumination.
- Assemble the middle-floor workshop table and pantry on the left. Slot a cream refrigerator against the far left wall. In front, place a wooden road barrier and center a wooden worktable with various kitchen items. Add chunky jars and canisters to a side shelf, ensuring there's space for NPC pathing.
- Arrange the right-side storage racks and coop on the middle floor. Populate with a two-tier shelf and produce baskets. Install a wire-fenced coop with straw bed and white hen at the far right. Ensure a one-tile-wide aisle between the table and racks.
- Park the military pickup and junk along the top deck’s left lane. Set the olive pickup truck on the left lane. Add a spare tire and yellow drum beside the wheel, with heavy log planks at the back fence.
- Build the central rooftop lab and populate its roof gear. Place a small cement room at the center with skull graffiti. Attach an external ladder and mount a cylindrical tank and satellite dish on top. Add a railing and scatter props on the catwalk.
- Fill the right deck with a dead tree, barrels, solar panel, and sand pit pen. Place a leafless tree at the back-right, stack red barrels, and angle a solar panel. Install a sand pit with rope-laced fence and ensure its corners are inside the rails.
- Add ambient effects, snowflakes, and final checks. Sprinkle snowflake VFX across all floors and place a small brown outlet block on the right interior wall. Confirm correct pathing and object placement for scene completion.
Notes & Precautions
- Collision discipline is crucial. Rotate objects slightly rather than shifting them a full tile if placement issues arise.
- Maintain clear silhouette views from the isometric camera.
- Avoid overlapping snowflakes and interactive props to ensure visibility.
- Ensure rail segments snap end-to-end on the roof to prevent pathing failures.
Tips & Tricks
- Build from the bottom up to expedite completion as ladder validations occur early.
- Group similar function items (power pieces, etc.) to maintain consistency.
- Utilize prop shadows for correct placements.
- Use spider webs as alignment markers for proper positioning.
- Rotate clutter subtly for best visual alignment.
