Dreamy Room Penguin Villa Level 7 Walkthrough
Welcome to the detailed walkthrough for Dreamy Room Penguin Villa Level 7. Follow these precise steps to create a charming, winter-themed retreat, maintaining perfect symmetry and flow throughout the level.
Step-by-Step Guide
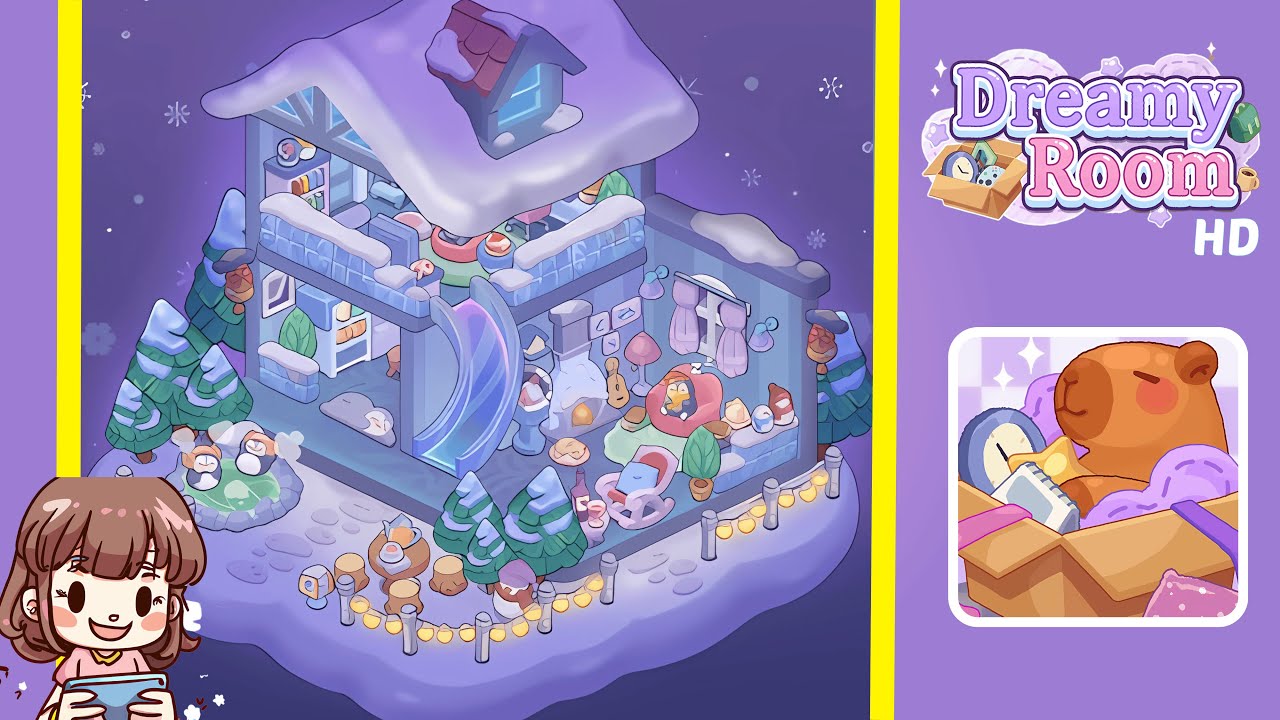
- Begin by placing the snowy base, striped walls, and roof with a chimney and dormer. Center the icy platform base, and align the striped walls at the back-left corner. Secure the snow roof, ensuring the blue truss on the front gable faces left. Add the chimney puck on the ridge and the red dormer on the right roof slope. Verify the wall angles and ensure the front edge remains clear for future lights.
- Place perimeter evergreens, posts with fairy lights, mailbox, and stepping stones. Arrange snow-tipped pines: two tall trees behind the left wall, three at the front-center, and one in the far right corner. Set short posts with fairy lights between the front and right edges. Position the mailbox at the lower-left, near the future onsen, and add pebble stepping stones inside the front edge. Finally, place two gnomes for symmetry.
- Assemble the penguin hot spring, stone ring, steam, and picnic stumps on the front-left exterior. Arrange stones with the darkest ones at the bottom-left. Seat two penguins in the hot spring, facing slightly right. Set stump stools and a table to the right, complete with a silver kettle and cups. Add a delivery box left of the stumps.
- Position the moon-crystal slide and ice pedestal at center-left. Anchor the slide base on a round ice pedestal at the center-left edge. Ensure the slide arcs rightward into the upper landing, precisely shadowing the floor rug. Confirm alignment with front-center trees and attach gradient-striped side panels.
- Arrange the downstairs right lounge: window, curtains, igloo hearth, seating, and decor. Install a square window with pink curtains on the right wall. Below it, place an igloo fireplace and add a wood slice rug in front. Position a pink beanbag with a sleeping penguin, a mint blanket bed, a pink rocker, a lavender bottle-lamp, and a guitar by the plant cluster. Decorate with dessert mugs and a cookie plate on the side table.
- Create the downstairs left wash nook: shelf, sink area, cloud mat, and sleeper. Under the left balcony, place a blue window with a potted shrub, a counter/shelf with towels and bottles. Position a fluffy cloud mat and a sleeping seal figure in the nook.
- Set up the upstairs: ice-block railings, bookshelf, prep counters, and dessert carousel. Install translucent ice-block guardrails, a bookcase under the eaves, a short counter with sink and utensils, and center a dessert carousel. Complete the scene with railing on the top-right, adorned with a small tree.
- Decorate with wall art, mittens, small figures, snow caps, and floor details. Hang frames and mittens around the window over the hearth. Add snow clumps, scatter cushions, place a tiny thermos, cupcake jars on the parapet, and a red-hat gnome by the trees.
Notes & Precautions
- To avoid burying items under the balcony, start building from the back to the front, and left to right.
- The slide and hearth emit glow; if objects appear dim, adjust them outside the light cones.
- Maintain a one-tile distance from the edge to keep the fairy-light chain visible.
- Ensure the dormer's snow cap is oriented correctly.
- Leave space when placing trees to accommodate gnomes and the mailbox.
- Focus on correct placement of objects rather than discovery.
Tips & Tricks
- Define "zones" like the outdoor spa, central slide, and lounges first, then decorate each from the back wall to the front edge.
- Use railing caps to center the slide top and dessert carousel precisely.
- If the penguin in the beanbag doesn't show Zzz, adjust the beanbag's position.
- Place the kettle before cups to fix the table's rotation.
- Position trees last to ensure lights are unobstructed.
- Slight misalignments are more noticeable on corners; zoom in when adjusting windows and frames.
- Mirror negative spaces from the final image, as empty snow is part of the design.