Dreamy Room Level 8 Walkthrough
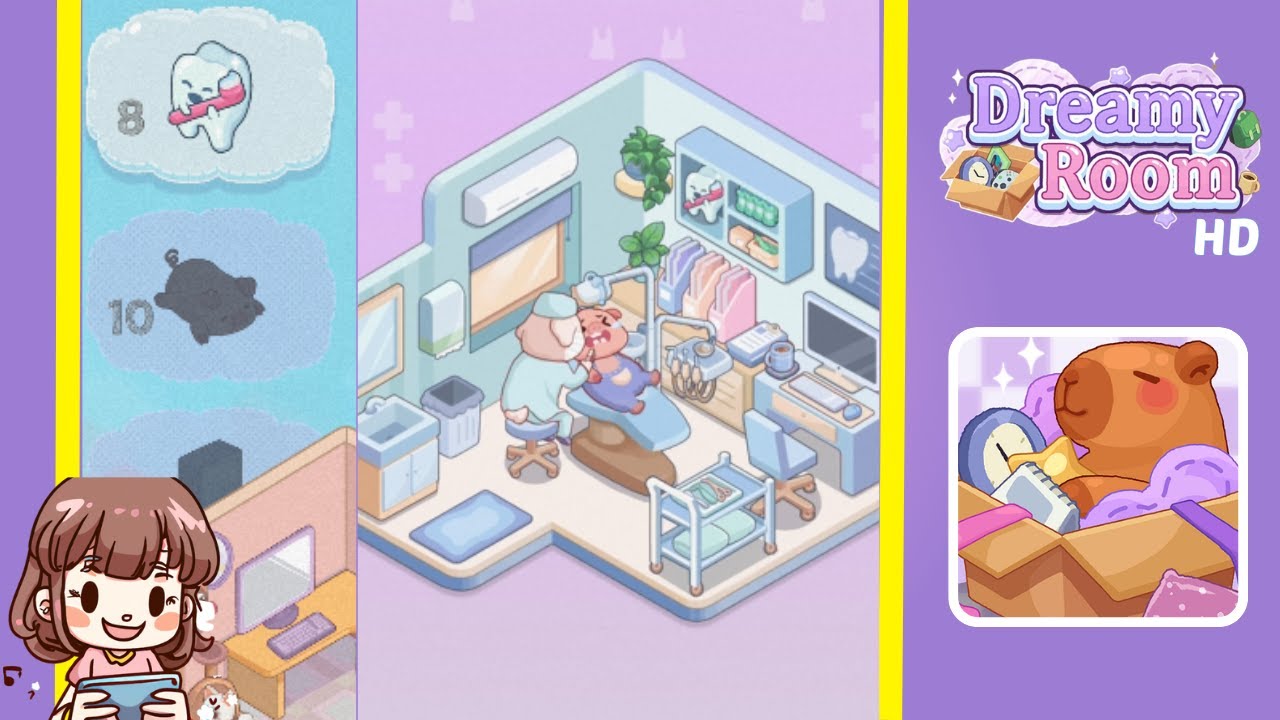
Below is a comprehensive walkthrough for Dreamy Room Level 8. Follow these steps to transform the empty, debris-strewn space into the cozy dental clinic shown in the final image. Remember, the main challenge in Dreamy Room Level 8 is figuring out the exact placement for each item, so pay close attention to these instructions.
Step-by-Step Guide
- Clear the Floor: Remove all trash—such as used syringes, bandage wrappers, and cotton swabs—from the floor. This is crucial before you start decorating Dreamy Room Level 8 so you have a tidy foundation.
- Position the Dental Chair in the Center: Place the large dental chair in the middle of the room. Correct chair placement ensures your pig dentist and patient have enough space to move around.
- Seat the Dentist and Patient: Once the chair is in place, seat the pig patient in the dental chair. Position the pig dentist behind the chair, ensuring they face the patient properly. This step highlights the core gameplay, which focuses on perfect alignment of characters.
- Install the Overhead Lamp: Attach the overhead dental lamp directly above the chair. Make sure the lamp is centered so that it illuminates the patient’s face—an important detail in this level.
- Add the Upper Storage Shelf and Tooth Model: On the right wall, mount a storage shelf. Place a tooth model or plush on top of it to reflect the dental theme. Each decorative item helps bring the clinic to life.
- Organize the Towels and Supplies: Below the shelf, arrange neatly folded towels in varying colors. Next to them, line up your dental supply containers. Correct positioning is key for scoring maximum points.
- Hang the Potted Plant: In the top-right corner, suspend a potted plant. This greenery adds a relaxing ambiance and complements the clean aesthetic of the clinic.
- Set Up the Cabinet, Sink, and Trash Bin: Place the sink and cabinet on the left side of the room. Position the trash bin in the corner near the sink to maintain a realistic clinic layout.
- Attach the Air Conditioner and Window Blinds: Above the window on the left wall, install the air conditioner. Ensure the window blinds hang directly over the window, completing the upper portion of your clinic.
- Place the Cradle and Floor Mat: Finally, place a small cradle or baby bed near the lower-right corner. Add a floor mat near the entrance for extra comfort. These finishing touches tie the entire scene together.
Notes & Precautions
- Double-check object placement; slight misalignments can prevent you from completing the level.
- Remember that items sometimes “snap” into place when positioned correctly, so be patient.
- Keep the floor clear of trash throughout your decorating process to avoid confusion about item locations.
Tips & Tricks
- Use the Zoom Feature: Zoom in for precise placement, especially for small items like syringes and bandage wrappers.
- Group Items Logically: Tackle one area at a time (e.g., sink corner, main dental station). This method helps you stay organized and speeds up progress.
- Watch the Visual Cues: Some objects will glow or highlight if you’re near the correct spot—take advantage of these hints to complete the level faster.