Dreamy Room Level 17 Walkthrough & Guide
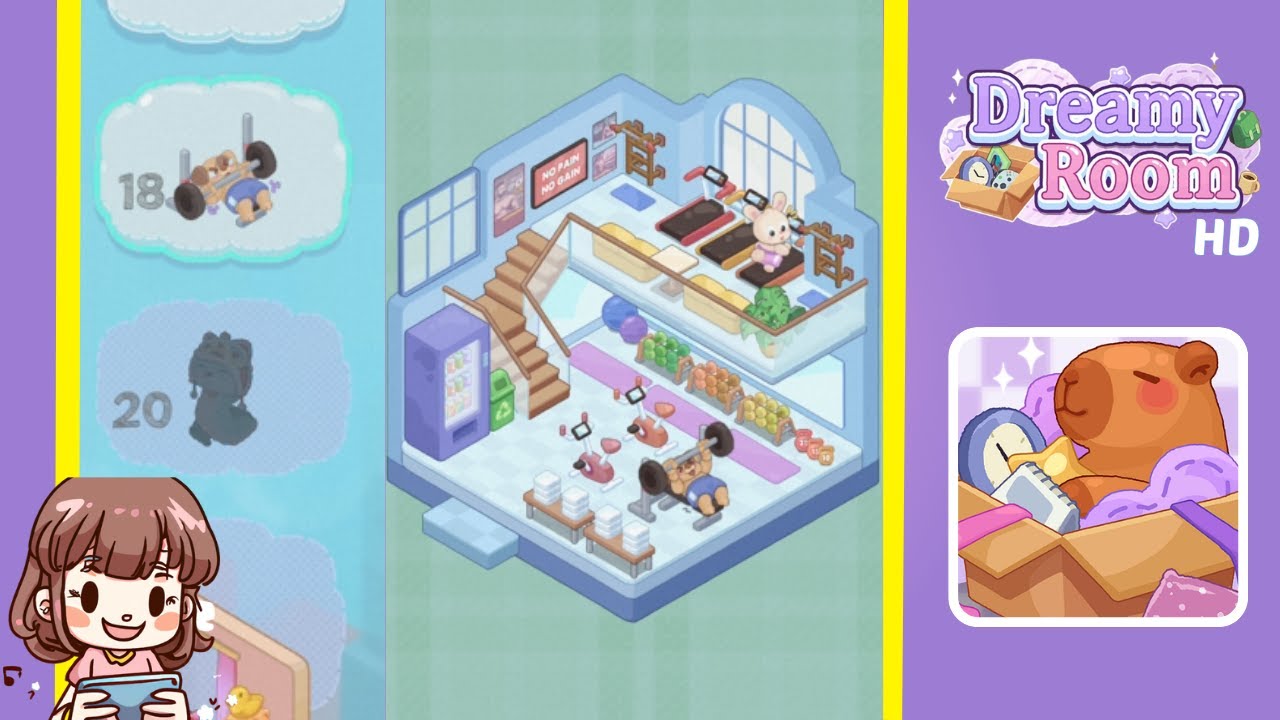
In Dreamy Room Level 17, your task is to transform a vacant room into a vibrant fitness center. This comprehensive walkthrough will help you position each piece of equipment and decoration exactly as shown in the final image. Completing Dreamy Room Level 17 requires careful planning and precision, but with the right approach, you’ll have a fully functional gym in no time!
Step-by-Step Guide
- Place the large wooden staircase on the left side of the room. This staircase leads to the upper section where you’ll arrange the treadmills and fruit rack.
- Move to the top section and place the three treadmills side by side against the wall with windows. Align them so that each treadmill faces forward and leaves enough space for characters to walk between them.
- On the wall behind the first treadmill (leftmost), hang the "No Pain No Gain" poster. This iconic poster adds motivation to the workout space.
- Place the bunny character on the treadmill at the far right to enhance the lively atmosphere.
- Position a potted green plant to the left of the rightmost treadmill to bring natural color to the gym.
- Behind the treadmills (against the back wall), set up the long fruit rack and stock it with assorted fruit to emphasize a healthy lifestyle theme.
- On the lower floor, place the large purple yoga ball roughly in the middle, near the open space between the stairs and the bench press area.
- Move to the bottom right side and install the bench press. Ensure the bench is oriented so that the bar faces outward, allowing room for a character to lift comfortably.
- Next to the bench press, arrange the different weight plates in an organized manner, signaling a well-organized workout station.
- Along the lower wall or under the staircase, position the shelf containing neatly folded towels to maintain a tidy environment.
- In the lower area, facing the staircase, place three stationary bikes side by side, leaving enough space for the characters to get on and off comfortably.
- Right behind the bikes, organize the small dumbbells in a neat row for quick access to free weights.
- To the left of the staircase, install the vending machine for easy access to refreshments after a tough workout.
- Add the green recycle bin immediately next to the vending machine to help keep the room clean, completing the final touch.
Notes & Precautions
- Alignment Matters: Objects must be aligned properly; otherwise, the game may not recognize them as correctly placed.
- Spacing: Leave enough space around larger items like the treadmills and bench press to avoid blocking paths needed for decorations.
- Object Rotation: Ensure each item faces the correct direction. Incorrectly rotating objects is a common mistake.
- Room Boundaries: Avoid placing items too close to the walls; some objects have invisible boundaries that can overlap and cause placement errors.
Tips & Tricks
- Preview Your Layout: Temporarily position objects to gauge spacing and alignment before finalizing each placement.
- Group Similar Items: Keep similar equipment together to simplify organization and help visualize the final layout.
- Use the Staircase as a Reference: Place the staircase first to guide the positioning of other items.
- Check Angles: Rotating your camera angle (if possible) can help you spot tight spaces and ensure you don’t overlap objects.