Dreamy Room Level 35 Walkthrough & Guide
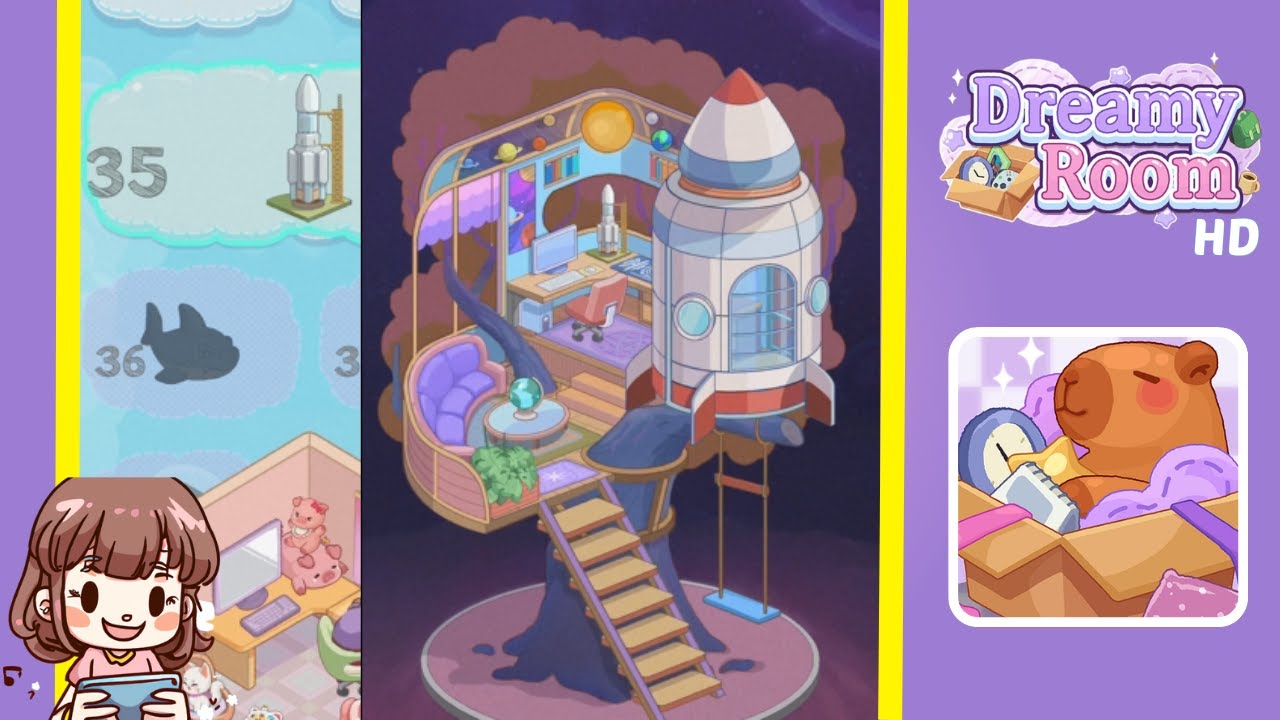
Below is a comprehensive walkthrough for Dreamy Room Level 35, guiding you through every step needed to transform the empty treehouse into the enchanting rocket-themed haven shown in the completed image. The main challenge in Dreamy Room Level 35 is figuring out the correct placement for each item. Follow these steps carefully to recreate the cozy, imaginative space you see in the final screenshot.
Step-by-Step Guide
- Position the Ladder Leading Up the Trunk: Begin by placing the wooden ladder against the tree trunk on the right side of the platform. Ensure the bottom of the ladder touches the base of the trunk, and the top aligns with the edge of the wooden floor. This ladder visually connects the ground level to the main platform.
- Attach the Swing Beneath the Right Branch: Install the small swing seat directly under the right-side branch. Make sure the ropes are securely affixed, so the swing hangs freely. Position it just off-center to avoid interference with the rocket or the main walkway.
- Place the Rocket on the Right Side of the Room: Attach the rocket to the right side of the treehouse platform, near the front edge. Align the base with the floor, pointing the nose slightly upward. This striking piece sets the cosmic theme.
- Arrange the Curved Purple Sofa on the Left: Place the plush purple sofa snugly against the curved edge on the left side. Leave space between the sofa and the trunk for movement. This seating area balances the rocket’s presence.
- Set the Globe on the Small Side Table: In front of the sofa, position a compact round table and place a globe on top. Ensure it is visible from the sofa to serve as a playful accent piece.
- Add the Green Plant Beside the Sofa: Place a lush green plant next to the sofa, adding a touch of nature. Ensure the plant does not obstruct the globe.
- Install the Desk and Computer in the Center: Set up a wooden desk at the center of the floor with a computer on top. Position the matching chair in front of the desk. Keep it centered for accessibility and visibility.
- Place the Star-Shaped Rug near the Desk: Spread a small, star-patterned rug in front of the desk. It adds whimsy and anchors the workstation area.
- Install the Bookshelf at the Back Wall: Position a simple bookshelf against the back wall to store books and knickknacks. Keep it aligned with the wall’s curved arch for depth.
- Hang the Planetary Ornament at the Top Arch: Mount the large planetary or sun-like ornament at the very top arch. Center it to illuminate the desk and rocket, completing the cosmic ambiance.
Notes & Precautions
- Check Item Overlaps: Some objects can overlap if placed incorrectly. Verify that each item has ample space.
- Mind the Floor Curves: Align items carefully with the curved floor to avoid odd angles or gaps.
- Ensure Visibility: Place items thoughtfully to prevent them from becoming partially hidden.
- Watch the Ladder Clearance: Ensure the ladder is angled correctly to avoid clashes with the rocket.
Tips & Tricks
- Use Zoom Features: If zooming is available, use it for precise placement of small items.
- Rotate Objects: Rotate items slightly if they appear off. A small tweak can significantly improve their fit.
- Test Different Layouts: Experiment with alternate positions for fun before settling on the final arrangement.
- Group Themes Together: Keep the space elements visually connected to enhance the cosmic vibe.