Dreamy Room Level 49 Walkthrough & Guide
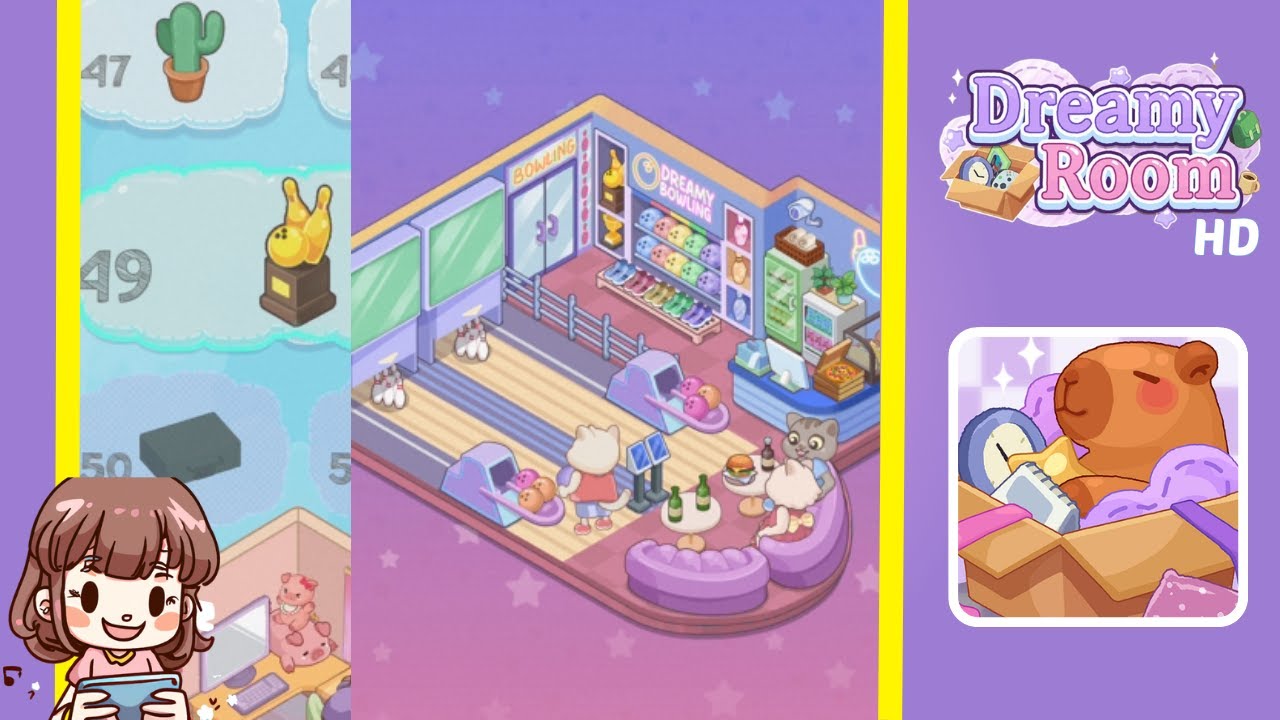
Below is a detailed walkthrough for Dreamy Room Level 49, guiding you through every step needed to transform the empty bowling-themed room into the cozy, fully decorated space shown in the completed image. This walkthrough emphasizes the main challenge of Dreamy Room Level 49: finding the correct placement for each item to recreate the scene perfectly.
Step-by-Step Guide
- Install the Bowling Lanes: Locate the two long wooden lanes with light beige and gray panels. Position them on the floor so they stretch from the back wall toward the rounded front edge. Ensure each lane aligns with the checkerboard-style flooring on the right side.
- Set Up the Left Wall Screens: Identify the two large, pastel-green monitor screens. Mount them side-by-side on the left wall, directly above the bowling lane area. These screens serve as scoreboards, so aligning them above the lanes is crucial.
- Place the Shoe Rack and Hanging Shoes: Find the shoe rack with multiple white-and-pink bowling shoes. Position the shoe rack beneath the screens, closer to the lanes. Ensure that some shoes appear to be hanging just below the screens, emphasizing the playful vibe of the room.
- Add the “Bowling” Entrance Door: Look for the glass door labeled “Bowling.” Place it in the center of the right wall, slightly toward the back corner. This door is where characters enter, so leave enough space around it for foot traffic.
- Arrange the Bowling Ball Display: Locate the display shelf with colorful bowling balls (pink, green, yellow, and blue). Place it just inside the right wall, near the entrance door, ensuring it’s easy to access. Add the trophy shelf with golden cups and a “Dreamy Bowling” sign on top, right above or behind the bowling ball display for a cohesive look.
- Furnish the Lounge Area with Purple Sofas: Identify the curved purple sofa pieces. Position them near the front-right section of the room, forming a comfortable seating circle. This area allows characters to relax while waiting for their turn.
- Place the Small Round Table and Drinks: Locate the small round table with two green bottles and matching glasses. Put this table in front of the curved sofas so it’s easily reachable. The beverages add to the cozy feel.
- Introduce the Adorable Cat Character: Find the small cat figure curled up contentedly. Place the cat on one of the curved sofa seats, making it appear relaxed and enjoying the vibe.
- Set Up the Snack and Refreshment Counter: Look for the counter unit that includes a coffee machine, pastries, and a green display board. Place this counter in the top-right corner, adjacent to the trophy shelf. This station provides treats and drinks for bowlers.
- Final Touches: Characters and Bowling Action: Identify the small bowling figures: one character rolling a pink bowling ball, another happily cheering on the seats. Position the bowler at the start of one of the lanes, aiming toward the pins. Place the cheering friend near the lounge area, emphasizing the fun and excitement.
Notes & Precautions
- Precision Matters: The main challenge is getting each object’s placement exactly right. Slight misplacements can prevent completion.
- Check Item Shadows: Align shadows under objects as an indicator of correct placement.
- Avoid Overlapping: Ensure items like the sofa, table, and ball rack do not overlap incorrectly to prevent glitches.
- Stay Organized: Refer back to the completed image if you’re unsure of the correct position.
Tips & Tricks
- Preview the Room: Use the preview function to compare your layout with the target design.
- Use the Zoom Feature: Zoom in to fine-tune object placement, especially around corners and walls.
- Tap-and-Hold for Info: Tap and hold an item for more details if you're unsure what it is or where it might go.
- Place Larger Items First: Start with the bowling lanes, big sofas, and snack counter. Once positioned, fit smaller items around them.