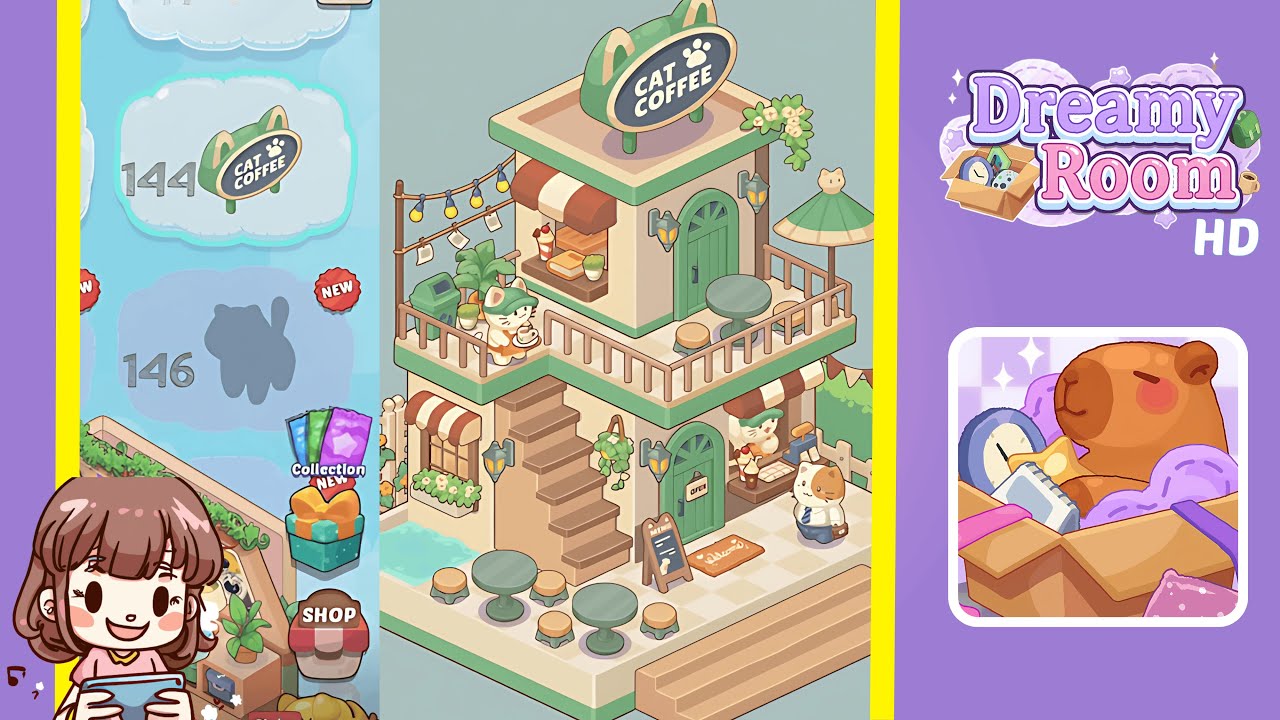
Dreamy Room Level 144 Walkthrough & Guide
Welcome to the Dreamy Room Level 144 walkthrough. This guide will help you navigate the steps necessary to create the perfect pastel café scene. Ensure precision in placing each component for optimal game performance and aesthetics.
Step-by-Step Guide
- Place the full checkerboard base platform in the center of your room. Align it flush with the game’s grid to ensure subsequent object placement is correct.
- Erect the rear walls and central staircase. Position cream-colored back walls and an arched doorway wall piece, then attach the wide staircase below the arch.
- Install the ground floor entrance and window with a canopy. Insert a green arched door piece and a square window under a red-and-white striped fabric canopy.
- Arrange the ground floor seating, water feature, and exterior accents. Add café tables, a water pool, and decorative plants for a charming outdoor setting.
- Set up the lower level service counter, menu sign, and welcome mat. Position these around the entrance to facilitate natural character movements.
- Install railings and support posts for the second-floor balcony. Ensure railings form a continuous perimeter and posts are correctly aligned.
- Add the second-floor service window, awning, and counter display. Arrange these elements carefully to maintain customer animation paths.
- Arrange the upper balcony seating, umbrella, and greenery. Use precise alignment to create a welcoming seating area with vibrant accents.
- Mount the rooftop sign and trailing vines. Position the CAT COFFEE sign and vines for maximum visual impact.
- Place the character figures and final decorative accents. Ensure figures are positioned to interact seamlessly with scene elements.
Notes & Precautions
- Ensure the base platform is centered to avoid cascading placement errors.
- Grid snapping is essential for wall and staircase positioning. Adjust angles as needed.
- Awnings must not overlap with railings or window frames to prevent placement errors.
- Collision boundaries are crucial for the service counter and associated elements.
- The second-floor railings and posts need proper alignment before adding components.
- Interactive objects should be checked against the grid to prevent clipping issues.
- Keep decorative items within subtle drape boundaries to avoid automatic repositioning.
Tips & Tricks
- Use grid toggles for previewing placement boundaries to avoid misalignments.
- Group similar objects for streamlined placement in one sweep.
- Use the undo button cautiously to maintain alignment.
- Save progress periodically to prevent rework in case of an error.
- Utilize the rotate function to align objects before placement.
- Preview animations to identify potential collision errors.