Dreamy Room Level 168 Walkthrough
Navigate through Dreamy Room Level 168 with this step-by-step guide, focusing on precise placement to create a harmonious layout. Follow each instruction carefully to master this room's unique challenges.
Step-by-Step Guide
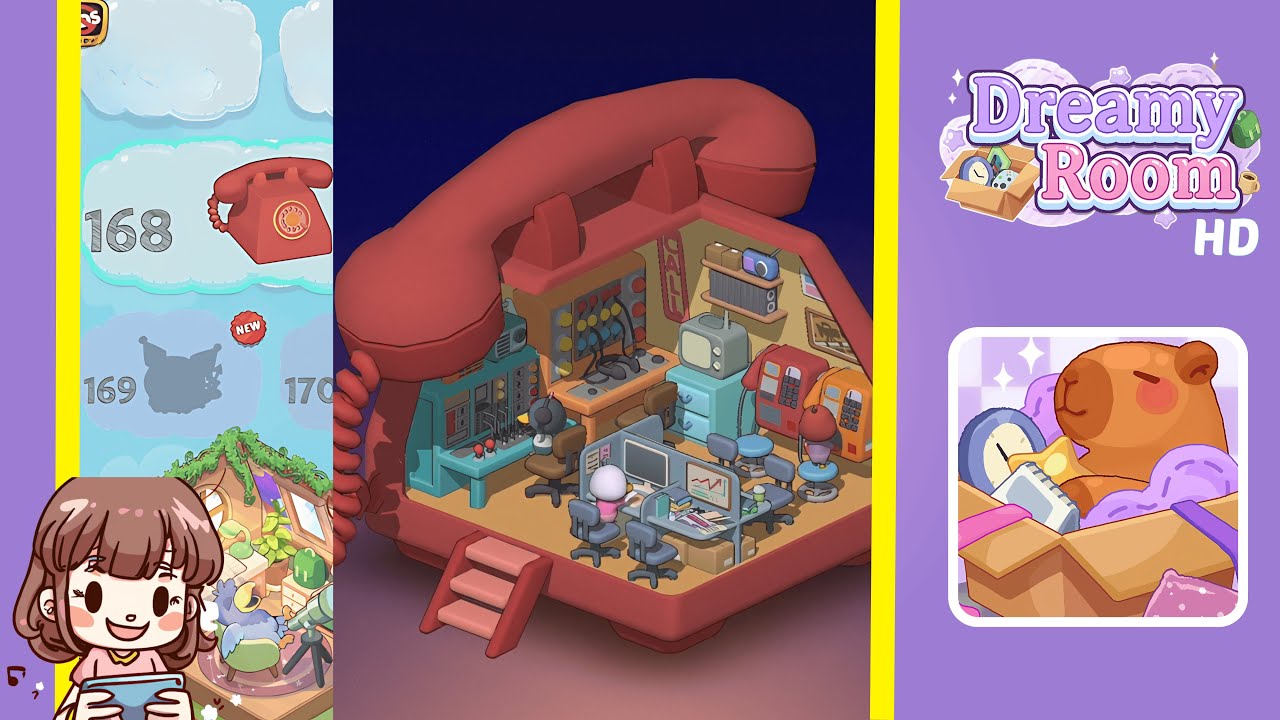
- Place the teal audio console in the left wall recess. Ensure it is flush with the pale yellow wall, positioned about one hand’s width above the orange floor. Avoid intersecting the red curved handle overhead.
- Seat the brown office chair and the grey cat-like character at the console. The chair should be directly under the console, and the character should face the knobs, sitting naturally with paws above the joysticks.
- Position the wooden mixing desk with multicolored knobs and dangling wires against the back wall, centered between the handset’s support pegs with cables draped neatly.
- Attach the vertical “CALL” neon sign to the back wall, two palm-widths above the mixing desk and centered under the handset. Ensure the sign's wiring is neatly tucked.
- Mount the dual-shelf wall unit on the right wall. The top shelf should hold a light-blue vintage radio, and the lower shelf a grey speaker, with proper spacing maintained.
- Place two retro payphones on round stools, one red and one orange, ensuring handset cords hang straight and keypads face outward.
- Seat the small bird character next to the orange payphone, angled to appear engaged without intersecting the stool’s edges.
- Assemble the foreground cubicle desk cluster with monitors and accessories, ensuring a functional and polished arrangement.
- Arrange the cardboard boxes below the desk and manage cables so that they do not touch the floor border or block paths.
- Final alignment of all chairs and overall balance check, verifying consistent wall spacing and natural character positioning.
Notes & Precautions
- Precision is crucial as small misalignments can cause objects to clip. Double-check grid snaps before confirming placements.
- Rotate items by exact 15° increments to maintain symmetry.
- Avoid placing objects where they might block UI pop-ups due to interactive characters.
- The fixed camera may cause items to appear off; verify from the entry point perspective.
- Careful layering is essential; placing the radio shelf after the sign may create overlap issues.
- Patience and observation are key to maintaining the cozy atmosphere of the room.
Tips & Tricks
- Drag objects slowly and hover to preview grid snaps, reducing rotation errors.
- Place wall-mounted elements like the “CALL” sign and shelf before other items to avoid depth-sorting issues.
- Use the 15° snap rotation by holding Shift for perfect alignment.
- Take quick-reference screenshots after major placements for easy backtracking if needed.
- Use night-mode preview to ensure neon and radio highlights stand out.
- Regularly zoom out to catch any off-grid elements and preserve the room's charm.