Dreamy Room Level 182 Walkthrough & Guide
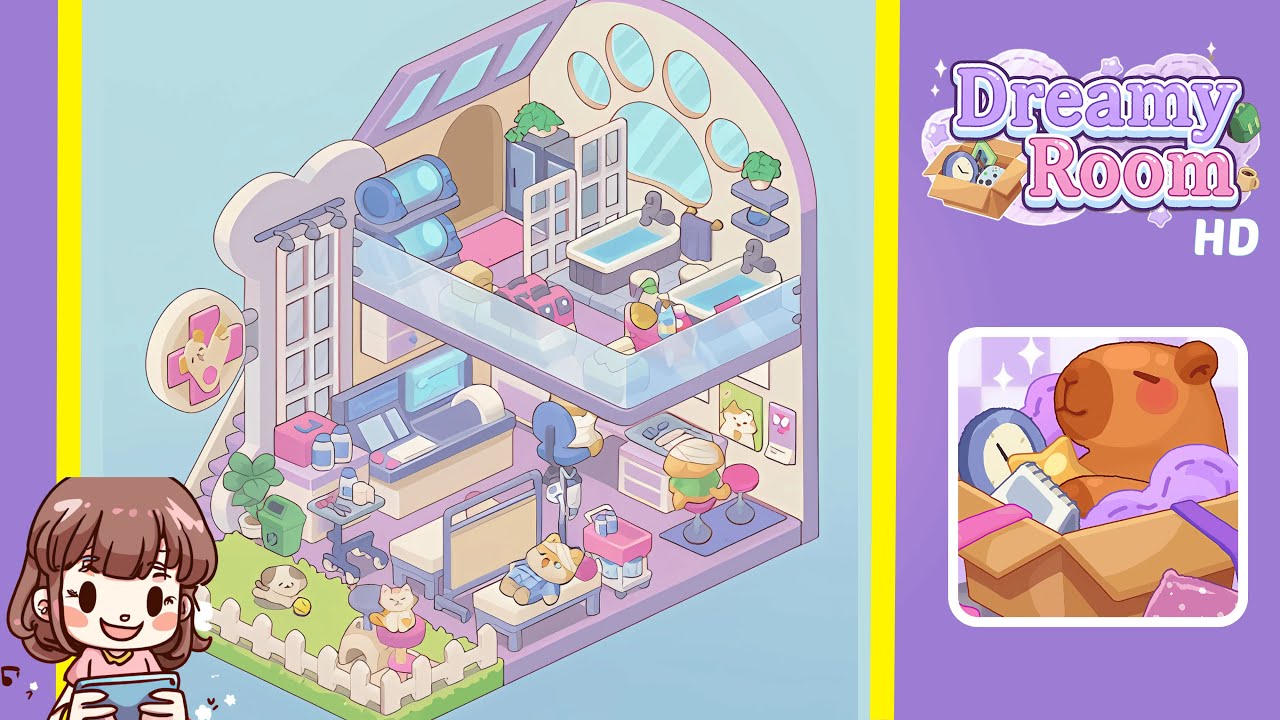
Dreamy Room Level 182 invites you to step into the role of a gentle veterinarian, providing care and comfort in an aesthetic, pastel-colored space. This level challenges you to balance whimsical decor with a functional layout, guiding each item—whether it’s a bathtub or a cat scratching post—to its ideal spot. It highlights mindful organization and the joy of design, unfolding object by object. Let’s explore how to turn the empty chamber into a bustling clinic, step by step.
Step-by-Step Guide
- Place the pastel purple floor panel at the room’s base. Start with an empty pastel surface, transforming it into a cozy veterinary clinic scene. Place the primary subtle lavender-hued base directly in the center, using the snap-to-grid feature for precise alignment, and rotate if needed.
- Attach the three wall panels to form surrounding back walls. Secure the tall bone-shaped panel on the left, the central beige panel, and the right-hand paw-arched panel. Ensure they click neatly together, forming a continuous backdrop.
- Install the overhead skylight and paw-print window cluster. Position the skylight on the top edge of the right shell-shaped wall. Place the five oval windows within the paw silhouette on the right-hand panel.
- Create the outdoor garden with a fence, grass, plant, and bin. Lay the green grass floor tile flush against the left edge of the lavender base. Place the white picket fence, a potted plant, and the recycle bin seamlessly.
- Set up the cat play area with a scratching post and kittens within the fenced courtyard. Place the multi-tiered post securely, then position the cream-colored kitten with a yellow ball and another perched atop the post.
- Assemble the staircase and glass balcony railing. Place the gray staircase on the left side, ensuring proper alignment with the lavender floor panel, and snap the clear glass railing onto the edge of the second level.
- Configure the ground-floor clinic station. Position the clinical exam bed, IV stand, rolling cart, and digital console in their designated spots, ensuring functionality and aesthetic appeal.
- Arrange the office nook with a desk, computer, and seating. Set the gray desk against the right paw panel, adding the computer, pink hamburger stool, file cabinet, and a cheerful corgi poster for decoration.
- Equip the second-floor bath area with tubs, cabinets, and accessories. Align two pastel bathtubs along the glass railing, add towels, a gray storage cabinet, water tank cylinders, potted plant, and pet carriers.
Notes & Precautions
- Precision is crucial; use snap-to-grid and rotation controls for aligning objects.
- Zoom in and check for misaligned edges if pieces are not snapping correctly.
- Move items incrementally to avoid misalignment; observe the green and red outlines for correct placement.
- Ensure adjacent pieces are secured; overlapping can prevent proper placement.
- Vertical adjustments may be necessary for some objects; use elevation controls sparingly.
Tips & Tricks
- Group similar items before placing them to save time.
- Use the rotate-and-hold feature for precise angle adjustments.
- Enable 'ghost preview' to visualize item placement before setting them down.
- Complete structural elements first to avoid occlusion issues.
- Enable high-contrast visuals for better distinction of overlapping pieces.
- Increase UI scale for identifying alignment markers on high-resolution displays.
- Practice the layout in sandbox mode to memorize positions efficiently.